Final Render Pass
Rendering > Final Render Pass

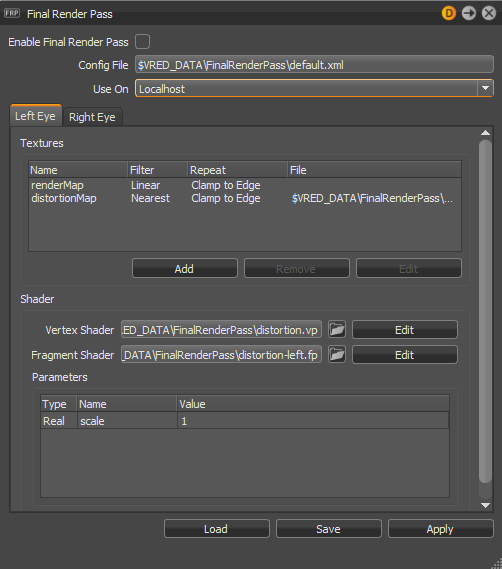
Opens the Final Render Pass module, which allows the definition of a custom shader applied to the rendering to be output before being displayed.
Find these options at the top of the module:
Enable Final Render Pass - Check to enable the final render pass.
Config File - Set the file used for the config file. A default configuration file can be set through the Final Render Pass preferences.
Use On - Choose from Localhost, Cluster, and Localhost and Cluster.
Texture
Displays the textures for the final render pass for the selected eye. Use the Add, Remove, and Edit buttons to make changes to the textures used.
Shader
Displays the shaders for the final render pass for the selected eye. Use ![]() and the Edit buttons to make changes to the textures used.
and the Edit buttons to make changes to the textures used.
Vertex Shader - Set the file for the vertex shader.
Fragment Shader - Set the file for the fragment shader.
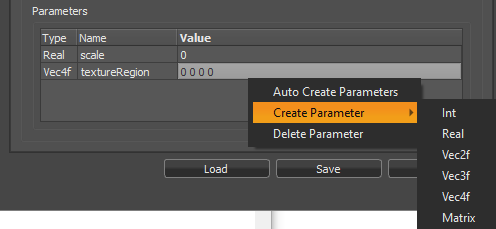
Parameters - Lists the parameters used and provides a right-click context menu for creating and deleting parameters.

Right-click within the table to access the following options:
- Auto Create Parameters - Parses the vertex and fragment, and auto creates the parameter GUI. Clicking OK will destroy all parameter settings.
- Create Parameter - Choose a parameter type, enter a name in the Create Parameter dialog, then click OK. This adds the parameter to the table.
- Delete Parameter - Removes the selected parameter from the table.
When all changes are made, use the Load, Save, and Apply buttons at the bottom of the module.
Adding and Editing a Texture
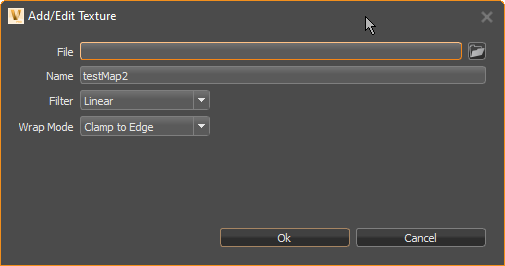
Use the Add/Edit Texture dialog for adding textures to your final render pass and editing currently set ones.

Click the Left Eye or Right Eye tab.
Do one of the following:
- To add a texture, click Add.
- To edit a texture, click Edit.
The Add/Edit Textures dialog appear.
Click
 and locate a texture.
Set the filter type. Choose from Linear and Nearest.
Set the wrap mode. Choose from:
- Repeat - Wraps the texture repeating it.
- Clamp - Locks the texture wrapping in place.
- Clamp to Edge - Locks the texture wrapping to the edge.
- Clamp to Border - Locks the texture wrapping to the border.
Click OK. If this change is for both eyes, repeat these steps for the other eye.
When finished, click Load, Apply, then Save.
Removing a Texture
- To remove a texture your final render pass, click the Left Eye or Right Eye tab.
- Select the texture to remove and click Remove.
- If this change is for both eyes, repeat this for the other eye.
- When finished, click Load, Apply, then Save.
Editing Shaders
- Use the Edit button to open the Right or Left Vertex Program.
- Make your changes and click Apply and OK.