VRED Go
File > Publish VRED Go
Video captions: In VRED 2021, we added the option for exporting a VRED Go executable. Just go to File > Publish VRED Go. Here, you can select, if you want to use it for VR instantly or desktop mode. Set the resolution of the rendering window and set password with expiring date. The VRED Go executable will contain the current VRED scene with some parts of the VRED engine. HTML overlays will need to be on the same path, or the complete code has to be inlined into the HTML Editor. After the file's created, you can open the VRED Go file on a different system and explore the scene there. This is very helpful, for example, when doing a presentation on a system where VRED isn't installed, as the VRED Go files doesn't need any license. Thanks for watching the video.
VRED Go packages a scene and viewer into a single executable you can store on a USB stick, then give to someone to view on any machine, without a license. VRED Go uses AES256 encryption and the scene data is never extracted. In conjunction with a password, the encryption is very safe. A time bomb feature is included, so the file expires after a set period of time. The default is 30 days. Render settings from the scene are published. You can set VRED Go to be viewed either by desktop or VR.
VRED Go only allows OpenGL and CPU rasterization.

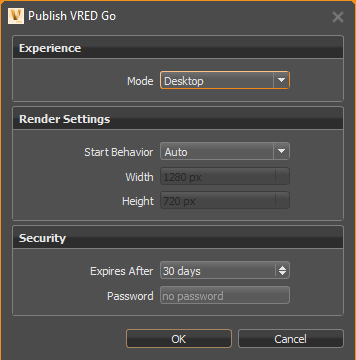
Use this dialog to set the type of viewing experience, render settings, and security measures for the VRED Go executable.
Experience
This section contains viewing mode options.
Mode
Sets the view used for the scene. Choose from VR and Desktop. VR files can be viewed in Desktop mode, if a supported VR device is not detected. See VRED Go Limitations for VR setup instructions.
Render Settings
This section contains options for setting the window behavior and size.
Start Behavior
Determines the size of the viewer when opened. Select from Auto, Full Screen, and Fixed Size, which locks the aspect ratio during window resize. Use Alt+Enter to enter full screen for all modes.
Width
Determines the width of the viewer, when Fixed Size is selected. Enter the pixel width of the viewer.
Height
Determines the height of the viewer, when Fixed Size is selected. Enter the pixel height of the viewer.
Security
This section contains options for entering a password and setting the file's expiry.
Expires After
Sets when the VRED Go executable will expire and can no longer be viewed.
The maximum days is 60 days.
Password
Sets a password the end user will need to access the VRED Go executable.
A password is not required.
VRED Go Limitations
These are the current limitations for VRED Go:
The following VR devices are supported for use with VRED Go:
- Oculus and Vive (via Open VR only)
- Varjo
Your VR device and software must be running before starting VRED Go. This ensures the device is detected and the VRED Go VR view mode can be correctly switched from Desktop to VR.
Note:To view the file in Desktop mode, turn off the VR device and exit the VR software.
Raytracing mode is not supported.
VRED Go can only open the published scene executable.
VRED Go cannot render images or export data.
VRED Go cannot drive a cluster or display clusters.
VRED Go only uses OpenGL and CPU Rasterization.
VRED Go expiry cannot be set for longer than 60 days.
VRED Go will create an additional data container when your file size exceeds the 4GB limitation. This is necessary because Windows has a maximum executable size of 4GB. The following will be created:
demo.exe- This file will be about 3 MB.demo.var- This file has an unlimited size, since a var is a VRED archive file type.Double-clicking
demo.exeauto-detects thedemo.varfile. If the executable exceeds 4 GB, an extra dialog opens to inform you two files were created. See Where is My VRED Go Executable? to find where to fine these files.Important:These two files must be kept together. If one is lost, the VRED Go presentation will not work.
Key Shortcuts
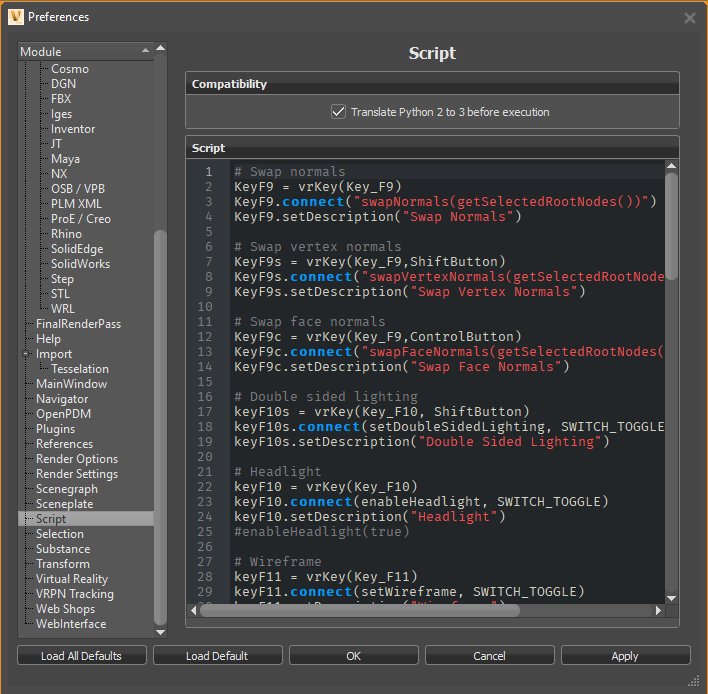
Find the key shortcuts in the preferences for scripts (Edit > Preferences > Scripts). These will always be included in the published VRED Go file.
Any changes to the scripts will not be exported.

Creating a VRED Go Executable
With a scene loaded in VRED, select File > Publish VRED Go. This opens the VRED Go dialog, where you can choose the mode for the experience, render settings, and security features.

Click OK, select a location for the executable, give it a name, then click Save. Publishing (creating a VRED Go executable) can take some time. When finished, an executable is created in the designated location.
Where is My VRED Go Executable
The VRED Go executable is found in the location selected after clicking OK in the Publish VRED Go dialog. If you forget where that was, select File > Publish VRED Go and click OK. The dialog opens to the last saved location.
Opening a VRED Go Executable
![]() When you receive a VRED Go executable, just double-click the file and enters the password, if one was assigned, and click OK. The VRED viewer opens and streams the content directly from memory. Toggle the view of the scene in the viewer. If the scene contains touch sensors, they will work.
When you receive a VRED Go executable, just double-click the file and enters the password, if one was assigned, and click OK. The VRED viewer opens and streams the content directly from memory. Toggle the view of the scene in the viewer. If the scene contains touch sensors, they will work.
Raytracing mode is not supported.