Python API v2 for VR (Since 2020.1)
The Python API for VR follows the concept of connecting device actions, such as button presses, to actual functionality implemented through a Python script. The API is platform agnostic, which means scripts need to be written only once for different VR controllers. The only exceptions are buttons on the input devices. One device might offer different buttons from another. Therefore, this is something to keep in mind when using the corresponding interfaces in a Python script.
Functionality in VR, such as teleport, is called a device interaction in VRED and is of type vrdDeviceInteraction. These interactions contain several device actions of type vrdDeviceAction that reflect such things as button presses. In the case of teleport, there is one device action for activating the targeting arc, another for executing the teleportation, and one more for deactivating the targeting arc.
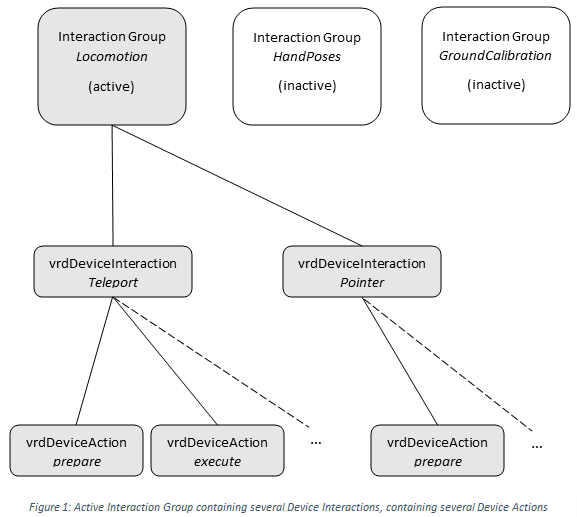
In VRED, there is also the concept of interaction groups. Each device interaction is part of an interaction group and there is only one group active at a time. When such a group is active, all its included interactions are also active and vice versa. Different groups are a convenient way to change the context of user interactions quickly, like when a different tool is selected in VR. It is important to know that every device action, such as pressing button A of the left controller, can only occur once in an interaction group. This prevents triggering multiple functions at once, which prevents side effects between different interactions.
For better understanding the relationship between interaction groups, device interactions, and device actions see Figure 1.
The API also gives access to objects of type vrdVRDevice representing the input devices. These objects provide some additional functionality to read and manage the state of each device.
Usage of the Interface
The starting point of the VR Python interface is the class vrDeviceService. This service allows the creation, access, and management of device interactions and VR input devices.
Creating a New Device Interaction
vrDeviceService provides the method createInteraction, which takes the name of the new interaction as parameters. Per default, the interaction will be supported in all available interaction groups. An example for an interaction group is “Locomotion”, which includes some of VRED’s default interactions, like teleport and pointer. If a new interaction becomes a part of this group, it is important to know that some of the buttons and corresponding actions are already used by the default interactions and are not available anymore. The following line of code shows how to create an interaction.
myInteraction = vrDeviceService.createInteraction("MyInteraction")The interaction is created by using the service, gets the name “MyInteraction” and is supported in all currently available interaction groups.
The vrdDeviceInteraction object allows the creation of device actions, using its method createControllerAction. This method takes a string as a parameter that describes the actual action. The string has the format <Side>-<Element>-<Event>, for example, “left-trigger-pressed”. See the Python documentation that comes with VRED (Help > Python Documentation) to get more information about the parameter. The vrdDeviceAction that is returned by the method provides a signal named “triggered” that can be used to connect the action to a function in the Python script, as the following example demonstrates.
def myFunction():
    print("My function is called")

myInteraction = vrDeviceService.createInteraction("MyInteraction")
myAction = myInteraction.createControllerAction("any-xa-pressed")
myAction.signal().triggered.connect(myFunction)
First, a function is implemented that prints out that it has been called. The device action is created by the device interaction object and will send a signal, if the X/A button has been pressed on any controller. The last line connects the signal “triggered”, which is a member of the device action’s signal object, to the actual function that should be called.
If a device action is already in use, it will be needed to add the interaction to a different interaction group and activate this group.
def myFunction(action, device):
    print("My function is called")

myInteraction = vrDeviceService.createInteraction("MyInteraction")
myInteraction.setSupportedInteractionGroups(["MyGroup"])
vrDeviceService.setActiveInteractionGroup("MyGroup")
myAction = myInteraction.createControllerAction("any-touchpad-pressed")
myAction.signal().triggered.connect(myFunction)
This example additionally sets a supported interaction group of the interaction with method setSupportedInteractionGroups. Afterwards, the group is activated, using the service’s method setActiveInteractionGroup. This way, the touchpad, which is already used in the group “Locomotion”, can be assigned again. Note that using device actions more than once in an active group results in undefined behavior. The following actions are already in use in VRED’s default interaction group “Locomotion”:
| Side | Element | Event |
|---|---|---|
| Any | Touchpad | Pressed |
| Any | Touchpad | Unpressed |
| Any | Touchpad | Touched |
| Any | Touchpad | Untouched |
| Any | CustomTrigger | Pressed |
| Any | CustomTrigger | Unpressed |
| Any | CustomTrigger | Touched |
| Any | CustomTrigger | Untouched |
| Any | Menu | Pressed |
| Any | Menu | Released |
| Any | Thumb | Pressed |
| Any | Thumb | Unpressed |
| Any | Thumb | Touched |
| Any | Thumb | Untouched |
| Any | YB | Pressed |
| Any | YB | Released |
The vrdDeviceInteraction object provides more functionality to manage device actions and the interaction groups it belongs to. See the VRED’s Python documentation for more information (Help > Python Documentation). The VRED examples also include the script vr/customInteraction.py that shows the implementation of a new custom device interaction.
It is recommended that complex interactions that need to use some of the default actions be put into a custom interaction group and to activate this group when needed. This can be done using a menu entry, for example. See Creating VR Menu Entries for more information. It is also possible to rearrange the default actions on the touchpad of a controller, using virtual buttons. For more information on that, see Setting Virtual Buttons on Touchpads.
Connecting to Default Device Interactions
The default interactions, like teleport and pointer, already provide some basic functionality for navigating or interacting with objects in a scene. This functionality can be extended by connecting functions to the actions of the default interactions. The first step to achieving this is to get the default interaction from vrDeviceService.
def printNodeName(action, device):
    node = device.pick().getNode()
    print(node.getName())

pointer = vrDeviceService.getInteraction("Pointer")
pointerExecute = pointer.getControllerAction("execute")
pointerExecute.signal().triggered.connect(printNodeName)
The example uses the “execute” action of the Pointer that will be triggered, when the user “clicks” an object in the scene with the pointing ray. The Pointer also has the actions “prepare” and “abort”, which only activate or deactivate the targeting ray. The different interactions available can be queried using vrDeviceService.getInteractions. Each interaction also provides the method getControllerActions to get all available actions related to VR input devices. The script vr/connectToDeviceActionSignal.py contains another simple example of how to connect to default interactions.
Working with Controllers and Trackers
Input devices for VR are represented by the class vrdVRDevice. This class provides access to the buttons, position, haptic feedback, and visualization of a device. Refer to the Python documentation (Help > Python Documentation) that comes with VRED for a detailed description for all methods of vrdVRDevice.
Getting a VR Device
There are several ways to get a device object. The first way is the vrDeviceService method getVRDevice.
leftController = vrDeviceService.getVRDevice("left-controller")This will return an object representing the left controller. The string parameter is the name of the device. The left controller will always have the name “left-controller” and the right controller will always have the name “right-controller”. This is hardware independent and works for all controllers supported by VRED. Note that changes will apply as soon as the corresponding controller is connected. When the handedness of the controller changes, VRED will apply all the settings of the “old” left controller to the “new” left controller.
The getVRDevice method also works for HTC Vive Trackers.
tracker = vrDeviceService.getVRDevice("tracker-1")The name of trackers is always “tracker-” appended by a number. Note that this number will change according to the order the trackers connected. As this might become an issue for some applications, devices can also be identified by their serial number, using the method vrDeviceService.getVRDeviceBySerialNumber. For some devices, the serial number saved on the device is different from the one printed on it. In this case, the API supports reading the serial number through the vrdVRDevice method getSerialNumber, which will only return a valid value, if the device is connected. The example script vr/printAllDeviceSerialNumbers.py will print out all serial numbers. An easy way to get a specific serial number is to connect only one device at a time, while running the example script.
The methods getVRDevice and getVRDeviceBySerialNumber always return an object, even if there is no device connected. Settings for this object, which are made before a device is connected, will be applied as soon as the corresponding device connects.
Note that either getVRDevice or getVRDeviceBySerialNumber should be used for the same device type, as the name of some devices might change, when connected or reconnected (e.g., the number of the tracker or side of an HTC Vive controller). Otherwise, two different objects might represent the same physical device, which could lead to unwanted behavior.
If all devices are needed, vrDeviceService provides the method getConnectedVRDevices, which will return all devices that are currently connected.
Attaching Geometry to a VR Device
The vrdVRDevice class provides a method getNode, which returns a node that represents the transform of the device. The node should not be used to add child nodes directly, as it doesn't get cleaned up on new scene, but can be used for a parent constraint, as shown in the following example.
deviceNode = myDevice.getNode()
constraint = vrConstraintService,createParentConstraint([deviceNode], myNode, False)
Setting Virtual Buttons on Touchpads
Some controllers, like the ones of the HTC Vive, have touchpads that can be split into different areas to simulate more buttons. The class vrdVRDevice provides the method addVirtualButton, which takes two arguments, one object of type vrdVirtualTouchpadButton and a string for the corresponding non-virtual button it belongs to.
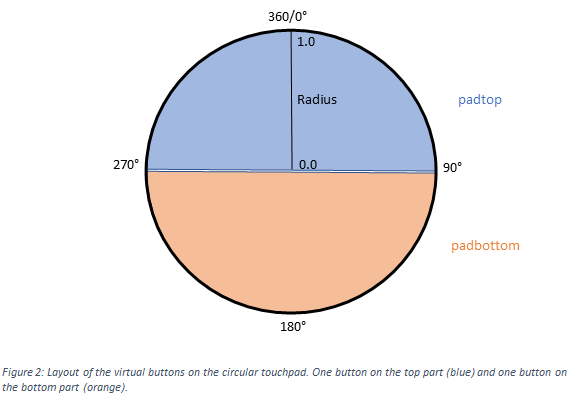
padTop = vrdVirtualTouchpadButton("padtop", 0.0, 1.0, 270.0, 90.0)
padBottom = vrdVirtualTouchpadButton("padbottom", 0.0, 1.0, 90.0, 270.0)
This example starts with creating two vrdVirtualTouchpadButton objects. The first argument of the constructor takes a name for the new button, the second and third argument describe the radius where the button is located, in this case it uses the full radius of the touchpad. The fourth and fifth argument describe the angle on the touchpad where the button is located. In these two cases, the first button will cover the top half and the second, the bottom half, of the touchpad. Figure 2 illustrates the layout of the two buttons. Note that in case of overlapping buttons, only one of the buttons will send a signal. It is recommended to not create overlapping buttons.
After the instantiation of the virtual buttons, they are added to the controller.
controller.addVirtualButton(self.padTop, "Touchpad")
controller.addVirtualButton(self.padBottom, "Touchpad")
The method vrdVRDevice.addVirtualButton takes two arguments, the first is the vrdVirtualTouchpadButton object and the second is the name of the actual button on which the virtual button is placed. In VRED, this currently works only for the round touchpad of the HTC Vive controller.
The newly added virtual buttons can now be used like regular buttons, when creating device actions.
myAction = myInteraction.createControllerAction("left-padtop-pressed")See the script vr/virtualControllerButtons.py or vr/groupTeleport for more examples on how to use virtual buttons.
VR Collaboration Sessions
Use the VRED Python API for the management of collaborative sessions. This includes not only the adjustment of general settings, but the handling of users and sending of Python commands across participants.
General Session Management
The class vrSessionService gives access to the functions that are also available in the Collaboration user interface in VRED. This includes, for example, joining or leaving a session, checking the connection, uploading a scene, etc.
Besides the settings, the service can also be used to implement some logic for interactivity in a collaborative session. For this, it provides methods like addSyncNode or syncNode to synchronize transformation and visibility of nodes across all users. This might be helpful when multiple users should be able to manipulate objects in a scene simultaneously.
Session Users
The class vrSessionService also provides access to other users, who participate in the session. For this, the methods getUser, getUsers, and getRemoteUsers can be used. They will return an object, respectively, a list of objects of type vrdSessionUser. This class gives access to the basic user properties, such as id, name, if, and which HMD is used.
It also provides access to the nodes the user’s avatar consists of, including the tracking matrices for each body part.
Auto Color for Session User
To assign an unused color to each session user using the VRED Stream App, use the setUserColor method of vrSessionService. Set a NULL value (0,0,0,0) as the userColor parameter to enable auto coloring of session users.
Sending Python Commands to Other Users
The session service provides methods to send Python code to any user in the session, which is then executed locally on the receiver’s side.
A quick way to send Python code to every user is provided by vrSessionService, directly with its method sendPython. When using this method, every user in the session will receive the same Python code and will execute this. This is especially helpful, when more general code, without user specific parts, need to be sent.
vrSessionService,sendPython("print('Hello')")It is important to know that if variables are used in these strings, they need to exist on the side of the receiver, as well, as the code is executed as if the receiving user would type it into his local VRED console.
If user-specific code needs to be sent, such as a welcome message including the user name, it is also possible to send a command to only a selected user.
users = vrSessionService.getRemoteUsers()
for user in users:
    name = user.getName()
    user.sendPython("print('Hello {0}')").format`(name)`)
The first step gets all users currently connected to the scene using vrSessionService.getRemoteUsers. This returns a list of vrdSessionUser objects, each representing a user. This example iterates over the users and call,s the method getName on each user object to get the name. After that, the method sendPython is called to send some Python code. This method takes Python code as a string.
As it might happen that not all users are present when the Python code is sent, the service also provides signals that will be sent, when a user joins or leaves a session. It is possible to connect functions to these signals.
def userArrived(user):
    print(user.getUserName() + " has arrived")

def userLeaves(user):
    print(user.getUserName() + " has left")
vrSessionService.userArrives.connect(userArrived)
vrSessionService.userLeaves.connect(userLeaves)
In this example, two functions are implemented that take an object of type vrdSessionUser as an argument and are then connected to the corresponding signals.
A detailed description of all methods of vrSessionService and vrdSessionUser can be found in VRED’s Python documentation (Helpt > Python Documentation).
Creating VR Menu Entries
The VR Menu can be extended by custom entries. This can be achieved by creating a new tool with the class vrImmersiveUIService. The following example shows how a simple push button can be added to the menu and how to connect a function to its clicked signal.
def hasClicked():
    print("click")

tool = vrImmersiveUiService.createTool("MyTool")

tool.setText("My Tool")

icon = QtGui.QIcon()
icon.addFile("myToolIcon.png")
tool.setIcon(icon)

tool.signal().clicked.connect(hasClicked)
A vrdImmersiveTool is created using the immersive UI service. This tool needs some configuration, by setting text and an icon that will be displayed in the VR Menu. The tool comes with different signals, but in this case, only the clicked signal is needed and connected to a function to show it is working.
These additional tools in the menu are not limited to simple push buttons. It is also possible to add toggle buttons, sub menus with web content, or sub menus with whole Qt widgets. The more advanced features are demonstrated in the example script vr/customMenuButton.py.
Examples Shipped with VRED
The VR examples show how the Python API can be used, in more detail. They can also be found in VRED’s Python API v2 documentation.
vr/attachToController.py- Uses a controller node to move geometryvr/attachToTracker.py- Uses a tracker node to move geometryvr/collabSyncExample.py- Synchronizes a node across multiple users in a collaborative sessionvr/colorChooser.py- Adds a color choosing tool to the VR Menu for changing the color of a material that can be selected, using the default pointer interactionVideo: https://autode.sk/2NX60Mn
vr/combineCustomAndDefaultInteraction.py- Implements a custom interaction that can be used together with the default interactionsvr/connectToDeviceActionSignal.py- Connects to a signal that is sent, when a device action is executedvr/customInteraction.py- Shows how to implement a custom device interactionvr/customMenuButton.py- Adds a push button, toggle button, sub menu with web content, and sub menu with a Qt widget to the VR Menuvr/getVRDeviceBySerialNumber.py- Gets a VR input device by its serial numbervr/groupTeleport.py- Extends the teleport so all users can be teleported at onceVideo: https://autode.sk/32w2HPw
vr/handleVRCollabUsers.py- Implements methods that are executed when users join or leave a collaborative session, for example, sending Python code to a new uservr/objectMove.py- Moves objects with names starting with “movable” by extending the default pointerVideo: https://autode.sk/32rD6XR
vr/printActions.py- Prints all device actions of a device interactionvr/printAllDeviceSerialNumbers.py- Prints the serial numbers of all connected VR input devices to the VRED consolevr/printInteractions.py- Prints all device interactions to the VRED consolevr/printSerialNumber.py- Prints the serial number of a VR input device, when the trigger is pressed, to the VRED consolevr/printTouchpadPosition.py- Prints the position of the finger on the controller touchpad to the VRED consolevr/scaleGeometry.py- Implements scaling of geometry with two VR input devices, by extending the pointer default interactionVideo: https://autode.sk/2NXbzdz
vr/setTeleportToVirtualButton.py- Splits up the touchpad of the controller into virtual buttons and sets the teleport default interaction on one of thosevr/showUserInfo.py- Prints a bunch of information about a user in a collaborative session, such as head positionvr/showVRCollabUserPositions.py- Implements a radar screen in front of the users view that shows the position of all users in the sessionVideo: https://autode.sk/32vEN6r
vr/switchControllerVisuals.py- Changes the visualization of multiple VR input devices to different modes: hand, controller, and hand + controllervr/virtualControllerButtons.py- Splits the touchpad of a controller into different virtual buttonsvr/virtualHands.py- Implements virtual hands, which can be controlled using Python code