Hands in XR
Hands are used for gestures and to provide a more immersive experience by delivering a more natural feel when interacting with a 3D scene, whether in VR or in a real-world setting through XR.
If having problems with hand tracking, see Troubleshooting Hand Tracking.
Hand Gestures
Only supported for the Varjo XR-3.
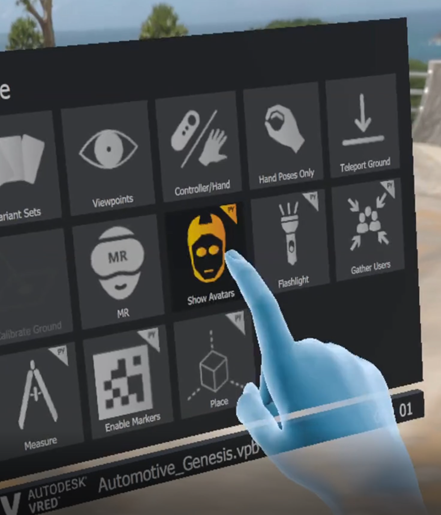
This section provides the supported VRED hand gestures for interacting with your digital designs. Your hand movement is tracked as you tap parts of a model with the tip of your index finger to initiate touch events, select tools from the xR Home Menu, or interact with HTML 5 HMI screens. Use these gestures to navigate scenes, without the need of controllers.
The virtual hands will automatically adjust to match your real-world ones.

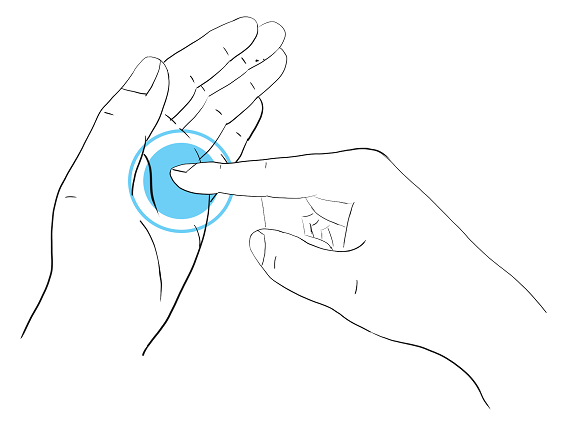
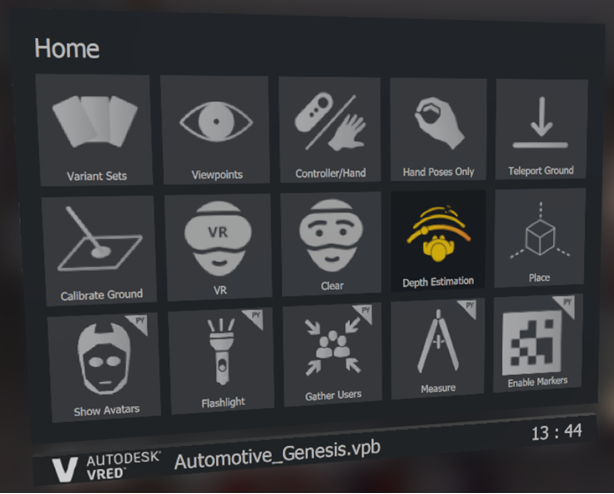
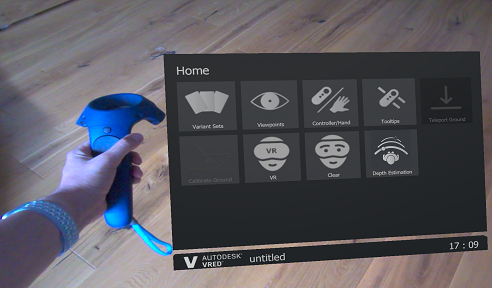
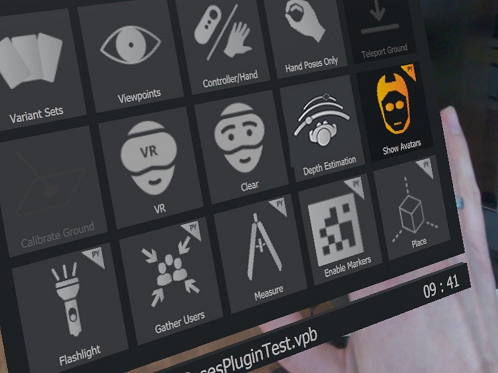
Using the xR Home Menu
For reference information on the xR Home Menu, see xR Home Menu.
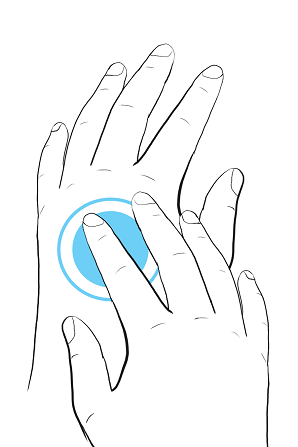
To open the menu, move your index finger to the palm of your other hand. Repeat this gesture to close the xR Home Menu.
To trigger a tool in VR or XR, there must be a small angle between the tip of your index finger and a tool from the menu to trigger it. If your index finger is perpendicular, VRED's sensor might have an issue detecting the action. Tap the tool.
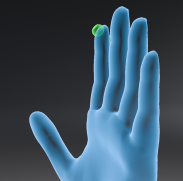
In 2022.3, we implemented a new collision model for index finger VR interaction that uses an improved sensor angle and position. You can see the placement of this geometry in the following image.
To see your real-world hands in front of virtual objects, such as the xR Home Menu or 3D geometry, enable Depth Estimation.
To set this as the default state, enable Depth Estimation in Edit > Preferences > Virtual Reality > HMD (tab) > Varjo.
 Hands for VR
To enter VR, select (the VR feature) in the xR Home Menu.
VRED comes with one set of standard hands, which support joints/bones with pre-skinned vertices for hand representation. This makes for a smoother transition between hand poses. Gestures are driven by an HMD-specific controller setup.
An X-Ray material is used for the hands to improve the experience.
Using Hands in VR
When activating the Oculus Rift or OpenVR mode, one hand appears per tracked controller.
VRED uses the OpenVR 1.12.5 SDK.
You can use it to interact with WebEngines and touch sensors in the scene. Only the index finger can be used for interaction. When the finger touches interactable geometry, a left mouse press/move/release is emulated for WebEngines and touch sensors on that geometry.
When using a script with vrOpenVRController, the hands will disappear automatically. You can enable them again with controller.setVisualizationMode(Visualization_Hand).
When working in OpenVR and in Oculus Rift mode:
For an example scenes with touch sensors, see File > Open Examples >
deprecated_VR_examples>OculusTouchExample.vpb. To see what this file is doing, check out (Deprecated) Oculus touch example. However, for better touch examples, see the following:
When working in OpenVR:
- For example scenes with touch sensors and WebEngines to interact with, see File > Open Examples >
deprecated_VR_examples>VR-hands-webengine-buttonVibration-openvr.vpb. Touch the calculator buttons with the index finger. The calculator material is connected to a web engine. Touching the web engine geometry with the index finger triggers a mouse events on the website and a controller vibration. The calculator web engine has javascript code that sends arequestVibration()Python command to the VRED WebInterface, when a button on the web site is hit. This triggers haptic feedback (vibrations) on the connected controller device.
- For example scenes with trackers, see File > Open Examples >
deprecated_VR_examples>OpenVRTracker.vpb. To see what this file is doing, check out (Deprecated) OpenVR Tracker. However, for an updated example, see Add a child node to the node of a VR Tracker. In this script, a box is added as child to the node of a VR tracker.
How to Make Nodes Interactable
Nodes in the scene are not interactable, by default. All nodes you want to interact with need to be made "interactable" with the Python command setNodeInteractableInVR(node, True). Please view the Python documentation (Help > Python Documentation) for more details. Enter the command in the Script Editor, press Run. The setNodeInteractableInVR command is not persistent and needs to be executed every time you load a scene. We recommend you save the scene with the script, so the nodes are interactable the next time you open the scene.
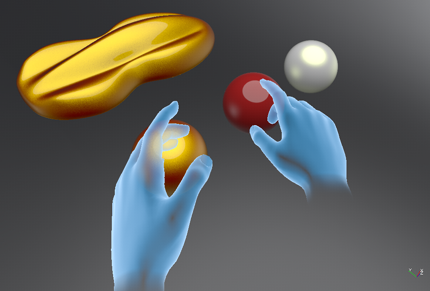
VR Hand Poses
Besides using your fingers and hands for pressing and touching buttons on the HTC VIVE or Oculus Touch Controllers, use them to communicate with others.
Use the following poses:
- Forefinger to point and touch objects
- Thumb's up/down to communicate if something is good or bad
- Open hand for waving
- Pinch and pick up objects
- Clenched Fist
If you have a Varjo XR-3, there are gestures for interacting with your digital designs. See Hand Gestures.
Customization for VR Hands
Use Python scripting and HTML5 to create custom setups. You can find script files in the VRED Examples folder (C:\ProgramData\Autodesk\VREDPro-15.2\examples\deprecated_VR_examples).
Here are some of the added scripts:
To enable haptic feedback (controller vibration) when a hand touches an interactable node.
VR-hands-vibrate-openvr.py- For OpenVR modeVR-hands-vibrate-oculus.py- For Oculus Rift mode
To change hand color / hit point color
VR-hands-color-openvr.py- For OpenVR modeVR-hands-color-oculus.py- For Oculus Rift mode
To interact from a distance (instead of directly touching something) by just pointing with the index finger at nodes in the scene. A sphere appears at the hit point. When activating the "Pointing" pose (Grip button pressed, Index trigger button not pressed), touch sensors and web engines can be executed.
VR-hands-pointing-openvr.vpb- For OpenVR mode
 Hands for XR
Currently, only Varjo XR HMDs are supported for XR.
To enter XR, select  (the XR feature) in the xR Home Menu.
In XR (mixed reality), VRED replaces the VR X-Ray material hands with your own.
If you want to change this behavior and re-enable VR Hands in MR, click here for an article that explains how to do that with a custom Python Script.
Be aware, there are differences in the supported functionality for the XR-1 and XR-3 in XR.
The XR-1 supports hand depth estimations and marker tracking.
The XR-3 supports hand depth estimations, marker tracking, and hand tracking (gestures). This means hand gestures can be used for scene interaction in place of controllers. Since VRED is replacing the standard hands which support joints/bones with your real-world hands, you can use Python to connect hand trackers for scene interaction.
Tip:Use the Virtual Reality preferences to set default behaviors for hand tracking, teleporting, marker tracking, and your HMD.
Connecting Hand Trackers with Python
Only available for Varjo XR-3 and Varjo VR-3 users.
To see how to connect hand tracking using Python, select File > Open Examples and navigate to the vr folder, where you'll find externalHandTracking.py. This provides an example for how to set hand tracking.
- For the left hand use
vrDeviceService.getLeftTrackedHand() - For the right hand use
vrDeviceService.getRightTrackedHand()
The returned object is of type vrdTrackedHand.
Use Tracked Hands in VR
Only available for Varjo XR-3 and Varjo VR-3 users.
Use the Virtual Reality preferences to set the default behavior for hand tracking in VR. Choose from Varjo Integrated Ultraleap for hand tracking in VR, XR, or Custom to use other hand tracking devices. To adjust any offset between the tracked hands and the hands rendered in VR, use Translation Offset and Rotation Offset.
Setting up Hand Tracking for Other Devices
For the Custom Tracker option, you must provide all the tracking data to VRED's Python interface. How to do this can vary from device to device; however, if you can access the tracking data via Python script, the data needs to be set into the vrdTrackedHand objects returned by the methods used. This requires the transformation data of the tracked hand and/or different finger joints (see the externalHandTracking.py example file for how this works).
For testing, set the corresponding preferences, load the script, and enter VR. You may have to modify the script by changing values for hand and/or joint transforms to understand how everything works.
Troubleshooting Hand Tracking
Only available for Varjo XR-3 and Varjo VR-3 users.
Some issues are due to preference settings (Edit > Preferences > Virtual Reality).
- For hand tracking, in the Interaction tab > General section, ensure Default Visualization is set to Hands. In the Hand Tracking section, ensure Use Tracked Hands in VR is enabled and Tracker is set to Varjo Integrated Ultraleap.
- For activating the creation of collision objects, in the Interaction tab > General section, ensure Create Collision Objects is enabled.
- For setting hand offset, use Translation Offset and Rotational offset.
Here are some common hand tracking issues and how to resolve them.
If you cannot see your hands in VR, check the following:
Does hand tracking works in Varjo Base software? If not, restart Varjo Base.
Are you preferences set up correctly?
Are Ultraleap runtimes installed and running? Hand tracking will only work in VRED if only the Varjo runtime provides hand tracking data.
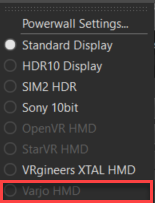
Is Varjo HMD selected in View > Display? If OpenVR HMD is selected, hand tracking is not supported and it won't work.
Does the hand tracking use the network ports. If these are used by another application, it could cause a conflict. We recommend using a tool like TCPView to check port availability and usage. The default port is 12345, but can be changed by adding a
client_config.jsonfile toProgramFiles\Varjo\varjo-handtracking\Ultraleap.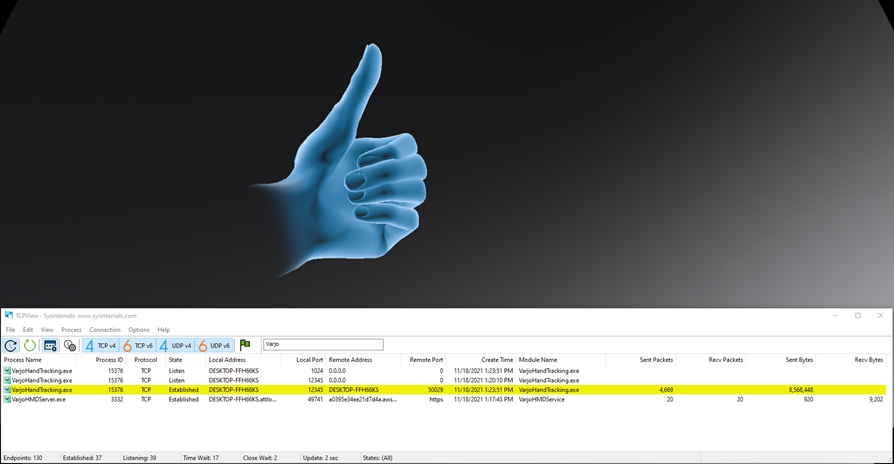
If touch doesn't work, check that the creation of collision objects is active in the preferences.
If hands don't work in MR, but do in VR, check the following:
- Does the open VR Menu move with the hand? Try to carefully touch some menu items. This might require some practice.
- Does the position of the VR Menu look offset on your real hands, in comparision to your virtual hands in VR? If so, correct the offset in the preferences. See Translation Offset and Rotational offset in the Hand Tracking section.
 Hand Depth Estimation
Currently, only Varjo XR HMDs are supported for XR.
Detects your real-world hands in the mixed reality video and shows them in front of a virtual object, if they are closer than the object. When disabled, the rendering from VRED will always occlude the real hands, even if the hands are closer than the rendered object.
Find this option in the xR Home Menu. To set a default behavior for this option, visit the Virtual Reality preferences > HMD tab > Varjo section.
| Hand Depth Estimation OFF | Hand Depth Estimation ON |
|---|---|
 |
|
Displaying Your Hands in Mixed Reality
Currently, only Varjo XR HMDs are supported for XR.
Use the Hand Depth Estimation tool to display your hands, while in mixed reality.
Wearing a connected Varjo HMD that supports XR, in VRED, select View > Display > Varjo HMD.
Press the Menu button on your controller to access the xR Home Menu.
Press
to see your real-world hands in XR.
Teleport
To teleport, you will need to initiate the teleporter, orient the arc and arrow, then execute a jump to the new location. When finished, terminate the teleporter.
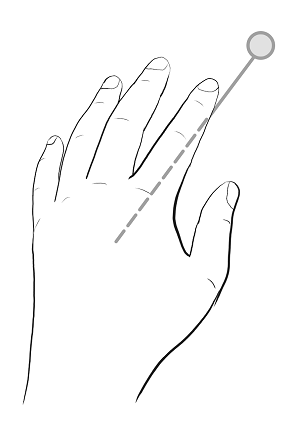
Initiating and Terminating Teleport
To initiate and terminate teleporting, use the same gestures.
Using one hand, tap the back of the other hand. This initiates the teleport from the tapped hand. Now, orient the arc and teleport. Repeat this gesture to terminate the teleporter.
Teleport Orientation
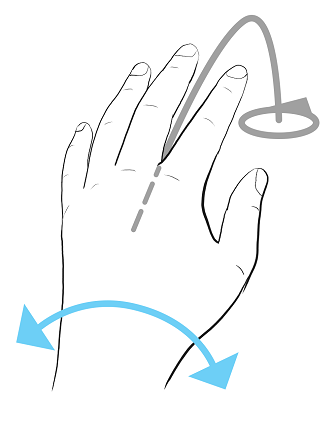
Rotate your wrist, while the teleport arc is displayed, to orient the teleporter. Now teleport.
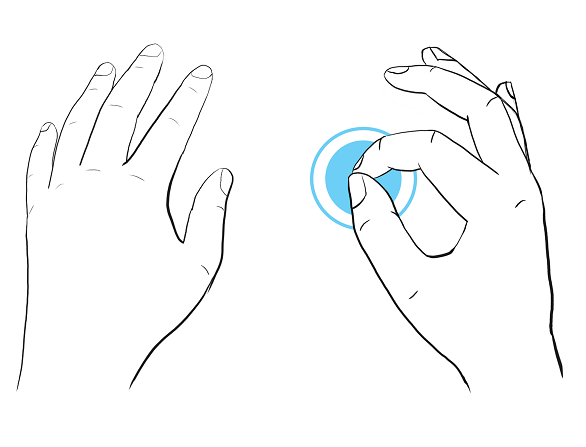
Teleporting
With the hand not currently displaying the teleport arc, pinch your index finger to thumb. This accepts the teleport arc location and orientation, executing the teleport. When finished, terminate the teleport to exit the tool.
For information on teleporting, see Teleporting.
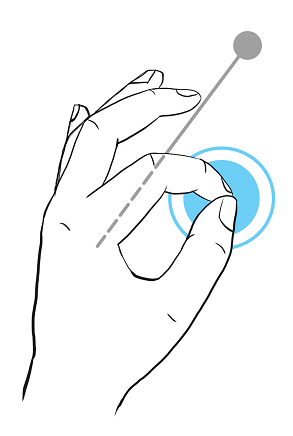
Laser Pointer
To use the Laser Pointer, you will need to initiate, execute, then terminate it.
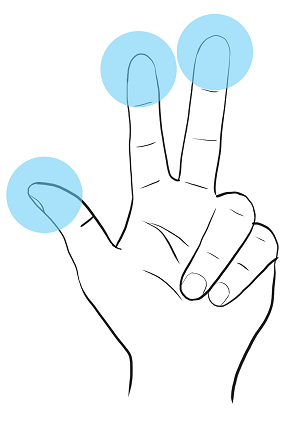
Initiating and Terminating the Laser Pointer
To initiate and terminate the Laser Pointer, use the same gestures.
Point your thump, index, and middle fingers out with palm facing towards camera. Now, use the laser pointer to point to things or trigger interactions with scene content. Repeat this gesture to terminate the Laser Pointer.
Using the Laser Pointer
Use your index finger to point at scene content.
Pinch your index finger to thumb together to trigger interaction with scene content, such as selecting tools from the xR Home Menu, activating a touch sensor, or interacting with HTML 5 HMI screens. When finished, terminate the Laser Pointer to exit the tool.