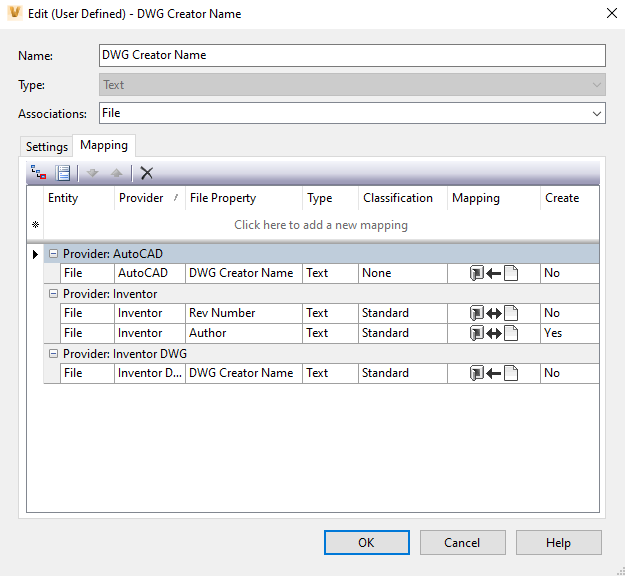
You can map properties to a user-defined property (UDP) so that values from the master file, such as a file property, are written to the subordinate UDP.
Mapping priority determines the order in which properties are written to a vault object. If more than one property writes to a particular object, the highest ranking property takes precedence.
- When both file and item UDPs are mapped to the same file property, the item UDP takes precedence.
- Mapping Text with Number or Text with Date works well when all clients and the server are in the same language-locale. If mixed locales are used, values may convert in a manner that is not intuitive and may produce an undesirable result. Therefore, mapping Text with Number or Text with Date is only recommended when the server and all clients are set up to work in the same locale.
- For property mappings, some datatypes require the same client language. See Plan Your Deployment for more details.
Import and Export Mapping Configurations
- Certain file property definitions come with the client and are already included in the vault.
- Adding a file to the vault only captures new property definitions for the file if it is set to create. Otherwise, only property definitions already defined in the vault will be created for the file to reduce extraneous property definitions or duplicates.
There are two ways in which a file property is added to the vault:
Access Property Mappings
- Select Tools
 Administration
  Vault Settings.
- In the Vault Settings dialog, click the Behaviors tab.
- In the Properties section, click Properties.
- In the Property Definitions dialog box, select a property for editing and click Edit.
- Select the Mapping tab to add or remove a property mapping.
Create a New Property Mapping
- On the new (or existing) Property dialog, select the Mapping tab.
- Click in the
(Click here to add a new mapping) field beneath the Entity column.

- Entity: Select what you want to map this property to/from - File or Item. You may have multiple mappings on a property so you can map to both files and items, but they must be mapped separately.
- Provider: Displays a list of available options for the selected Entity type. These can be CAD files such as AutoCAD or Inventor drawings and models, Office Documents, etc.
- File Property: File property options depend on the Entity type. If the Entity type is File, you will be able to select a file property either from your file system or from within the Vault. If the Entity type is Item, your will be only able to map to a file that exists in the Vault.
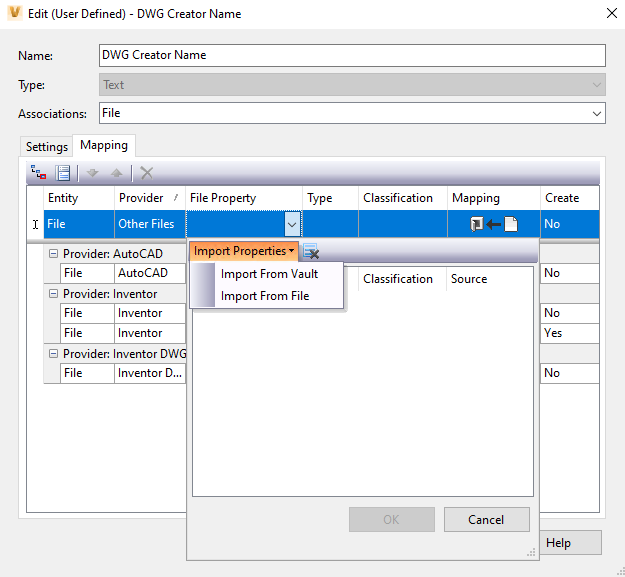
- Click in the field under File Property and then click Import Properties.

- Select whether you want to import properties from the vault or from a source file.
- On the Select File dialog, locate the file from which you want to import. Click Open.
The Import Properties list is automatically updated with the properties available for import from the specified source.
- Click OK to save the imported property list and create the mapping.
- Click the Clear Properties list icon
 at any time to remove all imported properties.
- Click in the field under File Property and then click Import Properties.
- Type: It is based on the property selected (depends on the type of data associated with the File Property, such as Text, Date, Number etc.)
- Classification: Indicates whether the File Property is a Standard Property or a Custom Property.
- Mapping: Informs the Vault how to push/pull the data being shared between the Vault Property and the File Property. It can be:
- Vault to File
- File to Vault
- Bi-directional
- Create: Determines whether the Vault will create the property on the file if it does not already exist. If your mapping direction is File to Vault, this option will be set to No, as properties in the Vault cannot be created in this manner.
Note: If the Create option is set to "No", property compliance treats a null or empty property value as the property doesn't exist in the file. If the Create option is set to "Yes", it will write the correct value to the property.
Note: Some of the fields are non-editable, so if you need to make major changes to a mapping, you may need to delete it and create a new one. - On the Mappings tab, click OK to commit all changes and return to the Edit Property dialog box.
Edit Mapping Priorities
- Select the property on the Mapping tab that you want to prioritize, and click the Move Up or Move Down arrow icons as needed to change mapping priority.
- Click OK to commit all changes and return to the Property Definitions dialog box.
Properties at the top of the list take precedence over those lower on the list. You can reorganize the list using the Move Up and Move Down arrow icons on the Mapping tab.