Learn how to display properties for individual component instances in Vault Client.
Instance properties are properties assigned to individual component instances that are stored in the parent assembly. For more information on Instance properties, see the Inventor Help.
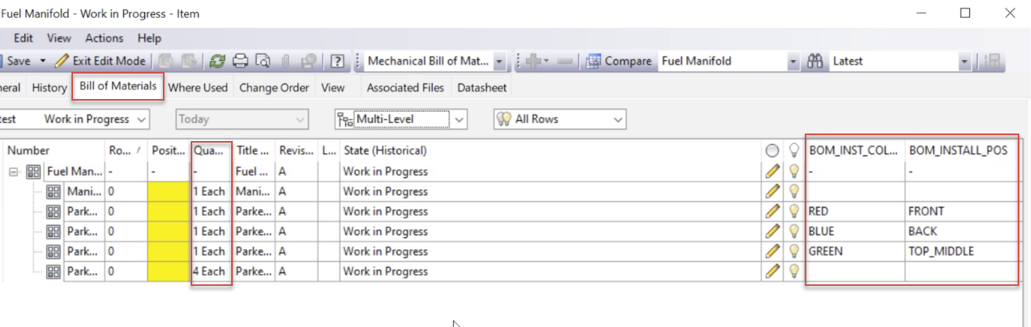
Working with Instance Properties in Vault Client
Instance Properties work the same way as Item Property occurrence within the Vault Bill of Materials (BOM). Items with the same part number are grouped by the instance property value.
Ensure to configure the following settings.
- In the Configure Assign Item dialog, select "All" for rows that will be turned on during Assign Item.
- Select/Deselect "Group BOM rows as per the design BOM" option.
- If only model view is enabled in Inventor design BOM, then
- If "Group BOM rows as per the design BOM" option is checked, then in Vault Explorer assigned BOM view will show items split.
- If "Group BOM rows as per the design BOM" option is unchecked, then in Vault Explorer assigned BOM view will show items grouped.
- If Structure view is enabled in Inventor design BOM, then
-
If you check "Merge Instance Rows" option in the Inventor BOM view setting, then all instances are merged in the Inventor BOM Structure view. Vault Explorer assigned BOM view will always show item grouped and "Group BOM rows as per the design BOM" setting is ignored.
- If you uncheck "Merge Instance Rows" option in the Inventor BOM view setting, then all instances are split in the Inventor BOM Structure view.
- If "Group BOM rows as per the design BOM" option is checked, then in Vault Explorer assigned BOM view will show items split.
- If "Group BOM rows as per the design BOM" option is unchecked, then in Vault Explorer assigned BOM view will show items grouped.
-
- If only model view is enabled in Inventor design BOM, then
To display Instance Properties, you need to customize BOM row properties in the Vault and create new BOM row properties that map to file properties with Instance Properties values.
- On the Toolbar menu, select Administration > Vault Settings.
- In the Vault Settings dialog, select the Behaviors tab.
- Click Properties to create a new BOM row property that maps to file properties to streamline your design management process. See Create a Bill of Materials (BOM) Row Property Definition for details.
- Select the Mapping tab to map properties to a user-defined property. Mapping priority determines the order in which properties are written to a vault object. See Map Properties for details.
- Once a property definition is created, select the file with Instance Properties, right-click and select Assign /Update Item to display the Item dialog.
- Select the Bill of Materials tab and click on the Bill of Materials row.
- Right-click on the item, and then select Customize View to customize how your BOMs are displayed in the preview pane and the item record.
- On the Customize View dialog, click Fields to add newly created properties as the fields in the Bill of Materials. See Customize the Bill of Materials (BOM) View for details.
- Again, click the BOM row, right-click on the item and select Turn Branch On. The selected row and all its children are included in the BOM.
- Click Save.