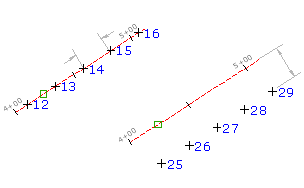
Creates points at equally spaced intervals along an alignment.
Specify the distance between points, and optionally an offset distance from the alignment.
- Select settings and create styles, layers, point groups, and description keys.
-

 .
.
- Select an alignment. Note: If the selected alignment has associated profiles, the Select a Profile dialog box is displayed. You can select a profile from the list and the levels for the points you create will be set from that profile. If there is no profile section for a chainage on the alignment, or if you select <none>, the point level will be set according to the Points Creation settings in the Create Points dialog box.
- Enter the number of segments into which you want to divide the selected alignment.
The command calculates the distances between points by dividing the total length of the alignment by the number of segments specified.
- Enter the offset. If you have selected a profile, the offset value for the profile displays as the default.
A series of equally spaced points are placed along the alignment at the specified offset.
- If prompted, for each point, enter a point name, description, and level. Note: If you want the point description to be taken from the object, specify Automatic - Object in the Prompt For Descriptions section of the Points Creation settings. The alignment name and chainage display in the Raw Description column in the Point Editor.
Note: Many factors affect how the point is displayed. For more information, see About Controlling the Appearance of Points in a Drawing.