Use the editing functionality in the Edit Sample Line dialog box to change the name, length, vertex locations, and chainage value parameters.
In the drawing, use sample line grips to specify the stretch point, base point, or to copy sample lines. You use the grips to change swath widths or chainages.
To use parameters to edit sample line location and length
- In the drawing, click the sample line you want to edit.
-
Click

 Find.
Find.
Note that the Edit Sample Line dialog box and Sample Line Tools toolbar are both displayed.
- In the Edit Sample Line dialog box, review the parameters for each vertex of the sample line by clicking Previous Vertex and Next Vertex.
- At the vertex you want to edit, do one or more of the following:
- In the Name field, change the name of the sample line.
- In the Sample Line Vertex Northing and/or Sample Line Vertex Easting field(s), enter new values.
- In the Sample Line Segment Length field, change the length of the swath width to the desired distance in ground units or click
 to pick a new segment length from the drawing.
 - In the Sample Line Chainage Value field, change the sample line chainage value or click
 to pick a new chainage value from the drawing.
- Close the Edit Sample Line dialog box and Sample Line Tools toolbar.
The sample line is redrawn with the new parameters.
To use grips to edit a sample line
- In the drawing, click the sample line you want to edit.
The sample line displays grip edit locations at each vertex.
- Use the diamond-shaped center grip to move the sample line to a new location along the alignment.
The sample line slides to the new location while maintaining its relative geometry. As the sample line moves, it reorients to the underlying element (for example, transition, curve, or other straights). It always remains perpendicular to the alignment.
- Use the square-shaped end grips to stretch (lengthen or shorten), move, or rotate segments.
The sample line is redrawn.
- Use the triangular-shaped grips at the ends of segments to stretch (lengthen or shorten) each segment while keeping its relative direction.
The sample line is redrawn.
- Press Esc or enter eXit to complete the procedure.
The sample line segments are moved or edited.
To restore a rotated sample line to the perpendicular
- In the drawing, click a sample line.
The sample line displays grip edit locations at each vertex.
- Use the square-shaped end grips to rotate segments off their perpendicular orientation to the parent alignment.

- Click the rotated sample line.
- Right-click and click Make Orthogonal.
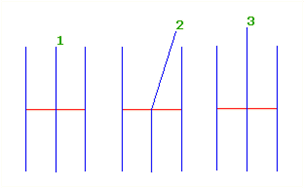
The rotated sample line (1-2) rotates back to a perpendicular orientation (3) to its parent alignment, but retains the length to which it was stretched or contracted.

To change the display style of a sample line
- In the drawing, click the sample line.
- Right-click the sample line. Click .
- In the Sample Line Properties dialog box, click the Information tab.
- In the Object Style field, select a different style in the list.
To resample section sources
- Select a sample line in the drawing.
- Click

 Find.
Find. - In the Section Sources dialog box, do one or more of the following:
- Select a source in the Available Sources field and click Add >> to add it to the Sampled Sources field.
- Select a source in the Sampled Sources field and click Remove << to remove it From the Available Sources field.
- In the Section Sources dialog box, click OK.