To create a data shortcut project in Autodesk Docs, you will be working with familiar commands in Civil 3D, but you will select a connected drive instead of a local or LAN data storage environment for the project.
- To create and manage an Autodesk Docs data shortcut project, you'll need access to Autodesk Collaboration for Civil 3D, which is available when you subscribe to Autodesk BIM Collaborate Pro.
- You don't need to be an Account Administrator to create a data shortcut project within an existing Autodesk Docs project. However, if you want to create a new Autodesk Docs project for your data shortcuts, you will need to be an Account Administrator and use the Account Admin module in the Autodesk Docs web interface.
Note: The Account Administrator who sets up the Autodesk Docs project can use an existing project folder in Autodesk Docs as a template when creating a new project. A template project can be set up in advance to include a set of folders and files that you typically use.
Set up the Project Folder Template and Project Permissions
There are two options that you can use when creating a Civil 3D data shortcut project:
-
Manually create the project folder structure in Autodesk Docs and then create the data shortcut project within Civil 3D using the standard data shortcut project creation workflow. Using this approach, you create a new project in Autodesk Docs without referencing the settings from an Autodesk Docs template and then you create the data shortcut project in Civil 3D within the Autodesk Docs project.
A limitation with this approach is that you will need to manually set Autodesk Docs permissions for the folders in the project. After you create an Autodesk Docs project, set the working folder in Civil 3D to be a subfolder within the \Project Files folder in the new Autodesk Docs project and then create a data shortcut project in that folder using the New Data Shortcuts Project Folder command.
- Create the project folder structure in Autodesk Docs using a project template and then create the data shortcut project within Civil 3D. This approach provides the ability to set folder permissions and then use the structure (including the permissions that are set on the folders) as a template that can be used when creating new projects.
This approach is documented in the following sections.
Create a Project Template in Autodesk Docs
You can create a project in Autodesk Docs to use as a template and then copy the settings from the template when you create new projects. You can customise the folders for this project template in Autodesk Docs or it can match the current Civil 3D project template that is installed in your C:\Users\Public\Documents\Autodesk\Civil 3D Project Templates folder.
When you copy the settings from a template project to create a new project, only the folder structure and permissions are copied to the new project. Files that are included in a project template folder structure are not copied when you create a new project from a project template.
- Sign in to Autodesk Docs.
Note: To complete the steps in this task, you need to be an Autodesk Docs Account Admin.
- Click the Module Selector and select the Account Admin module.
- Click the Projects tab.
- Click Add to begin creating a new project.
- On the Create Project Profile page, do the following:
- Enter a Project Name such as Civil 3D Project Template.
- Select Template Project as the Project Type.
- Optionally enter your company address.
- Click Save & Continue to display the Activate Services page.
- On the Activate Services page, do the following:
- Click Activate next to Document Management.
- Do not select a project under Copy Project Settings.
- Enter your email address and click Save to add yourself as a project administrator.
- You can add other project administrators if you would like to share this template project.
- Click Finish to create the project.
You now have an empty template to populate with your company's typical folder structure.
Add Folders to the Project Template and Assign Role-based Permissions in Autodesk Docs
Add the typical folders that you use in a project and then assign role-based permissions to the folders.
Many functions in Autodesk Docs can be managed at a user, role or company level. It is recommended to use role-based permissions when possible when you are setting up the project template in Autodesk Docs. You can assign folder permissions to a BIM Manager or Civil Engineer role and then for each project, you can assign roles to people instead of having to manage individual access.
The folders and their permissions will be copied when you create a project from the project template.
- In Autodesk Docs, navigate to your newly created Civil 3D project template.
- Click the Module Selector and select the Project Admin module.
- Click the Members tab.
- Assign yourself the role of Project Admin.
- Click the Module Selector and select the Document Management module.
- Click the Folders tab.
- In the Project Files folder for the project template, add the typical folders that you use in a project.
These folders will be copied to new projects you create that are based on this template.
- Next to the Project Files folder, select the More button and select Permissions.
- In the Permissions window, click the Add button to display the Add Permissions dialog box.
- Type in a few letters for the name of a role (Civil Engineer, Project Manager and so on) and then click the role name in the list.
- Click the Permission Level list and select the permissions level you would like to assign to this role. For more information about permissions, see Folder Permissions.
Note:
- Permissions are not immediately active in Civil 3D after they are applied in Autodesk Docs. It takes several minutes after specifying permissions in Autodesk Docs to make the permissions active in Civil 3D.
- Folders with View only permissions are not visible to Civil 3D users.
- Click Add to complete the process. The role should now have a small triangle next to it. When assigned to a real project, you can expand this triangle to see the users that have that role.
- Close the Permissions window and repeat the process of adding permissions to other project folders as needed.
You now have an Autodesk Docs template project with role-based permissions assigned to folders. You can now use this template to create a new project as described below.
Create an Autodesk Docs Project Using Settings from the Project Template
- Click the Module Selector and select the Account Admin module.
- Click the Projects tab.
- Click Add to begin creating a new project.
- On the Create Project Profile page add the project name and other details and then click Save & Continue to display the Activate Services page.
- On the Active Services page, click Activate next to Document Management.
- Under Copy Project Settings, select the template project you set up for your Civil 3D projects. The folder structure and any folder permissions will be automatically copied to the new project.
- Add one or more project administrators and then click Finish.
In the next steps you will create a data shortcut project in Civil 3D that will be stored in the Autodesk Docs project.
To create a data shortcut project in Autodesk Docs
This procedure assumes that you have an existing Autodesk Docs project in which the data shortcut project will be created.
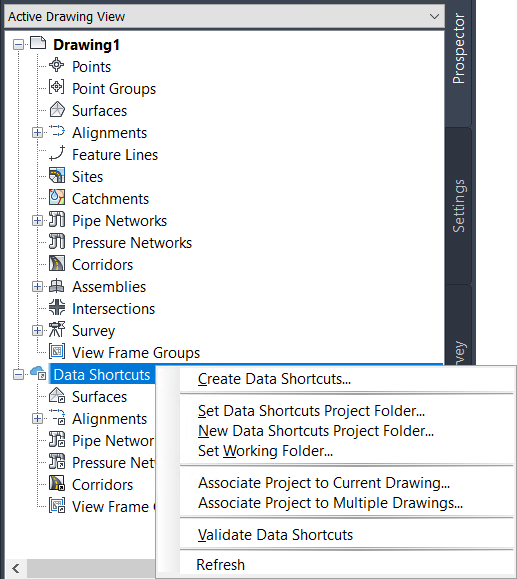
- In Toolspace, on the Prospector tab, right-click on the Data Shortcuts node
 Set Working Folder.
- In the Set Working Folder dialog box, navigate to the project folder location in Autodesk Docs.
The working folder for data shortcut projects needs to be at least one folder level below the Autodesk Docs project folder. For example, <Autodesk Docs Drive>\<Account Name>\<Project Name>\<Working Folder Name>. It is not permitted to set the working folder to a folder outside the project.
Note: It is possible to set the top level \Project Files folder as the working folder, but only administrators can see the \Project Files folder so it is recommended that you use a subfolder within \Project Files. - Click Select Folder.
The Data Shortcuts node in Prospector changes to
 to indicate that the working folder is in Autodesk Docs.
- Right-click on the Data Shortcuts node New Data Shortcuts Project Folder.
- You can use the same name as the Autodesk Docs project or a different name.
- If you already have your project folder structure set up the way you want it based on copying your template project, do not select the Use Project Template tick box.
- Specify the name and the other project details and click OK.
- Right-click on the Data Shortcuts node Set Data Shortcuts Project Folder.
- Select the data shortcut project to use and click on OK.
- In Autodesk Docs, verify that the new _Shortcuts folder that was automatically created when you created the data shortcut project has the required permissions.
- Create drawings and data shortcuts in the project as you normally would and save them all in Autodesk Docs.
Note: A data shortcut project and its associated drawings need to be stored in the same data storage environment. When you are working in a data shortcut project that is stored in Autodesk Docs, the drawing files must also be stored in Autodesk Docs.