Use these setting to customize how the selected viewport behaves.
Interface
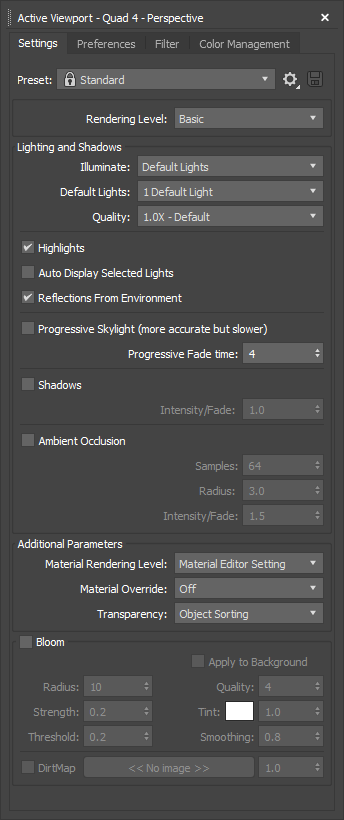
- Preset
- Sets the display quality for the viewport: High Quality, Standard, Performance, or DX mode.
- Both the Standard and Performance settings use default lighting. Use DX mode when working with DirectX shader materials. You can also save custom presets and load saved presets from file, using the gear and disk buttons.
- Rendering Level
- Sets the rendering level. The options are Basic, Advanced, and DX.
Lighting and Shadows group
Controls how lights are displayed in viewports other than wireframe views.
The default setting and availability of these controls depend on the visual style you have chosen.
- Illuminate
- Sets how to illuminate the scene in the viewport:
-
Default Lights (The default.) Illuminates the viewport using the default lights. If no lights exist in the scene, the default lighting is used automatically, even when Scene Lights is chosen.
Sometimes the lighting you create in the scene can make objects difficult to see in the viewport. The default lighting displays the objects with even illumination. You can use either one or two lights. By default, 3ds Max uses one default light.
- Scene Lights Illuminates the viewport using light objects in the scene using a maximum of four lights.
-
Default Lights (The default.) Illuminates the viewport using the default lights. If no lights exist in the scene, the default lighting is used automatically, even when Scene Lights is chosen.
- Default Lights
- Sets the number of default lights, either one or two.
- 1 Light Provides an over-the-shoulder light with 20% faster redraws at the expense of less natural illumination.
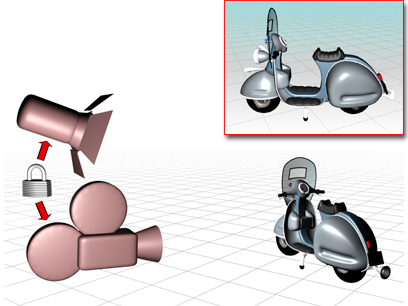
A single default light is linked to the camera and moves when you change your viewport point of view.
- 2 Lights (The default.) Provides more natural illumination, but slower viewport performance.
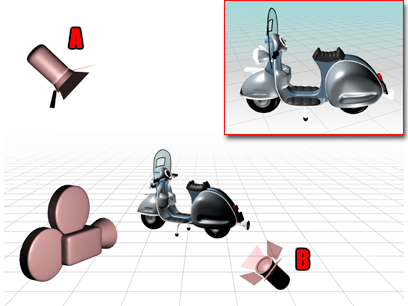
Two default lights are placed opposite to each other.
The key light, A, is in front of the object, on the upper-left side, while the fill light, B, is behind on the lower-right side.
- 1 Light Provides an over-the-shoulder light with 20% faster redraws at the expense of less natural illumination.
- Quality
- Sets the style of lighting used to generate shadows, and the kind of shadows generated. Range: From Point Lights/Hard Shadows to 16.0X - Very High Quality. If the setting is higher than Point Lights/Soft-Edged Shadows, area lights are taken into account. Default = 1.0X - Default.
- Highlights
- When on, viewports include highlights that come from the lighting. Default=on.
- Progressive Skylight
- When enabled, uses accurate fully shadow-casting skylights. When disabled, skylights will contribute simplified lighting to Realistic viewports, but are not treated as shadow-casting lights.
Progressive Skylight gives good results with outdoor scenes, but can cause problems with interior scenes. Disabling this setting results in less physically accurate scenes but can improve the appearance of interior scenes and reduce visual flicker in the viewport.
- Auto Display Selected Lights
- When enabled, light from selected lights is automatically displayed in shaded viewports. Default=off.
Some default settings and the availability of these controls depend on the visual style you have chosen.
- Reflections From Environment
- When enabled, glossy materials in Realistic viewports reflect the environment map. This gives good results with outdoor scenes (for example, on a shiny car body), but with high dynamic range (HDR) images, problems can occur in indoor scenes, for example with shiny floors. Turn off this toggle to correct any problems.
- Progressive Fade-in time
- Sets the speed at which progressive fade-ins occur.
Several effects in the viewport can be rendered progressively, such as the Skylight, area lights, and depth-of-field (out of focus) effects. Progressive effects are computed over time and gradually refined. When interacting with the scene, a simplified view is used; when the mouse is released, the progressive render begins, gradually fading in to replace the simplified view.
Note: This setting applies not only the Progressive Skylight feature detailed above but all such progressive effects. - Shadows
- When enabled, the scene is rendered with shadows.
- Shadow Intensity/Fade
- Controls the intensity of shadows. The higher the value, the darker the shadows.
Ambient Occlusion group
- Ambient Occlusion
- Enables ambient occlusion (AO). AO improves shadow quality by taking into account the proximity of objects. When AO is enabled, the controls for it become available.
- Samples
- Sets the number of samples to use. A higher number produces a smoother result but takes longer to process; a lower number will process faster but with a grainier result.
- Radius
- Defines the radius, in 3ds Max units, for occluding objects. Larger values cover larger areas.
- Intensity/Fade
- Controls the intensity of the AO effect. The higher the value, the darker the shadows.
Additional Parameters group
- Material Rendering Level
- Sets the level of detail and effects in material rendering. Select either basic smooth shading, advanced high-quality shading, or the current material editor setting.
Note: This option only affects material display in the viewport, not final renders.
- Material Override
- Overrides materials with fast shading or the UV checker image.
- Transparency
- Turns transparency on and off. Objects with transparent materials show as black when this setting is off.
- Apply to All Viewports
- When enabled, applies the currently selected settings to all visible viewports upon clicking OK.
Bloom group

Bloom reproduces the effect of bright light overwhelming the camera capturing the scene. It creates a glint/halo of light extending the borders of bright areas in an image. Use Bloom to enhance photorealism, or to create a dream-like effect.
- Apply to Background
- Applies bloom effect to the background as well as selected objects.
- Radius
- Controls width of bloom effect. Higher values give a wider effect.
- Quality
- Controls blur, detail and noise based on a Gaussian kernel filter. Higher values give better quality.
- Strength
- Multiplies the overall effect.
- Tint
- Multiplies the tint effect of the selected color. Default=white.
- Threshold
- Controls the amount of bloom applied based on pixel intensity. Higher values filter more light.
- Smoothing
- Softens the edges of the bloom effect.
- DirtMap
- Multiplies the look of dirt and scratches on a camera lens.