Provides basic controls for specifying the vector graphics file, how it is placed, and certain output options.
-

 Material Editor > Material/Map Browser > Maps > Standard > Vector Map > Parameters rollout
The main Vector map controls are similar to those for Bitmaps.
Interface
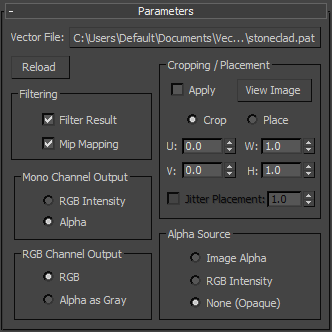
- Vector File
- Click to choose a vector graphic file by using the standard file browser. After selection, the full path name appears on this button.
- Reload
- Reloads the vector graphic file using the same name and path. You don’t need to use the file browser to reload the vector graphic file after you've edited it.
Clicking reload for any instance of the map updates the map in all sample slots and in the scene.
Filtering group
Filtering options let you select the method of pixel averaging used in antialiasing the vector graphic file.
- Filter Result
-
When on, does an antialiasing pass when rendering the Vector map. Default = on.
- Mip Mapping
- When on, mipmaps are generated for the image. Default = on.
Mipmaps are a set of lower-detail bitmaps. The first is half the size of the original image, the next is half the size of that, and so on down to a single pixel. (You can think of them as being arranged like a pyramid.) They are used to optimize display time and reduce aliasing when the texture is to be displayed at less than full size. For example, if your original image is 512 x 512 pixels, but the area in which it would be displayed is only 100 pixels square, the display device would interpolate between the 128 x 128 mipmap and the 64 x 64 mipmap.
We recommend you generate mipmaps when your scene is animated: This can improve rendering time.
Mono Channel Output group
Some parameters, such as opacity or specular level, are a single value as opposed to a material's three-value color components. Controls in this group determine the source of the Output mono channel in terms of the input vector file.
- RGB Intensity Uses the intensity of the red, green, and blue channels as the map. The color of the pixels is ignored and only the value or luminance of the pixels is used. The colors are computed as gray values in the range between 0 (black) and 255 (white).
- Alpha (The default.) Uses the intensity of the alpha channel as the map.
RGB Channel Output group
The RGB Channel Output determines where the output RGB part comes from. The controls in this group affect only maps for material components that display color: Ambient, Diffuse, Specular, Filter Color, Reflection, and Refraction.
- RGB (The default.) Displays the full color values of the pixels.
- Alpha as Gray Displays tones of gray based on the levels of the alpha channel.
Cropping/Placement group
The controls in this group let you crop the vector graphic file or reduce its size for custom placement. Cropping a vector graphic file means to reduce it to a smaller rectangular area than it originally had. Cropping doesn't change the scale of the graphic.
Placing a vector graphic file lets you scale the map and place it anywhere within its tile. Placing can change the graphic's scale, but shows the entire graphic. The four values that specify the placement and size of the cropping or placement region are all animatable.
Cropping and placement settings affect the graphic only as it's used for this map and any instances of the map. They have no effect on the vector graphic file itself.
- Apply
- Turn on to use the cropping or placement settings.
- View Image
- Opens a window that shows the vector graphic surrounded by a region outline with handles at its sides and corners. To change the size of the crop area, drag the handles. To move the region, position the mouse cursor inside it and drag.
To see the results of editing the region, turn on Apply (see preceding). This shows changes in the region as you make them.
The vector graphic window has U/V and W/H (width/height) controls on its toolbar. Use these to adjust the location and size the image or crop area.
When Place is chosen, dragging the region area handles changes the scale of the vector graphic (hold down Ctrl to preserve the aspect ratio), and dragging the image changes its location within the tile area.
The UV/XY button at the right of the window toolbar lets you switch between using UV or XY coordinates in the toolbar spinners (Default=UV). .
- Crop Makes cropping active.
- Place Makes placement active.
- U/V
- Adjust the location.
- W/H
- Adjust the width and height of the map or the crop area.
- Jitter Placement
- Specifies the amount of random offset. At 0, there is no random offset. Range = 0.0 to 1.0
When Place is turned on, the size and position specified by the spinners or editing window are ignored. 3ds Max then chooses a random size and tile position for the image.
Alpha Source group
Controls in this group determine the source of the Output alpha channel in terms of the input bitmap.
- Image Alpha Uses the image's alpha channel (disabled if the image has no alpha channel).
- RGB Intensity Converts the colors in the vector graphic file to grayscale tonal values and uses them for transparency. Black is transparent and white is opaque.
- None (Opaque) Does not use transparency.