Using a Custom Code Node
You can create a for loop in different ways. You can create a Custom Code node. Select Tools  Toggle Advanced Mode to enter advanced mode, then choose Hw Shader Nodes Various Custom Code. On the Properties panel, click the Edit button to enter your code in the Custom Code editor dialog that appears. Use functions that are compatible with the DirectX viewport driver.
Using a For Loop Node
You must also be in advanced mode in order to create a For Loop node.
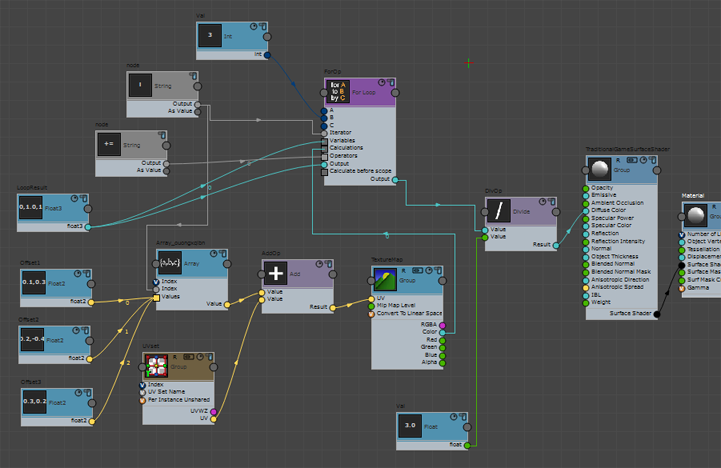
The following example demonstrates how to use a for loop to sample a texture three times with different UV offsets. The sampled values are added, the total divided by three, and the average value applied to the Diffuse Color channel of the TraditionalGameSurfaceShader.
Set up the for loop:
- In the ShaderFX work area, right-click and choose Tools Toggle Advanced Mode to make sure advanced mode is active.
- Right-click and choose Hw Shader Nodes Flow Control For Loop to create a ForOp node.
 Tip: A square port signifies that the port can accept more than one input.
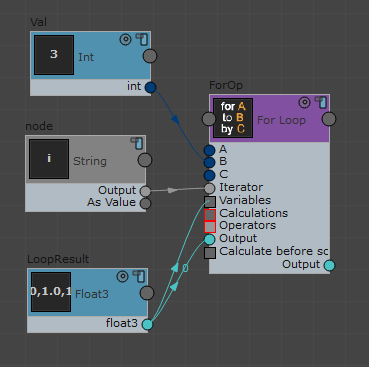
 - Choose Hw Shader Nodes Values Int to create an Integer node. On the Propertes panel, set its value to 3. Connect it to the B attribute of the For Loop node.
- The A attribute represents the start of the loop.
- The B attribute represents the end of the loop.
- The C attribute represents the interval of the loop.
By default, the value of A is 0 and the value of C is 1. If you use these default values for your loop, you do not need to connect these attributes.
In this example, we set for i = 0, i < 3, i++; therefore, we do not need to explicitly set the A and C values.
- Choose Hw Shader Nodes Various String to create a string you will use as an iterator. On the Properties panel, choose i from the Default Options drop-down list (you have to scroll down to see this choice). Connect the Output port of the String node to the Iterator attribute of the For Loop node.
- Choose Hw Shader Nodes Values Float3 to create a variable to store the values that are calculated within the loop. Tip: Use Float3 or Float4 to store the values. Do not use a Color node.
- On the Properties panel, rename the Float3 node to LoopResult and verify that the three values are initialized to 1.0.
- Connect the LoopResult node to the Variables attribute of the For Loop node. Because this is a simple loop where only one variable is used, connect LoopResult to the Output attribute of the For Loop as well.
Set up the texture sampling:
- Choose Hw Shader Nodes Textures Texture Map to create a TextureMap node. On the Properties panel, use the MyTexture / Path controls to assign a texture file to this node.
Also on the Properties panel, make sure that the Sampler / U Coordinate and Sampler / V Coordinate attributes are set to WRAP.
Because the texture will be sampled with an offset, the sampling might exceed the 0–1 UV range. Setting these attributes to WRAP ensures that pixels are sampled from the beginning of the texture when the UV range exceeds 1.0.
- Choose Hw Shader Nodes Values Array to create an Array node. The three sets of offset values are stored in this array.
- Choose Hw Shader Nodes Values Float2 three times to create three Float2 nodes to store three sets of offset values. Use the Properties panel to set the three Float2 attributes as follows:
- Name: Offset1, X: 0.1, Y: 0.3
- Name: Offset2, X: 0.2, Y: -0.4
- Name: Offset3, X: 0.3, Y: 0.2
- Connect all three Float2 nodes to the Values attribute of the Array node.
- Choose Hw Shader Nodes Inputs Common UV Set and Hw Shader Nodes Math Add to create a UV Set node and an Add node.
- Connect the nodes as follows:
- Connect the Value attribute of Array to the Value attribute of Add.
- Connect the UV attribute of UV Set to the other Value attribute of Add.
- Connect the Result attribute of Add to the UV attribute of TextureMap.
- Connect the Output attribute of the iterator (String node) to the Index attribute of Array. This allows the For Loop to obtain the offset values.
- Connect the Color attribute of Texture Map to the Calculations attribute of For Loop. This sets the calculations in the for loop, which samples the texture map three times.

Calculate the average of the sampled results:
- Choose Hw Shader Nodes Various String to create a String node. On the Properties panel, choose += from the Default Options drop-down list.
- Connect the Output value of the new String node to the Operators attribute of the For Loop node.
The For Loop adds the results of the texture sampling to the Loop Result variable.
- Choose Hw Shader Nodes Math Divide to create a Divide node. Connect the Output attribute of For Loop to the first Value attribute of Divide.
Because Loop Result is the sum of three sampled values, it must be divided by three to obtain its average.
- Choose Hw Shader Nodes Values Float to create a Float node. On the Properties panel, set its Value to 3.0. Connect its Float attribute to the other Value attribute of Divide to divide the sum of the sampled results by three.
- Connect the Result attribute of Divide to the Diffuse Color attribute of TraditionalGamesSurfaceShader.

Result of iterating a checkerboard pattern (rendered with the Quicksilver renderer)
You can export your ShaderFX material to a shader file and examine the shader code to see the for loop you just created:
float3 LoopResult = float3(1.0, 1.0, 1.0);
for(int i=0; i<3; i+=1)
{
    float2 AddOp = (Array_bphdfiwhhj[i] + IN.map1.xy);
    float4 Sampler = chessboard_woodjpg.Sample(MMMLWWWSampler, AddOp);
    LoopResult += Sampler.xyz;
}
For more information about exporting to a shader file, see Export to HLSL, CgFX and GLSL.