The Sunlight and Daylight systems use light in a system that follows the geographically correct angle and movement of the sun over the earth at a given location. You can choose location, date, time, and compass orientation. You can also animate the date and time. This system is suitable for shadow studies of proposed and existing structures. In addition, you can animate Latitude, Longitude, North Direction, and Orbital Scale.
-
 Create panel >
  (Systems) > Object Type rollout > Click the Sunlight button or the Daylight button.
Sunlight and Daylight have a similar user interface. The difference is that:
- Sunlight uses a directional light.
- Daylight combines Sunlight and Skylight. The Sunlight component can be an
IES Sun light, or a standard light (a
target direct light). The Skylight component can be an IES Sky light, or a Skylight.
- The IES Sun and IES Sky lights are photometric lights. It is appropriate to use them if you are creating a rendering that uses radiosity with exposure control.
- The Standard light and Skylight are not photometric. It is appropriate to use them if your scene uses standard lighting (Sunlight with its Directional light works for this, too), or if you are using light tracing.
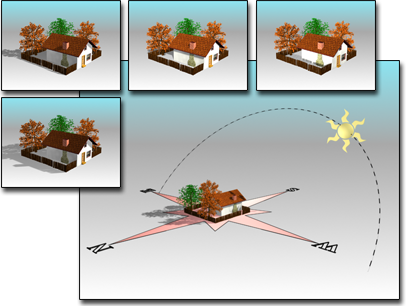
Large view shows compass and light in a viewport. The resulting rendered images are seen above it.
When you first create a Daylight system, the default creation parameters are set to midday (noon) on the summer solstice (June 21). Use the Get Location button in the Control Parameters rollout (see below) to choose the correct geographic location. If the rollout is not available, select the Daylight01 object in the viewport to gain access.
Procedures
To create a Sunlight or Daylight system:
- On the
Create panel, click
(Systems), then click Sunlight or Daylight.
Alternatively, you can create a Daylight system from the Create menu
 Lights or Systems submenu.
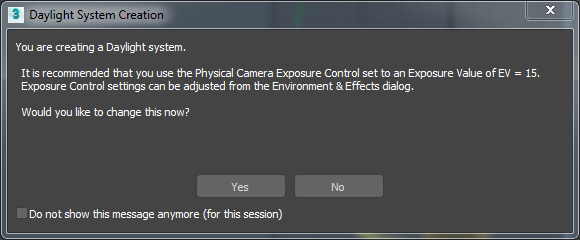
Whichever method you use, if you add a Daylight system while no exposure control method is in effect, 3ds Max automatically prompts you to apply an appropriate exposure control. Always use the exposure control that’s best suited to the current renderer:
Renderer Recommended Exposure Control Default Scanline Logarithmic Quicksilver Physical Camera - Choose a viewport in which to create a compass rose (the compass direction of your "world"). This should be a Top or Perspective/Camera view.
- Drag to create the radius of a compass rose (the radius is for display purposes only), and then release the mouse button and move the mouse to set the
orbital scale of the sun light over the compass rose. This can be any distance you find convenient, since directional and IES Sun lights produce parallel illumination regardless of where their icon is located. Click to finish.
Upon creation you have two objects in your scene:
- The compass rose, which is a helper object that provides the world direction for your sun.
- The light itself, which is a child of the compass rose, and is permanently targeted on the center of the compass rose.
If you created a Daylight system, the Daylight Parameters rollout on the Modify panel lets you choose the type of sunlight and skylight. The Sunlight drop-down list lets you choose IES Sun, or Standard (directional). The Skylight drop-down list lets you choose IES Sky, or Skylight. These lists also offer you the options of choosing no sunlight or no skylight.
Controls for the geographic location and time of day are on the Motion panel. The default time is noon, and the default date and time zone are based on your computer's local settings. The default location is San Francisco, CA.
The directional light created by the system is managed by two special controllers: Solar Date and Solar Time. After you create your system, you can access its creation parameters (time and date, location, and orbital scale) in the Motion panel for the directional light. The parameters are interrelated, so you can adjust them in any order. Generally, it's easiest to choose a location first, and then adjust the date and time. You can access the parameters for selected sunlight or skylight objects in the Modify panel. The radius of the compass rose is also editable from the Modify panel, after selecting the compass rose object.
If Date/Time position is selected the Sun and Sky multipliers are automatically set and animated according to their position. They can be edited only by using the Manual Position override.
Tip: If your scene rendering with Daylight is too bright or too dark, use an exposure control.
Example: To create a shadow study:
- Choose Create menu Daylight System, and when prompted to add an exposure control, click Yes. Add the Daylight system in a viewport.
- On the
 Modify panel, set the date and location.
Note: Once you’ve created the Daylight system, you’ll find these controls on the
Modify panel, set the date and location.
Note: Once you’ve created the Daylight system, you’ll find these controls on the Motion panel.
- Turn on
 .
.
- In the Control Parameters Time group, adjust the Hours setting to a start time in early morning, such as
6.
- Click
 (Go To End).
- Set Hours to a time in the late afternoon, such as 18.
- For a complete view of your environment and its shadows, render an animation from a Top viewport or a view above your scene.
Interface
Daylight Parameters rollout (Daylight system only)
The Daylight Parameters rollout lets you define the daylight system's sun object. You can set the sunlight and skylight behaviors.
This rollout appears on the Modify panel when the light component of the Daylight system is selected.
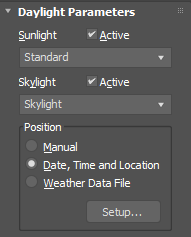
- Sunlight
- Choose an option for sunlight in your scene:
- IES Sun Uses an IES Sun object to simulate the sun.
- Standard Uses a Target Direct light to simulate the sun.
- No Sunlight No sunlight is simulated.
- Active
- Turns sunlight on and off in the viewport.
- Skylight
- Choose an option for skylight in your scene:
- IES Sky Uses an IES Sky object to simulate skylight.
- Skylight Uses a Skylight object to simulate skylight.
- No Skylight No skylight is simulated.
- Active
- Turns skylight on and off in the viewport.
Position group
- Manual When chosen, you can manually adjust the location of the daylight assembly head object in your scene, as well as the intensity value of the sunlight.
- Date, Time and Location When chosen, daylight uses the geographically correct angle and movement of the sun over the earth at a given location.
Note: When Date, Time And Location is active, adjusting the light's intensity has no effect.
- Weather Data File When chosen, daylight derives the angle and intensity of the sun from a weather data (EPW) file.
- Setup
- When Manual or Date, Time And Location is chosen, opens the
Motion panel, allowing you to adjust the time, location, and site of your daylight system.
When Weather Data File is chosen, opens a Configure Weather Data dialog so you can choose which weather data you want the daylight system to use.
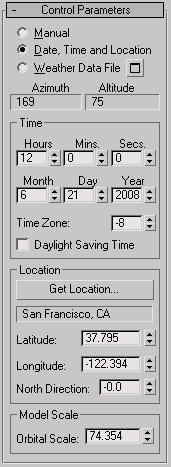
Control Parameters rollout
This rollout appears on the Create panel, and on the Motion panel when the light component of the Daylight or Sunlight system is selected.
[control source radio buttons] (Daylight system only)
- Manual When chosen, you can manually adjust the location of the sun object in your scene, as well as the intensity value of the sun object.
- Date, Time and Location When chosen, daylight uses the geographically correct angle and movement of the sun over the earth at a given location.
Note: When Date, Time And Location is active, adjusting the light's intensity has no effect.
- Weather Data File When chosen, daylight derives the angle and intensity of the sun from a weather data (EPW) file.
 Click the button to open a
Configure Weather Data dialog, where you can specify the EPW file and choose which weather data you want the daylight system to use.
Click the button to open a
Configure Weather Data dialog, where you can specify the EPW file and choose which weather data you want the daylight system to use.
- Azimuth and Altitude
-
Display the azimuth and altitude of the sun. Azimuth is the compass direction of the sun in degrees (North=0, East=90). Altitude is the height of the sun above the horizon in degrees (Sunrise or Sunset=0).
Time group
Provides settings for the time, date, and time zone.
If the location you choose uses Daylight Savings Time, turn on the Daylight Saving Time checkbox. The Sunlight system adjusts the sun's azimuth and altitude accordingly during the summer months.
- Hours/Mins/Secs
- Specify the time of day.
- Month/Day/Year
- Specify the date.
- Time Zone
- Time zones range from –12 to 12. If you're uncertain about a time zone, you can look them up in Window's Date Time Properties dialog (available through My Computer Control Panel Date Time). Click the Time Zone tab, and then display the list of world locations and their time zones.
- Daylight Savings Time
- When on, calculates daylight savings by adjusting azimuth and altitude during the summer months.
Location group
Provides controls for setting the location of your scene in the world.
- Get Location
- Displays the
Geographic Location dialog, which lets you set the latitude and longitude values by selecting a location from a map or a list of cities.
Note: For precise locations, enter exact coordinates using Latitude/Longitude.
- [city name text box]
- Displays the name of the city you choose from the Geographic Location dialog. If you adjust the Latitude or Longitude spinners after choosing a location, this area becomes blank.
- Latitude/Longitude
- Specify the location based on the latitude and longitude.
Note: Negative longitude values are west of the Greenwich meridian; positive values are to the east of the meridian. This differs from versions prior to 3ds Max 2009, in which the polarity of longitude values was incorrectly reversed.
- North Direction
- Sets the rotational direction of the compass rose in the scene. This is the geographical orientation of the compass rose. By default, north is 0 and points along the positive Y axis of the ground plane. Positive X (East) is 90 degrees. Adjust the North Direction to correspond to your site. Accuracy of the system depends on this correspondence.
Model Scale group
- Orbital Scale
- Sets the distance of the sun (the directional light) from the compass rose. Because a directional light casts parallel beams, this distance has no effect on the accuracy of the sunlight. However, the light must point toward your model (not away from it), and the light's hotspot and falloff do have an effect.
The best way to ensure that the light is set up correctly is to change one viewport to the light's view (for example, Sun 01). Then adjust the light's location using Dolly, and set the hotspot so it illuminates the whole model, with no falloff.