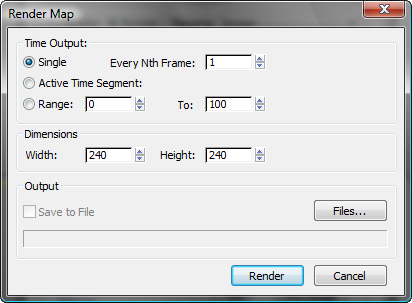
3ds Max opens the Render Map dialog when you use Render Map on the sample slot right-click menu to render the map displayed in a sample slot.
Note: If you get a warning that tells you that certain maps are only supported by 3ds Max and will not be recognized by other applications, it is letting you know that one or more of the materials in the scene will appear in other applications as a standard gray material. If this happens, convert the material that is causing the error to a
Standard Material with the same textures and try to export again.
Interface

Time Output group
These controls specify how many frames to render.
- Single Renders a single frame.
Every Nth Frame Renders a regular sampling of the animation. For example, a value of 8 includes only every eighth frame in the preview. Default=1 (every frame).
- Active Time Segment Renders the active time segment.
- Range Renders a custom range from the start to the end frame you specify in the spinners below.
Dimensions group
These controls specify the size of the rendered frames, in pixels.
- Width
- Specifies the frame width, in pixels.
- Height
- Specifies the frame height, in pixels.
Output group
These controls let you save the rendered map to a file.
- Save to File
- When on, the rendered map is saved to a file. When off, the map is rendered only to a Rendered Frame Window. This checkbox is unavailable unless you use Files to specify a file name, when it defaults to on.
- Files
- Click to display a file dialog that lets you specify where to save the rendered map.
When you click Save in the file dialog, you might see an additional dialog that gives you options specific to the file type you chose.
- File name field
- Displays the name of the file you chose.
- Render
- Renders the map to a feature-reduced version of the Rendered Frame Window, and to a file if you chose one.