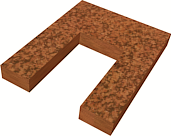
Use C-Ext to create an extruded C-shaped object.

Example of C-Ext
Procedure
To create a C-Ext object:
- From the Create menu, choose Extended Primitives
 C-Extrusion.
 - Drag the mouse to define the base. (Press Ctrl to constrain the base to a square.)
- Release the mouse and move it vertically to define the height of the C-extrusion.
- Click, and then move the mouse vertically to define the thickness or width of the walls of the C-extrusion.
- Click to finish the C-extrusion.
Interface
Creation Method rollout
- Corners
-
Draws the object from corner to corner. You can change the center location by moving the mouse.
- Center
-
Draws the object from the center out.
Parameters rollout

- Back/Side/Front Length
-
Specify the length of each of the three sides.
- Back/Side/Front Width
-
Specify the width of each of the three sides.
- Height
-
Specifies the overall height of the object.
- Back/Side/Front Segs
-
Specify the number of segments for a specific side of the object.
Note: The object's dimensions (Back, Side, Front) are labeled as though it were created in the Top or Perspective viewports, and seen from the front in world space. - Width/Height Segs
-
Set these to specify the number of segments for the overall width and height of the object.
- Generate Mapping Coords
-
Sets up the required coordinates for applying mapped materials to the object. Default=on.
- Real-World Map Size
-
Controls the scaling method used for texture mapped materials that are applied to the object. The scaling values are controlled by the Use Real-World Scale settings found in the applied material's Coordinates rollout. Default=off.