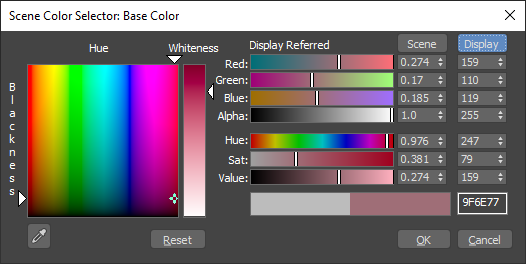
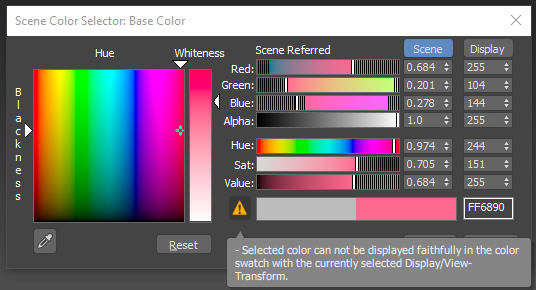
Use the Color Selector to specify various color parameters including light colors, material colors, background colors, and custom object colors. You can set values in either the rendering space or the display space using three different color models to help you zero in on the exact color you want.


- For UI colors and non-color data, the numbers under Float represent the values in floating-point format and the numbers under Integer represent the equivalent values as an 8-bit integer.
- For other colors, the numbers under Scene represent the color values in the rendering space in floating-point format, and the numbers under Display represent the equivalent colors in the display space (after the view transform and display encoding have been applied) as integers. Click either label to show the sliders in the corresponding space. Note that the Hue/Blackness box and Whiteness slider are always displayed in the rendering space. The color transform that is used to convert between the rendering and display spaces depends on your Color Management Settings.
The dialog shows three different color selection models. You can use the controls of any model to define a color. As you adjust the controls of one color model, the controls of the other two models change to match. The three color models are:
- Hue/Whiteness/Blackness (HWB)
The HWB model represents a natural, pigment-based way of mixing color by starting with a pure color (hue) and then making it darker by adding black, or lighter by adding white.
The main feature of the HWB model is a large square box displaying the color spectrum. Across the top of this box is the spectrum of pure colors, or hue. Down the side of the box you see increasing levels of blackness, making the color dark as you approach the bottom.
To the right of the color spectrum box is the Whiteness box, which controls the amount of white in the color. Use higher positions to decrease the whiteness, or lower positions to increase the whiteness.
- Red/Green/Blue (RGB)
The RGB model adjusts the mix of red, green, and blue to define a color. This model represents the way colored light can be mixed. This is additive color mixing, as opposed to the subtractive color mixing for paint and other pigments. You can adjust values using the color sliders, the numeric fields to their right (via the keyboard), or the spinners to the right of the numeric fields.
- Hue/Sat (Saturation)/Value (HSV)
The HSV color model adjusts hue, saturation, and value. Hue sets the color; saturation (labeled Sat) sets the color's purity; and value sets the color's brightness, or intensity. You can adjust values using the color sliders, the numeric fields to their right (via the keyboard), or the spinners to the right of the numeric fields.
When using OCIO-based color management and setting colors in the Scene space, the sliders indicate colors that cannot be reproduced on your display using black stripes. You can still select these colors, and the display will show the closest possible screen color. In addition, a warning symbol appears — hover the pointer over the icon to see whether the color is outside the display gamut, the rendering gamut, or both.


In most contexts, the Color Selector is modeless; that is, it remains on the screen until you dismiss it, and you can use other controls or work in a viewport while it is still visible. In other contexts, the Color Selector is modal, and you must close the dialog before proceeding.
Interface
- Hue/Blackness
-
Select a color by clicking anywhere in the box. To change the hue without affecting blackness or vice versa, drag the pointer along the top or left side of the box.
- Whiteness
-
The vertical bar to the right controls the amount of whiteness. The color set by the hue and blackness pointers is displayed at the top of the bar and pure white at the bottom. Drag the whiteness pointer down to lighten the color by adding white.
- Red, Green, and Blue
-
When a slider is all the way to the left, its numeric field contains 0; none of the color controlled by that slider is used. If the slider is all the way to the right, the maximum amount of that color is being used.
The spinners to the right of each slider are another way of setting the red, blue, or green component.
The colors in the sliders change to show an approximation of what the color result will be if you move the slider to that location, without adjusting any other color parameter.
- Hue
-
Sets the pure color. Locating the slider all the way to the left gives you pure red. As you drag the slider to the right you move through the spectrum of Red, Yellow, Green, Cyan, Blue, Magenta, and back to Red again.
- Sat (Saturation)
-
Sets the purity or strength of the color. A weak color, with a saturation near 0, is dull and gray. A color with high saturation is very strong and pure.
- Value
-
Sets the lightness or darkness of a color. Low values darken the color toward black. High values lighten the color toward white. A value in the middle gives you the color defined only by hue and saturation.
- Color Output
-
The pair of color swatches below the Value slider lets you compare the new color (shown on the right) to the original color (shown on the left) in the display space.
- Hex Box
-
The text box to the right of the Color Output swatches shows the RGB triplet of the display-space color in hexadecimal format. You can overwrite the value here if you know the hex value of the display color you want. You can enter values in the following formats:
- rrggbb (short form: rgb)
- #rrggbb (short form: #rgb)
- xrrggbb (short form: xrgb)
- 0xrrggbb (short form: 0xrgb)
Some examples:- 8a9fbb
- f80 (same as ff8800)
- #ffaabb (same as fab)
- 0xa1b2c3
- x7a9855
- x732 (same as 773322)
-
 Sample Screen Color
 -
Lets you pick a new color from anywhere on the screen. After clicking this button, the mouse cursor changes to the eyedropper icon shown on the button. While this cursor appears, use any of these methods:
- Click anywhere on the screen to replace the current color with the color of the pixel under the lower-right corner of the cursor.
- Drag to continually update the current color with the color of the pixel under the lower-right corner of the pointer. This makes it easier to make sure you get the right color if the desired color area is small (say, a one-pixel-thick line).
- At any time, press and hold
Shift to smoothly blend the current color with colors the cursor moves over.
Instead of replacing the current color with the new sampled color, smoothed sampling gradually mixes the sampled color with the current color, giving a smoothed color transition during sampling. This is useful for sampling noisy areas, where the variations in colors are accumulated to provide a representative general color.
You can release the left mouse button while holding the Shift key to move the mouse elsewhere (without sampling) and then start dragging again to continue smoothed sampling in other areas. Releasing Shift while keeping the mouse button pressed returns to regular sampling. Releasing both Shift and the mouse button exits the sampler mode, returning the mouse cursor and behavior to normal.
The Sample Screen Color tool matches the sampled color in the display space, inverting the display encoding and view transform to determine the corresponding color in the rendering space.
Sampling can occur under any conditions anywhere within any windows that belong to the current instance of 3ds Max. To sample anywhere outside of 3ds Max (for example, the desktop), first click within a 3ds Max window and then drag the pointer outside.
- Reset
-
Click to restore color settings to the original color.
- OK
-
Accepts any changes and closes the dialog.
Note: If you opened the Color Selector by clicking Add Custom Colors on the Object Color dialog, the button label reads Add Color. - Cancel
-
Restores the original color and closes the dialog.