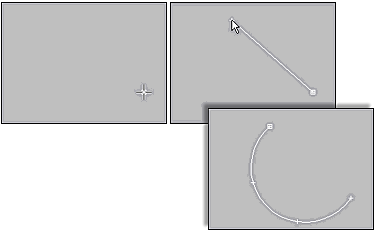
Use Arc to create open and closed partial circles made of four vertices.
Procedures
To create an arc using the end-end-middle method:
- Go to the
 Create panel and turn on
 (Shapes).
- Click Arc.
- On the Creation Method rollout, make sure End-End-Middle is chosen.
- Drag in a viewport to set the two ends of the arc.
- Release the mouse button, then move the mouse and click to specify a third point on an arc between the two endpoints.

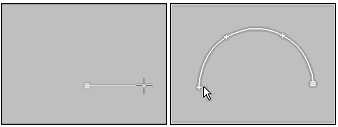
Creating an arc using the End-End-Middle creation method
To create an arc using the center-end-end method:
- Go to the
 Create panel and turn on
 (Shapes).
- Click Arc.
- On the Creation Method rollout, make sure Center-End-End is chosen.
- Press the mouse button to set the radial center of the arc.
- Drag and release the mouse button to specify the start point of the arc.
- Move the mouse and click to specify the other end of the arc.

Creating an arc using the Center-End-End creation method
Interface
Rendering and Interpolation rollouts
Most spline-based shapes share these parameters. For details, see Rendering rollout and Interpolation rollout.
Creation Method rollout

Use this choice to specify the sequence of mouse clicks involved in the creation of the arc.
- End-End-Middle
-
Drag and release to set the two endpoints of the arc, then move and click to specify the third point between the two endpoints.
- Center-End-End
-
Drag and release to specify the radius and one endpoint of the arc, then move and click to specify the other endpoint of the arc.
Keyboard Entry rollout
Creates an Arc spline from the keyboard. Use the X/Y/Z settings to specify the center point and the remaining parameters to specify the radius and arc extents, then click Create. After creating the spline, you can use the Parameters rollout controls to adjust the settings (see following).
Parameters rollout

Once you have created an arc, you can make changes using the following parameters:
- Radius
-
The arc radius.
- From
-
The location of the start point as an angle measured from the local positive X axis.
- To
-
The location of the end point as an angle measured from the local positive X axis.
- Pie Slice
-
When on, adds straight segments from the endpoints to the radial center, creating a closed spline.

Closed pie slice arcs
- Reverse
-
When on, the direction of the arc spline is reversed, and the first vertex is placed at the opposite end of an open arc. As long as the shape remains an original shape (and not an editable spline), you can switch its direction by toggling Reverse. Once the arc is converted to an editable spline, you can use Reverse at the Spline sub-object level to reverse direction.