The Parameters rollout provides controls for adding bones to the modifier, adjusting envelopes, and setting vertex weights manually. Alternative methods for setting weights are also available here.
Interface

- Edit Envelopes
-
Accesses the Envelope sub-object level for modifying envelopes and vertex weights. Clicking this button is the same as accessing the Envelope sub-object level on the modifier stack.
Select group
To assign vertex weighting manually, turn on Edit Envelopes, turn on Vertices, select vertices, and then adjust the selected vertices' weighting with the Weight Properties group tools.
- Vertices
- Turn on to be able to select vertices. Vertex selection is available only at the Envelope sub-object level. You access this level by clicking Edit Envelopes (see preceding) or choosing the Envelope sub-object level on the modifier stack. After selecting vertices, you can use the remaining tools in this group to modify the selection and the Weight Properties group tools to change the vertex weighting.
To rotate around selected vertices, use Orbit Sub-Object on the Orbit flyout. You can also rotate around a selected envelope as long as no vertices are selected, as they have precedence.Tip: Make sure to disable Cross Sections before selecting a vertex to orbit.
Selecting vertices is usually for setting their weights manually.
Note: To center on your selection, choose Use Selection Center from the User Center flyout. If you choose Use Pivot Point Center, Orbit centers on the selected bone/cross section.You can zoom on selected vertices using Zoom Extents Selected from the Zoom Extents flyout. You can also zoom on an envelope if no vertices are selected.
- Shrink
- Reduces the current vertex selection by progressively deselecting the outermost vertices. Has no effect if all vertices are selected.
- Grow
- Expands the current vertex selection by progressively adding neighboring vertices. To be able to grow the selection, start with at least one vertex.
- Ring
- Expands the current vertex selection to include all vertices part of parallel edges. First select two or more adjacent vertices (that is, on the same edge), then click Ring.
- Loop
- Expands the current vertex selection to include all vertices part of continuing edges. First select two or more adjacent vertices, then click Loop.
- Select Element
- When on, selects all vertices of the element you select, as long as you select at least one vertex from that element.
Tip: You can edit your selection by holding Ctrl or Alt, and then clicking vertices. This adds or removes, respectively, vertices to or from your selection.
- Backface Cull Vertices
- When on, you cannot select vertices pointing away from the current view (on the other side of the geometry).
- Envelopes
- Turn on for envelope selection.
- Cross Sections
- Turn on for cross-section selection.
Dual Quaternion group
Use dual-quaternion skinning to minimize the constriction (loss of volume) of a skin mesh resulting from twisting bone motion.
- DQ Skinning Toggle
- When on, the Skin modifier deforms the mesh using a combination of linear and dual-quaternion methods. When off, Skin applies linear deformation only.
- Blend Weights
- When on, all tools for adjusting vertex weighting except the Skin Weight Table dialog affect the dual-quaternion blending mask instead.
The first step, after applying the Skin modifier to an object, is to determine which bones participate in the object's weighting. Every bone you choose influences the weighted object with its envelope, which you can configure in the Envelope Properties group.
- Add
- Click to add one or more bones from the Select Bones dialog.
- Remove
- Choose a bone in the list, and then click Remove to remove it.
- Name
- Lists all bones in the system. At the Envelope sub-object level, highlighting a bone in the list displays that bone's envelope and the vertices influenced by the envelope.
Bones are automatically sorted in ascending alphabetical order, as indicated by an upward-pointing arrow on the Name button. To reverse the sorting order, click the Name button.
- [bone name type-in field]
- Enter search text in the field below the Name list to isolate matching bone names in the list and highlight the first item in ascending alphabetical order. Only those bones that match the text you enter will appear in the list. To restore the entire list, delete the search text.
Use these methods for finding bone names faster:
- Narrow the list by typing the first few characters in the name of the bone or bones you want to highlight. For example, if you have two bones named abcd and axyz, typing a will show both of them, but typing ab will show only the first.
- Use the wildcard (*) key to stand in for any number of leading characters. For example, you can find Robot R Index Finger by typing * R In
Cross Sections group
By default, each envelope has two round, lateral cross sections, one at each end of the envelope. These options add and remove cross sections from envelopes.
- Add
- Choose a bone in the list, click Add, and click a position on the bone in a viewport to add a cross section.
- Remove
- Select an envelope cross section and click Remove to delete it.
Before you can select a cross section, the Cross Sections option in the Select group must be on.
You can delete only extra cross sections that you have added; not the default cross sections.
Envelope Properties group
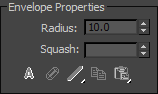
- Radius
- Select an envelope cross section, and use Radius to resize it. In order to select a cross section, the Cross Sections option in the Select group must be checked.
You can also click and drag a cross section control point in a viewport to resize it.
- Squash
- A squash multiplier for bones that stretch. This is a single value that reduces or increases the amount of squash applied to a bone when it is stretched with Freeze Length off, and Squash on.
Note: You can set Freeze Length and Squash in the Bone Tools dialog.
- Absolute/Relative
- This toggle determines how vertex weights are calculated for vertices between inner and outer envelopes.
- Absolute A vertex must merely fall inside the brown outer envelope to have 100% assignment weight to that particular bone. A vertex falling inside more than one outer envelope will be assigned multiple weights summing to 100% based on where it falls in the gradients of each envelope.
- Relative A vertex falling only within an outer envelope will not receive 100% weighting. A vertex must either fall inside two or more outer envelopes whose gradients sum to 100% or greater or the vertex must fall within a red inner envelope to have 100% weight. Any points within a red inner envelope will be 100% locked to that bone. Vertices falling within multiple inner envelopes will receive weighting distributed over those bones.
- Envelope Visibility
- Determines the visibility of unselected envelopes. Choose a bone in the list and click Envelope Visibility, then choose another bone in the list. The first bone selected remains visible. Use this to work on two or three envelopes.
- Falloff Flyouts
- Choose a falloff curve for the displayed envelopes.
Weight falls off in the area between the inner and outer envelope boundaries if envelopes overlap and Absolute is turned on. This setting lets you specify how the falloff is handled:
- Falloff Fast Out Weight falls off quickly.
- Falloff Slow Out Weight falls off slowly.
- Falloff Linear Weight falls off in a linear way.
- Falloff Sinual Weight falls off in a sinusoidal way.
- Copy
- Copies the currently selected envelope size and shape to memory. Turn on sub-object Envelopes, choose one bone in the list, click Copy, then choose another bone in the list and click Paste to copy an envelope from one bone to another.
Paste commands are on a flyout with the following options:
- Paste Pastes the copy buffer to the current selected bone.
- Paste to All Bones Pastes the copy buffer to all bones in the modifier.
- Paste to Multiple Bones Pastes the copy buffer to selected bones. A dialog allows you to choose the bones to paste to.
Weight Properties group
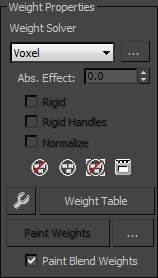
- Weight Solver
- A weight solver adjusts vertices to nearby bones procedurally using either of two methods and associated parameters. Applies to selected vertices, or if no vertices are selected, to all vertices.
- Abs. Effect
- Enter an absolute weight for the selected bone to selected vertices.
Choose the Envelope sub-object level, turn on Vertices in the Parameters rollout
 Select group, select a vertex or vertices, and then use the Abs. Effect spinner to assign weight. Selected vertices move in the viewports as their weight changes.
- Rigid
- Causes selected vertices to be influenced only by one bone, the one with the most influence.
- Rigid Handles
- Causes the handles of selected patch vertices to be influenced by only one bone, the one with the most influence.
- Normalize
- Forces the total weights of each selected vertex to add up to 1.0.
- Exclude Selected Verts
- Adds the currently selected vertices to the exclusion list for the current bone. Any vertices in this exclusion list will not be affected by this bone.
- Include Selected Verts
- Takes the selected vertices out of the exclusion list for the selected bone. The bone can then affect these vertices.
- Select Excluded Verts
- Selects all vertices excluded from the current bone (see Exclude Selected Verts, preceding).
- Bake Selected Verts
- Click to bake the current vertex weights. Baked weights are not affected by envelope changes, only by changes to Abs. Effect or weights in the Weight Table.
- Weight Tool
- Displays the Weight Tool dialog, which offers control tools to help you assign and blend weights on selected vertices.
- Weight Table
- Displays a table for viewing and changing weights for all bones in the skeletal structure.
- Paint Weights
- Click and drag the cursor over vertices in the viewports to brush on weights for the selected bone.
Tip: Streamline the painting process by using the Brush Presets tools.
-
 Painter Options [ellipsis]
 - Opens the Painter Options dialog, where you can set parameters for weight painting.
- Paint Blend Weights
- When on, blends painted values by averaging the weights of neighboring vertices and then applying the average weight based on the brush strength. Default=on.