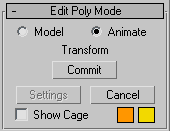
This rollout provides access to Edit Poly's two modes of operation: Model, for modeling, and Animate, for animation of modeling effects. For example, you can animate the Taper and Twist settings for polygons extruded along a spline.
During and between sessions, 3ds Max remembers the current mode for each object separately. The same mode remains active at all sub-object levels.
Edit Poly Mode also gives you access to the current operation's caddy, if any, and lets you commit to or cancel out of modeling and animation changes.
- Model
-
Lets you model using the Edit Poly functions. Operations in Model mode cannot be animated.
- Animate
-
Lets you animate using the Edit Poly functions.
In addition to choosing Animate, you must turn on Auto Key or use Set Key for animating sub-object transforms and parameter changes. Alternatively, in Animate mode you can apply a single command, such as Extrude or Chamfer, to an animated sub-object selection passed up the stack.
Tip: If you use Set Key to animate with Edit Poly, be sure to turn on Key Filters Modifiers. Note: The Edit Poly modifier can store any number of keyframes animating a single operation, such as transforming polygons, on the same sub-object selection. Use additional Edit Poly modifiers to:
- animate other parts of the object
- animate repeated applications of the same operation on the same sub-object selection
- animate repeated applications of a different operation on the same sub-object selection
For example, say you want to animate a polygon extruding from an object from frame 1 to 10, and then moving back to the original position over the next 10 frames. You can accomplish this with a single Edit Poly modifier using the Extrude function, setting one keyframe at 10 and another at 20. However, say you want to animate a polygon extruding outward, and then animate movement of one of the resultant side polygons. In that case, you'd need two Edit Poly modifiers: one for the extrusion, and another for the poly transform.
Tip: While modeling in Animate mode, you can use Commit to freeze the animation at the current frame. - [label]
-
Shows the current command, if any. Otherwise, it shows <No Current Operation>.
When you're working in Model mode using direct manipulation (that is, working in the viewports), the label shows the current operation during drag operations, and then returns to the unavailable state.
When you're working in Model mode using a caddy, or in Animate mode using direct manipulation or a caddy, the label continually shows the current operation.
- Commit
-
In Model mode, using a caddy, accepts any changes and closes the caddy (same as the OK button on the caddy). In Animate mode, freezes the animated selection in its state at the current frame and closes the dialog. Any existing keyframes are lost.
Tip: Commit lets you use animation as a modeling aid. For example, you could animate a vertex selection between two positions, scrub between the two to find a suitable in-between position, and then use Commit to freeze the model at that point. - Settings
-
Toggles the caddy for the current command.
- Cancel
-
Cancels the most recently used command.
- Show Cage
-
Toggles the display of a two-color wireframe that shows the editable poly object before modification or subdivision. The cage colors are shown as swatches to the right of the checkbox. The first color represents unselected sub-objects, and the second color represents selected sub-objects. Change a color by clicking its swatch. The Show Cage toggle is available only at sub-object levels.
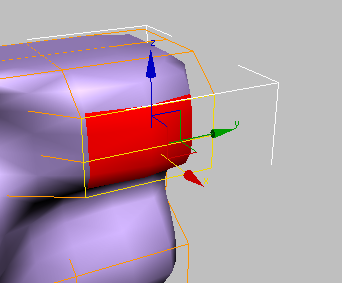
The cage displays the original structure of the edited object.
Typically this feature is used in conjunction with the MeshSmooth modifier because it lets you easily toggle visibility of the unsmoothed base object while simultaneously viewing the smoothed result, but it works with any modifier.
Tip: Show Cage is also particularly helpful when used with the Symmetry modifier.