![]()
At the Edit Poly Border sub-object level, you can select single and multiple borders and transform them using standard methods. This topic covers the Edit Geometry and Edit Borders rollouts; for other controls, see Edit Poly Modifier.
Procedures
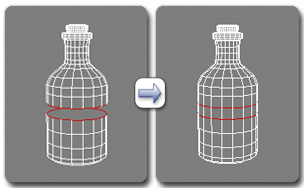
To create a polygon that closes the surface at the selected border:
- At the Border sub-object level, select any open edge.
This selects the entire closed loop of continuous open edges that make up the border selection.
- Click Cap.
Interface
Edit Poly Mode rollout
See Edit Poly Mode Rollout for information on the Edit Poly Mode rollout settings.
Selection rollout
See Selection Rollout (Edit Poly Modifier) for information on the Selection rollout settings.
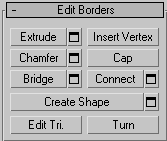
Edit Borders rollout

This rollout includes commands specific to editing borders.
- Extrude
- Lets you extrude a border manually via direct manipulation in the viewport. Click this button, and then drag vertically on any border to extrude it.
Extruding a border moves it along a normal and creates new polygons that form the sides of the extrusion, connecting the border to the object. The extrusion can form a varying number of additional sides, depending on the geometry near the border. As you increase the length of the extrusion, the base increases in size, to the extent of the vertices adjacent to the extruded border's endpoints.
Following are important aspects of border extrusion:
- When the mouse cursor is over a selected border, it changes to an Extrude cursor.
- To specify the extent of the extrusion, drag vertically, and to set the size of the base, drag horizontally.
- With multiple borders selected, dragging on any one extrudes all selected borders equally.
- While the Extrude button is active, you can extrude other borders in turn by dragging them. Click Extrude again or right-click in the active viewport to end the operation.
-
 Extrude Settings Opens the
Extrude Edges caddy, which lets you perform extrusion via interactive manipulation.
If you click this button after performing a manual extrusion, the same extrusion is performed on the current selection as a preview and the caddy opens with Extrusion Height set to the amount of the last manual extrusion.
- Insert Vertex
- Lets you subdivide border edges manually.
After turning on Insert Vertex, click a border edge to add a vertex at that location. You can continue subdividing border edges as long as the command is active.
To stop inserting vertices, right-click in the viewport, or click Insert Vertex again to turn it off.
- Chamfer
- Click this button and then drag a border in the active object. The border need not be selected first.
If you chamfer multiple selected borders, all of them are chamfered identically. If you drag an unselected border, any selected borders are first deselected.
A border chamfer essentially “frames” the border edges, creating a new set of edges paralleling the border edges, plus new diagonal edges at any corners. These new edges are exactly <chamfer amount> distance from the original edges. New chamfer faces are created with the material ID of one of the neighboring faces (picked at random) and a smoothing group which is an intersection of all neighboring smoothing groups.
Alternatively, you can create open space around the chamfered borders, essentially cutting away at the open edges; for details, see Chamfer.
 Chamfer Settings Opens the
Chamfer Edges caddy, which lets you chamfer borders via interactive manipulation and toggle the Open option.
If you click this button after performing a manual chamfer, the same chamfer is performed on the current selection as a preview and the dialog opens with Chamfer Amount set to the amount of the last manual chamfer.
- Cap
- Caps an entire border loop with a single polygon.
Select the border, and then click Cap.
Note: New faces that are generated are assigned to a new smoothing group, creating a visually appealing result.
- Bridge
- Connects pairs of borders on an object with polygon “bridges.” There are two ways to use Bridge in Direct Manipulation mode (that is, without opening the Bridge Settings dialog):
- Select an even number of borders on the object, and then click Bridge. This immediately creates the bridge between each pair of selected borders using the current Bridge settings, and then deactivates the Bridge button.
- If no qualifying selection exists (that is, two or more selected borders), clicking Bridge activates the button and places you in Bridge mode. First click a border edge and then move the mouse; a rubber-band line connects the mouse cursor to the clicked edge. Click a second edge on a different border to bridge the two. This creates the bridge immediately using the current Bridge settings; the Bridge button remains active for connecting more pairs of borders. To exit Bridge mode, right-click the active viewport or click the Bridge button.
The new polygons that result from a Bridge operation are automatically selected; you can see this by accessing the Polygon sub-object level.

Using Bridge at the Border level.
Note: Bridge always creates a straight-line connection between border pairs. To make the bridge connection follow a contour, apply modeling tools as appropriate after creating the bridge. For example, bridge two borders, and then use Bend. Bridge Settings Opens the
Bridge caddy, which lets you connect pairs of borders via interactive manipulation.
- Connect
- Creates new edges between pairs of selected border edges. The edges are connected from their midpoints.
You can connect only edges on the same polygon.
Connect will not let the new edges cross. Thus, for example, if you select all four edges of a four-sided polygon and then click Connect, only neighboring edges are connected, resulting in a diamond pattern.
 Connect Settings Lets you preview the Connect and specify the number of edge segments created by the operation. To increase the mesh resolution around the new edge, increase the Connect Edge Segments setting.
- Create Shape
-
After selecting one or more borders, click this button to create a spline shape or shapes from the selected edges, using the current settings from the Create Shape Settings dialog (see following).
The new shape's pivot is placed at the same location as that of the Edit Poly object.
-
 Create Shape Settings
 -
Lets you preview the Create Shape function, name the shape, and set it to Smooth or Linear.
- Edit Tri[angulation]
- Lets you modify how polygons are subdivided into triangles by drawing internal edges, or diagonals.
To edit triangulation manually, turn on this button. The hidden edges appear. Click a polygon vertex. A rubber-band line appears, attached to the cursor. Click a non-adjacent vertex to create a new triangulation for the polygon.
Tip: For easier editing of triangulation, use the Turn command instead (see following). - Turn
- Lets you modify how polygons are subdivided into triangles by clicking diagonals. When you activate Turn, the diagonals become visible as dashed lines in wireframe and edged-faces views. In Turn mode, click a diagonal to change its position. To exit Turn mode, right-click in the viewport or click the Turn button again.
Each diagonal has only two available positions at any given time, so clicking a diagonal twice in succession simply returns it to its original position. But changing the position of a nearby diagonal can make a different alternate position available to a diagonal.
For more information on how to use Turn with the enhanced Cut tool, see this procedure.
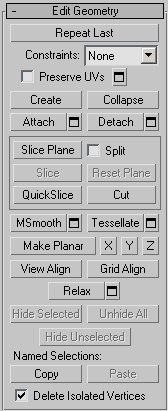
Edit Geometry rollout

For detailed descriptions of these controls, see Edit Geometry Rollout (Polymesh and Edit Poly).
Paint Deformation rollout
Paint Deformation lets you stroke elevated and indented areas directly onto object surfaces. For more information, see Paint Deformation Rollout (Polymesh).