The Light Tracer provides soft-edged shadows and color bleeding for brightly-lit scenes such as outdoor scenes.
-
Main toolbar >
 (Render Setup) > Render Setup dialog > Choose Default Scanline Renderer as the active production renderer. > Advanced Lighting panel > Select Advanced Lighting rollout > Choose Light Tracer from the drop-down list.
The Light Tracer is typically used in conjunction with a Skylight. While you can use light tracing for indoor scenes, radiosity is usually the better choice for such scenes.
Unlike radiosity, the Light Tracer does not attempt to create a physically accurate model, and can be easier to set up.
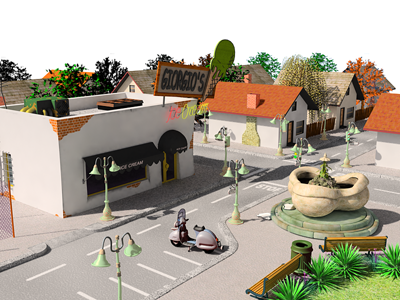
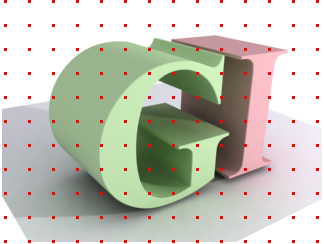
Outdoor scene lit by Skylight and rendered with light tracing

General Settings group
- Global Multiplier
- Controls the overall lighting level. Default=1.0.
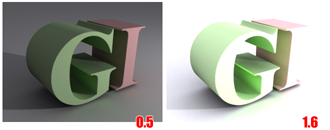
Left: Lower Global Multiplier value.
Right: Higher Global Multiplier value
- Object Multiplier
- Controls the level of light reflected by objects in the scene. Default=1.0.
Note: This setting has little effect unless Bounces is greater than or equal to 2.
- Sky Lights [toggle]
- When on, enables regathering from the Skylights in the scene. (A scene can contain more than one Skylight.) Default=on.
- Sky Lights [amount]
- Scales the intensity of the Skylights. Default=1.0.

Above: Increasing the Sky Lights value.
Below: Increasing the Object Multiplier value
- Color Bleed
- Controls the strength of color bleeding. Color bleeding results when light is interreflected among scene objects. Default=1.0.
Note: This setting has little effect unless Bounces is greater than or equal to 2.
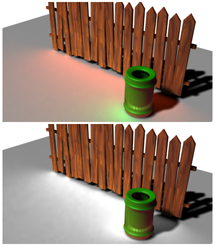
Above: Excessive color bleeding.
Below: Color bleeding eliminated by setting Color Bleed to 0.0
- Rays/Sample
- The number of rays cast per sample (or pixel). Increasing this value increases the smoothness of the effect, at a cost of render time. Decreasing this value results in a grainier effect, but renders more quickly. Default=250.
Tip: To get a “first draft” preview of the effect of light tracing, reduce the value of Rays/Sample and the Filter Size.
Changing the number of rays per sample. The higher the value, the less grain.
- Color Filter
- Filters all light falling on objects. Set to a color other than white to tint the overall effect. Default=white.
- Filter Size
- The size, in pixels, of the filter used to reduce noise in the effect. Default=0.5.
Tip: Filter Size is especially useful when Adaptive Undersampling is turned off, and Rays/Sample has a low value.
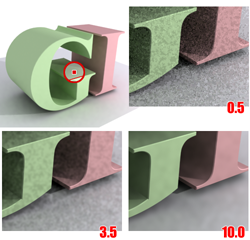
Increasing Filter Size reduces noise in the rendering.
- Extra Ambient
- When set to a color other than black, adds that color as extra ambient light on objects. Default=black.
- Ray Bias
- Ray Bias, like Shadow Bias , adjusts the positioning of the bounced light effects. Use it to correct rendering artifacts, such as the banding that can occur when an object casts shadows on itself. Default=0.03.
- Bounces
- The number of light-ray bounces that are traced. Increasing this value increases the amount of color bleeding. Lower values give faster results with less accuracy, and typically produce darker images. Higher values allow more light to flow through the scene, resulting in brighter, more accurate images at a cost of rendering time. Default=0.
When Bounces equals 0, the Light Tracer disregards volumetric lighting.
Tip: If your scene has transparent objects such as glass, increase Bounces to be greater than zero. Be aware that this increases rendering time.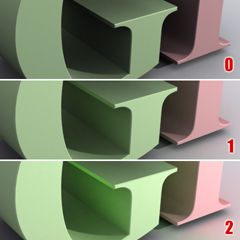
Increasing the number of bounces increases the level of global illumination and the amount of color bleeding in the rendering.
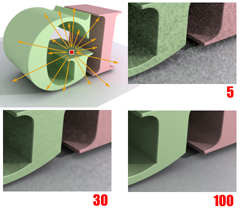
- Cone Angle
- Controls the angle used for regathering. Reducing this value can result in slightly higher contrast, especially in regions where lots of small geometry casts shadows on a larger structure. Range=33.0 to 90.0. Default=88.0.
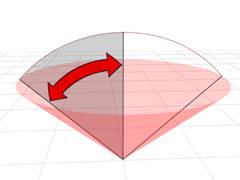
All rays initially cast are limited by the cone angle
- Volumes [toggle]
- When on, the Light Tracer regathers light from volumetric lighting effects such as Volume Light and Volume Fog. Default=on.
For volumetric lighting to work with light tracing, Bounces must be greater than 0.
- Volumes [amount]
- Multiplies the amount of light regathered from volumetric lighting effects. Increase to increase their impact on the rendered scene, decrease to decrease their effect. Default=1.0.
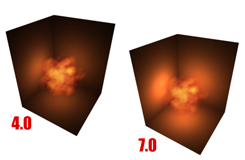
Increasing the Volumes value increases the effect of volumetric lighting in the rendering.
Adaptive Undersampling group
These controls can help you speed up rendering time. They reduce the number of light samples taken. The ideal settings for undersampling vary greatly from scene to scene.
Undersampling initially takes samples from a grid superimposed on the pixels of the scene. Where there is enough contrast between samples, it subdivides that region and takes further samples, down to the minimum area specified by Subdivide Down To. Lighting for areas not directly sampled is interpolated.
Initial sampling uses a regular grid.
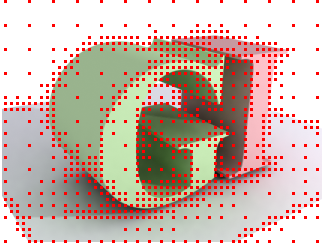
Adaptive undersampling concentrates on transition areas.
- Adaptive Undersampling
- When on, the Light Tracer uses undersampling. When off, it samples every pixel. Turning this off can increase the detail of the final rendering, but at a cost of rendering time. Default=on.
- Initial Sample Spacing
- The grid spacing for the initial samples of the image. This is measured in pixels. Default=16x16.
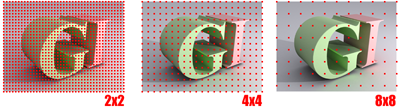
Initial sample spacing values
- Subdivision Contrast
- The contrast threshold that determines when a region should be further subdivided. Increasing this value causes less subdividing to occur. Too low a value can cause unnecessary subdividing. Default=5.0.
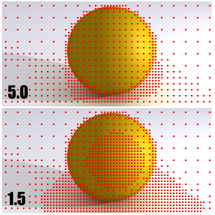
Decreasing the subdivision contrast threshold can reduce noise in soft shadows and bounced lighting.
- Subdivide Down To
- The minimum spacing for a subdivision. Increasing this value can improve render time at a cost of accuracy. Default=1x1.
Depending on the scene geometry, grids larger than 1x1 might still be subdivided below this specified threshold.
- Show Samples
- When on, sample locations render as red dots. This shows where the most sampling has taken place, which can help you choose the optimal settings for undersampling. Default=off.