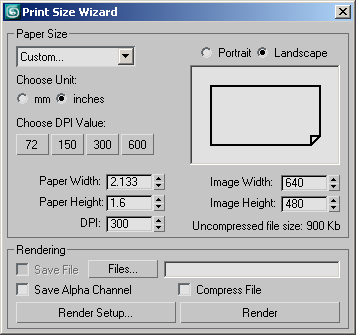
Provides the options for printing a rendering.

Paper Size group
- [drop-down list]
- The Paper Size drop-down list lets you choose from several standard print resolutions and aspect ratios. Choose one of these formats, or leave it set to Custom to use the other controls in the Paper Size group. These are the options you can choose from on the list:
- Custom
- A - 11 x 8.5 in. (at 300 dpi)
- B - 17 x 11 in. (at 200 dpi)
- C - 22 x 17 in. (at 150 dpi)
- D - 34 x 22 in. (at 100 dpi)
- E - 44 x 34 in. (at 75 dpi)
- A0 - 1189 x 841 mm (at 75 dpi)
- A1 - 841 x 594 mm (at 100 dpi)
- A2 - 594 x 420 mm (at 150 dpi)
- A3 - 420 x 297 mm (at 200 dpi)
- A4 - 297 x 210 mm (at 300 dpi)
- A5 - 210 x 148 mm (at 300 dpi)
- Letter (11 x 8.5 in. at 300 dpi)
- Legal (14 x 8.5 in. at 300 dpi)
- Tabloid (17 x 11 in. at 300 dpi) Tip: You can customize the Paper Size list by editing the file plugcfg\printwiz.ini . If you choose to edit the file, first be sure to save a backup copy of the original.
- Portrait/Landscape
- Choose Portrait for vertically oriented output or Landscape for horizontal output. The window image provides a graphic depiction of the orientation. Note: Changing between Portrait and Landscape simply switches the Width and Height settings. The actual orientation depends on the image dimensions. For example, if you choose Portrait, and then specify a custom size whose width is greater than its height, the resulting orientation will be horizontal.Tip: After changing this setting, be sure to preview the image using the Show Safe Frames function on the Point-Of-View (POV) viewport label menu. This shows how the output orientation corresponds to the viewport.
- Choose Unit
- Lets you specify whether the measurement units for Paper Width and Paper Height are in millimeters (mm) or inches.
- Choose DPI Value
- Provides four buttons for commonly used dots-per-inch settings: 72, 150, 300, and 600. Click one to set it in the DPI property, below.
- Paper Width/Height
- Specifies the output width and height in mm (millimeters) or inches, depending on which is chosen under Choose Unit. Note: Changing either setting also changes the corresponding Image size setting.
- Image Width/Height
- Specifies the output width and height in pixels. Note: Changing either setting also changes the corresponding Paper size setting.
- DPI
- Specifies the output resolution in dots per inch. The easiest way to set this is by clicking one of the buttons under Choose DPI Value. If you're using a different resolution, set it here manually.
Only TIFF files support DPI information. If you render to a different image format, you might have to later adjust the image resolution using an image-processing application.
Note: Changing the DPI setting also changes the Image Width/Height settings, keeping the same aspect ratio. - Uncompressed File Size
- Displays the size of the rendered TIFF image file if no compression is used.
Rendering group
Rendering directly from the Print Size Wizard allows you to output the current frame to a disk file in TIFF format. This format is commonly used in the publishing industry. To render to a different format, use the wizard's Render Setup button.
- Save File
- When on, 3ds Max saves the rendered image to disk when you render. Save File is available only after you specify the output file using the Files button. Default=off.
- Files
- Opens the Select TIFF File dialog, which lets you specify the output file name and location. If, during the current session, you already rendered an image to disk using the Render Setup dialog, the last file name you used appears in this field.
- Save Alpha Channel
- When on, 3ds Max includes an eight-bit alpha channel in the rendered TIFF file. Default=off.
- Compress File
- When on, uses compression when saving the file.
- Render Setup
- Opens the Render Setup dialog and transfers any settings (such as image size) you've made in the Print Size Wizard. Here you can make further changes and then render the scene.
- Render
- Renders the scene to the Rendered Frame Window. Also renders to a disk file if you've turned on Save File and specified a file name.