A target camera views the area around the target icon that you place when you create the camera. A target camera is easier to aim than a free camera because you simply position the target object at the center of interest.
You can animate both the target camera and its target to create interesting effects. To animate both the target and camera along a path, it is best to link them both to a dummy object, then animate the dummy.
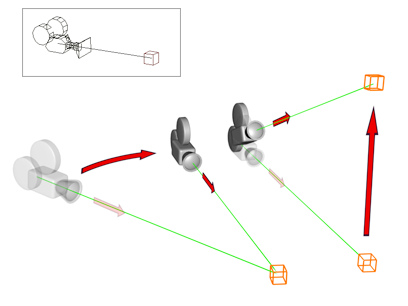
Target cameras always face their target.
Working with the Target Object
The distance from the camera to the target is displayed at the bottom of the Parameters rollout. You can animate this parameter, or directly animate the target object's location.
When you rename a target camera, the target is automatically renamed to match. For example, renaming Camera01 to Rolli causes Camera01.Target to become Rolli.Target. The target's name must have the extension .Target. Renaming the target object does not rename the camera object.
Clicking the line that connects the camera and its target selects both objects. However, region selection doesn't recognize the link line.
If a target camera is already selected, you add its target to the selection by right-clicking the camera, and then choosing Select Target from the quad menu  Tools1 quadrant. Or you can hold down the
Ctrl key and click the target to add it to the selection set.
Tools1 quadrant. Or you can hold down the
Ctrl key and click the target to add it to the selection set.