The Common Parameters rollout sets parameters common to all renderers.
-
Main toolbar >
 (Render Setup) > Render Setup dialog > Common panel > Common Parameters rollout

Time Output group
Select which frames you want to render.
- Single The current frame only.
- Every Nth frame Regular sample of frames. For example, type 8 to render every 8th frame. Available only for Active Time Segment and Range output.
- Active Time Segment The active time segment is the current range of frames as shown on the track bar.
- Range All the frames between and including the two numbers you specify.
- File Number Base Specifies the base file number, from which the file name will increment. Range= –99,999 to 99,999. Available only for Active Time Segment and Range output.
- Frames Nonsequential frames separated by commas (for example, 2,5) or ranges of frames, separated by hyphens (for example, 0-5).
For example, if you set the range to 0-3, Every Nth Frame to 1, and the File Number Base to 15, the output files are file0015, file0016, file0017, file0018.
You can specify a negative number base, as well. For example, if you're rendering frames 50–55, and set the File Number Base to -50, the result is file-050, file-051, file-052, file-053, file-054, file-055.
Area to Render group
Select the area you want to render.
- View Renders the active viewport.
- Selected Renders the selected object(s) in the active viewport.
- Region Move the bounding box by dragging inside it, or use the handles to set the area you want to render in the active viewport. To preserve the aspect ratio, press and hold
Ctrl.
Note: In Production mode, the Rendered Frame window is cleared before rendering, but in Iterative mode, the area of the window outside the region remains intact.
- Crop Specify the size of the output image by moving the bounding box by dragging inside it, or using the handles to set the area you want to render in the active viewport.
- Blowup Move the bounding box by dragging inside it, or use the handles to set the area you want to enlarge and render in the active viewport. The region is enlarged to fill the output display. The window is constrained to the aspect ration of the current output size.
- Auto Region Selected
- Sets the region to the current selection automatically.
Output Size group
Choose one of the predefined sizes or enter another size in the Width and Height fields (in pixels). These controls affect the image's resolution and aspect ratio.
- [drop-down list]
- The Output Size drop-down list lets you choose from several industry-standard film and video aspect ratios. Choose one of these formats and then use the remaining group controls to set the output resolution. Alternatively, to set your own aspect ratio and resolution, use the Custom option. The default is HDTV 1280 x 720. These are the options you can choose from on the list:
- Custom
- 35mm 1.316:1 Full Aperture (cine)
- 35mm 1.37:1 Academy (cine)
- 35mm 1.66:1 (cine)
- 35mm 1.75:1 (cine)
- 35mm 1.85:1 (cine)
- 35 MM Anamorphic (2.35:1)
- 35 MM Anamorphic (2.35:1) (Squeezed)
- 70mm Panavision (cine) (Image Aspect: 2.20)
- 70mm IMAX (cine) (Image Aspect: 1.36420)
- VistaVision (Image Aspect: 1.50)
- 35mm (24mm X 36mm) (slide) (Image Aspect: 1.50)
- 6cm X 6cm (2 1/4" X 2 1/4") (slide) (Image Aspect: 1.0)
- 4" X 5" or 8" X 10" (slide) (Image Aspect: 1.250)
- NTSC D-1 (video) (Image Aspect: 1.3333)
- NTSC DV (video) (Image Aspect: 1.350)
- PAL (video) (Image Aspect: 1.3333)
- PAL D-1 (video) (Image Aspect: 1.3333)
- HDTV (video) (Image Aspect: 1.77778).
Note: The values of the Image Aspect and Width and Height buttons can change, depending on which output format you choose from this list. - Aperture Width (mm)
- Lets you specify an aperture width for the camera that creates the rendered output. Changing this value changes the camera's Lens value. This affects the relationship between the Lens and the FOV values, but it doesn't change the camera's view of the scene.
For example, if you have a Lens setting of 43.0 mm, and you change the Aperture Width from 36 to 50, when you close the Render Setup dialog (or render), the camera Lens spinner has changed to 59.722, but the scene still looks the same in the viewport and the rendering. If you use one of the preset formats rather than Custom, the aperture width is determined by the format, and this control is replaced by a text display.
- Width and Height
- Let you set the resolution of the output image by specifying the width and the height of the image, in pixels. With Custom format, you can set these two spinners independently. With any other format, the two spinners are locked to the specified aspect ratio, so adjusting one alters the other. The maximum width and height is 32,768 x 32,768 pixels.
- Preset resolution buttons (320x240, 640x480, and so on)
- Click one of these buttons to choose a preset resolution. You can customize these buttons: right-click a button to display the Configure Preset dialog, which lets you change the resolution specified by the button.
- Image Aspect
- The proportions of the image: the ratio of width to height. Changing this value changes the Height value to maintain the correct dimensions for the active resolution. When you use a format other than Custom from the drop-down list in this group, the aspect ratio is fixed and displays as a read-only field.
In 3ds Max, the Image Aspect value is always expressed as a multiplier value. In written descriptions of film and video, often aspect ratio is also described as a ratio. For example, 1.33333 (the default Custom aspect ratio) is often expressed as 4:3. This is the standard aspect ratio for broadcast video (both NTSC and PAL) when letterboxing is not used. (Letterboxing shows the full width of a wide-screen film format, framed by black regions above and below.)
 When using a custom output size, the lock button to the right of Image Aspect locks the aspect ratio at its current value. When it is on, the Image Aspect spinner is replaced by a label, and the Width and Height fields are locked together; adjusting one alters the other to maintain the aspect-ratio value.
In addition, when the aspect ratio is locked, altering the Pixel Aspect value alters the Height value to maintain the aspect-ratio value.
Note: In viewports, the camera's cone changes to reflect the image aspect ratio you set in the Render Setup dialog. This change takes place when you exit the Render Setup dialog.
When using a custom output size, the lock button to the right of Image Aspect locks the aspect ratio at its current value. When it is on, the Image Aspect spinner is replaced by a label, and the Width and Height fields are locked together; adjusting one alters the other to maintain the aspect-ratio value.
In addition, when the aspect ratio is locked, altering the Pixel Aspect value alters the Height value to maintain the aspect-ratio value.
Note: In viewports, the camera's cone changes to reflect the image aspect ratio you set in the Render Setup dialog. This change takes place when you exit the Render Setup dialog. - Pixel Aspect
- Sets the aspect ratio of the pixels for display on another device. The image might look squashed on your display but will display correctly on the device with differently shaped pixels. If you use one of the standard formats rather than Custom, you can't change the pixel aspect ratio and this control is disabled.
The lock button to the left of Pixel Aspect locks the pixel-aspect ratio. When it is on, the Pixel Aspect spinner is replaced by a label, and you can't change the value. This button is available only with the Custom format.
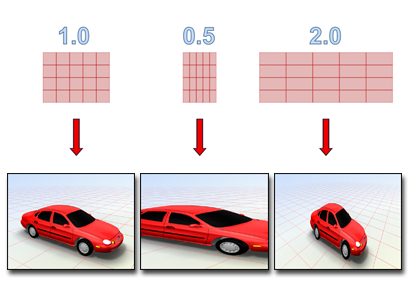
Images with different pixel aspects appear stretched or squashed on a monitor with square pixels.
Note: For standard NTSC, the pixel aspect ratio is 0.9. If you are creating 16:9 (0.778) anamorphic images for NTSC, the pixel aspect ratio should be 1.184. (As in the previous discussion of Image Aspect, this assumes the image is not letterboxed.)
Options group
- Atmospherics
- Renders any applied atmospheric effects, such as volume fog, when turned on.
- Effects
- Renders any applied rendering effects, such as Blur, when turned on.
- Displacement
- Renders any applied displacement mapping.
- Video Color Check
- Checks for pixel colors that are beyond the safe NTSC or PAL threshold and flags them or modifies them to acceptable values.
By default, "unsafe" colors render as black pixels. You can change the color check display by using the Rendering panel of the Preference Settings dialog.
- Render to Fields
- Renders to video fields rather than frames. Use this when creating animations for video.
- Render Hidden Geometry
- Renders all geometric objects in the scene, even if they are hidden.
- Area Lights/Shadows as Points
- Renders all area lights or shadows as if they were emitted from point objects, speeding up rendering time.
Tip: This option is useful for draft renderings, as point lights render much faster than area lights.Note: Scenes with radiosity are not affected by this toggle, as area lights do not have a significant effect on the performance of a radiosity solution.
- Force 2-Sided
- 2-Sided rendering renders both sides of all faces. Usually, you'll want to keep this option off to speed rendering time. You may want to turn it on if you need to render the inside as well as the outside of objects, or if you've imported complex geometry in which the face normals are not properly unified.
- Super Black
- Super Black rendering limits the darkness of rendered geometry for video compositing. Leave off unless you're sure you need it.
Advanced Lighting group
- Use Advanced Lighting
- When on, 3ds Max incorporates a radiosity solution or light tracing in the rendering.
- Compute Advanced Lighting When Required
- When on, 3ds Max computes radiosity when required on a per-frame basis.
Normally, when rendering a series of frames, 3ds Max calculates radiosity only for the first frame. If, in an animation, it might be necessary to recalculate the advanced lighting in subsequent frames, turn this option on. For example, a brightly painted door might open and affect the coloring of a nearby white wall, in which case the advanced lighting should be recalculated.
Bitmap Performance and Memory Options group
Displays whether 3ds Max is using full-resolution maps or bitmap proxies for rendering. To change this setting, click the Setup button.
- Setup
- Click to open the Global Settings and Defaults for Bitmap Proxies dialog.
Render Output group
- Save File
- When on, 3ds Max saves the rendered image or animation to disk when you render. Save File is available only after you specify the output file using the Files button.
- Files
- Opens the Render Output File dialog, which lets you specify the output file name, format, and location.
You can render to any of the still or animated image file formats that are writable.
If you render multiple frames to a still-image file format, the renderer renders individual frame files and appends sequence numbers to each file name. You can control this with the File Number Base setting.
- Put Image File List(s) in Output Path(s)
- Turn on to create an image sequence (IMSQ) file, and save it in the same directory as the rendering. Default=off.
3ds Max creates one IMSQ file (or IFL file) per render element. The files are created when you click Render or Create now. They are generated before the actual rendering.
Image sequence files can be created by the following kinds of rendering:
- The Render Setup dialog
- The Render command
- Batch rendering
- Command-line rendering
- MAXScript rendering
- ActiveShade rendering
They are not created by the following kinds of rendering:
- Rendering to textures
- Video Post rendering
- Rendering a panorama
- Create Now
- Click to create the image sequence file “by hand.” You must first choose an output file for the rendering itself.
- [image sequence file type]
- Choose one of the following:
- Autodesk ME Image Sequence File (.imsq) When chosen (the default), creates an Image Sequence (IMSQ) file.
- Legacy 3ds max Image File List (.ifl) When chosen, creates an Image File List (IFL) file of the kind created by previous versions of 3ds Max.
- Use Device
- Sends the rendered output to a device such as a video recorder. First click the Devices button to specify the device, for which an appropriate driver must already be installed.
- Rendered Frame Window
- Displays the rendered output in the Rendered Frame Window.
- Skip Existing Images
- When activated and Save File is on, the renderer will skip images in a sequence that have already been rendered to disk.