To view a wider area, do either of the following:
- Use the FOV spinner to increase the camera's field of view.
- Click a button with a shorter focal length. Use the Lens spinner to give the focal length a value other than the preset "stock" values on the buttons.
To view a narrower area, do either of the following:
- Change the FOV parameter to decrease the camera's field of view.
- Click a button with a longer focal length. Use the Lens parameter to give the focal length a value other than the preset "stock" values on the buttons.
In a camera viewport, the FOV button lets you adjust the field of view interactively.
The camera viewport Perspective button also changes the FOV in conjunction with dollying the camera.
Note: Only the FOV value is saved with the camera. The focal length value is merely an alternative way to express and select the FOV.
To set the camera lens size:
- In the Stock Lenses group, click a button to choose a stock focal length.
- Set the Lens spinner to a custom focal length. Tip: If you want to maintain the same lens, avoid using the FOV or Perspective controls among the navigation icon buttons, and don't change the FOV spinner.Attention: When a camera viewport is active, changing the Output Size or (custom) Aperture Width on the Render Setup dialog will change the camera's Lens setting.
To match a camera to a film or video format:
- On the
 Render Setup dialog, in the Output Size group, choose the type of output you want. Use either of the following methods.
 - Choose a preset, such as HDTV (video), from the drop-down list. The Aperture Width is locked to the preset's values.
- Choose Custom, and then set the desired Aperture Width value. (You can adjust the other output values at any later time. They have no affect on the camera lens settings, although they do affect the cropping of the scene.)
- After setting Aperture Width, set the Lens value for the camera to the type of camera lens you want to emulate (for example, 50mm).
To maintain the same lens, avoid using the FOV or Perspective controls among the navigation icon buttons.
To find a lens's focal length:
- To find the focal length of a lens based on changes in aperture width, open the Render Setup dialog, choose Custom from the Output Size drop-down list, and specify a value in the Aperture Width spinner. The new value of the camera's Lens parameter is based on the new Aperture Width value.
To display a camera's cone:
- Turn on Show Cone.
The camera's field-of-view cone appears outlined in light blue.
Note: A camera's cone is always visible while the camera object is selected, regardless of the Show Cone setting.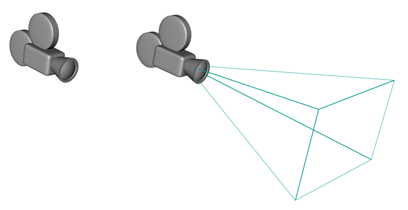
To display a camera's horizon line:
- Turn on Show Horizon.
A dark gray line appears at the level of the horizon in the camera's viewport.
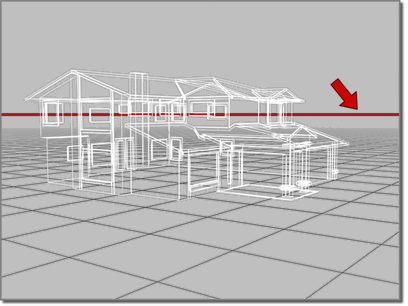
The horizon line shown in the viewport
The horizon line might not be visible if the horizon is beyond the camera's field of view, or if the camera is tilted very high or low.
To change the environment range:
- Adjust the value of Near Range or Far Range.
By default, the Near Range=0.0 and the Far Range equals the Far clipping plane value.
Environment ranges determine the near and far range limits for atmospheric effects you set in the Environment dialog.
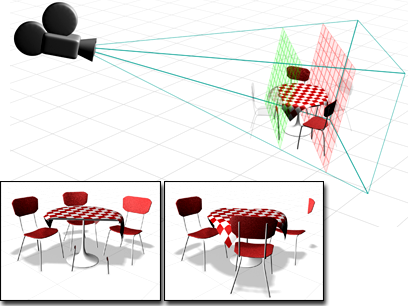
To see the environment ranges in viewports:
- Turn on Show.
The environment range displays as two planes. The plane closest to the camera is the near range and the one farthest from the camera is the far range.
To set clipping planes:
- Turn on Clip Manually.
When Clip Manually is off, the camera ignores the location of the Near and Far clipping planes, and their controls are unavailable. The camera renders all geometry within its field of view.
- Set the Near Clip value to position the near clipping plane.
Objects closer to the camera than the Near distance are not visible to the camera and aren't rendered.
- Set the Far Clip value to position the far clipping plane.
Objects farther from the camera than the Far distance are not visible to the camera and aren't rendered.
You can set the Near clipping plane close to the camera so that it doesn't exclude any geometry, and still use the Far plane to exclude objects. Similarly, you can set the Far clipping plane far enough from the camera that it doesn't exclude any geometry, and still use the Near plane to exclude objects.
The Near value is constrained to be less than the Far value.
If the clipping plane intersects an object, it cuts through that object, creating a cutaway view.
The effect of clipping planes
To apply a multi-pass rendering effect to a scene:
- In the Multi-Pass Effect group, turn on Enable and choose either Depth Of Field or Motion Blur.
- Use the Depth Of Field Parameters rollout or the Motion Blur Parameters rollout to set the values for the effect you chose.
- Activate a camera viewport.
- In the Multi-Pass Effect group, click Preview to preview the effect in the camera viewport.
The Preview button has no effect if a camera viewport isn't active.
- Render the scene or animation.