 Blend Curve Create
Lets you create new blend curves in the scene by placing location constraints. You can also use this tool to edit existing blend curves. Use the Blend Curve Create tool to create the initial shape of the curve. Then you can add, edit, or delete the initial constraints using the constraint tools.
Access this tool from the Blend Curves Toolbox palette:

Blend Curve Options
Knot Spacing
“Knot” is another term for edit point.
Chord – The chord length parameterizes the new curve edit points in current units. The chord length is the cumulative straight line distance between consecutive edit points. The starting point of the curve has the parameter 0.0, and the ending point has the parameter equal to the total chord length of the curve.
Uniform – The new curve edit points have integral parameters: the first edit point is parameter 0.0, the second is 1.0, and so on. This is the default.
Curve Degree
The mathematical degree of the curve created, which control the number of CVs per span: 1 (linear), 2 (quadratic), 3 (cubic), 5 or 7. The default is 5.
Auto Align at Surface Corners
When this option is checked on (default), a blend curve that is snapped to the corner of a surface (or trim surface) is automatically aligned with tangent continuity to one of the edges (or trim edges).
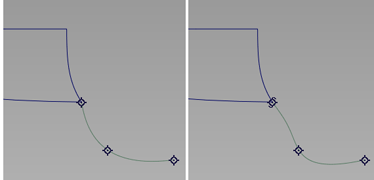
Auto Align at Surface Corner OFF (left) and ON (right).
Curve to Curve Continuity
When this option is set to G2 (default) blend curves align with G2 continuity when they snap to other curves. When set to G0, only positional continuity is guaranteed when snapping to curves.
Pivot Position
Specifies the initial position of the curve's pivot points (both rotation and scaling).
Origin – The pivot points are located at (0, 0, 0).
First CV – The pivot points are located at the position of the first CV, that is, the start of the curve. This is the default.
Last CV – The pivot points are located at the position of the last CV, that is, the end of the curve. The pivots position is re-calculated and displayed every time a new control point is placed (after the first one).
Curve center – The pivot points are located in the middle of the curve, based on arc length. (This is the same position as Snap to Center in the Curve Snap Options box.) The pivots position is re-calculated and displayed every time a new control point is placed (after the first one).
Bounding box center – The pivot points are located at the center of the curve's bounding box. The pivots position is re-calculated and displayed every time a new control point is placed (after the first one).
Blend Curve workflow
Select the Blend Curve Create tool
.Click to place blend points.
If you click on a curve, surface, or mesh, the blend curve is automatically attached to the geometry at that blend point (which is displayed with a slightly different icon). By default, the new blend curve has curvature continuity (G2) with the curve or surface to which it attaches. While the mouse button is held down, you can drag the new constraint on the geometry.
Tip: If the tool cannot tell which curve you meant to snap to, it will show the pick chooser. Point to the hand icon next to the curve you wanted to continue snapping to that curve.Choose the Blend Curve Create tool again to start a new curve.