 Line Tangent
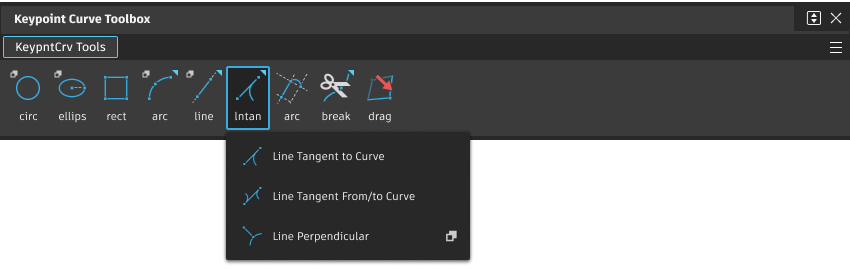
There are three Keypoint Line Tangent tools: Line Tangent to Curve, Line Tangent from/to Curve, and Line Perpendicular:
Line Tangent to Curve
Draws a keypoint line tangent to an existing curve.
Line Tangent From/to Curve
Draws a keypoint line tangent to two curves.
Line Perpendicular
Draws a keypoint line perpendicular from, or to, an existing curve or surface curve (curves on surface, surface edges, isoparms).
The surface curves are treated like normal curves, so that the line is perpendicular to the surface curve, but not normal to the surface. A line perpendicular to a 3D curve at a given point can lie anywhere in a plane normal to the tangent of the curve at that point. The second point selected determines the specific direction of the line, as well as the choice of the True or Projected option.
Access this tool from the Keypoint Curve Toolbox:
Line Perpendicular Options
The option box settings determine the initial values of the buttons that appear at the bottom of the window after choosing the tool.
You can create different instances of the tool on the shelf for each type of Line Perpendicular you plan to create.
Degree
The degree of the Line Perpendicular. Values range from 1 (default) to 7.
Type
True – The line is perpendicular to the curve in 3D space (as seen in the Perspective window) although it may not appear perpendicular in all orthographic views.
Projected – The line appears perpendicular to the given curve in the active orthographic view. For a Perspective window, turn off Perspective in the Viewing Panel to get an orthographic view.
Select
From Curve – The line extends from the selected point on the curve, perpendicular to the curve, and ends as close to the second point as possible. If the second point is selected on a curve, the line ends on that curve.
To Curve – The line extends from the selected point to the selected curve and is perpendicular to the curve.
Keypoint Line Tangent tool workflows
Draw a line tangent to a curve
Click the Line Tangent to Curve tool
.Click the start point of the tangent line.
Click the curve you want the line to be tangent to.
The Line Tangent to Curve tool calculates the end point for the line to be tangent to that curve.
- If it cannot find a tangent, it prints a message in the prompt line.
- If it finds more than one tangent, it uses the tangent closest to where you clicked.
Draw a tangent line between two curves
Click the Line Tangent from/to Curve tool
 .
.Click the first curve the tangent line will touch.
Click the second curve the tangent line will touch.
The Line Tangent from/to Curve tool calculates the line tangent to both curves.
- If it cannot find a tangent, it prints a message in the prompt line.
- If it finds more than one tangent, it uses the tangent closest to where you clicked.
What if...?
I want to edit the coordinates, parallel distance, or angle after I create a line?
Choose Windows > Information Window and change the parallel distance or angle.
The relationships between keypoint curves are maintained until you manually reshape one of the curves.
The tool does not create a true 3D tangent?
The tangent lines are only tangent in the current view. It is only a true 3D tangent if the curve and start point are planar.
To get a true 3D tangent, use the Line tool with curve snapping to place the first point on the curve, then snap to the tangent guideline.
Draw a line perpendicular from a curve
Click the Line Perpendicular tool
 .
.A set of 6 buttons appear in the active window: True|Projected, From Curve|To Curve, Next|Change Settings. The settings from the option box show as active buttons. See Line Perpendicular Options. .
If you need to change the settings, click Change Settings, then:
Click either True or Projected
Click From Curve
Note: If you select Projected while in a Perspective window, you must turn off Perspective in the Viewing PanelShift+Altto get an orthographic view where the line appears as intended.
Select the curve from which you want to make the line perpendicular.
Select a point in space, or a curve.
A keypoint line is created that extends from the point selected on the first curve (to which it is perpendicular) to the location closest to the point selected. If the second item selected was a curve, the line meets the curve at the point closest to where you clicked.
You can modify the position of the start point while in the tool and see the line update interactively. If the second item selected was a point, you can move the end point of the line to adjust its length.You can also type in the line length.
Click Next to create another line perpendicular with the same options. Or click Change Settings to choose different options.
Draw a line perpendicular to a curve
Click the Line Perpendicular tool
.A set of 6 buttons appear in the active window: True|Projected, From Curve|To Curve, Next|Change Settings. The settings from the option box show as active buttons. See Line Perpendicular Options.
If you need to change the settings, click Change Settings, then:
Click either True or Projected
Click To Curve
Note: If you select Projected while in a Perspective window, you must turn off Perspective in the Viewing PanelAltto get an orthographic view where the line appears as intended.
Select a point that will be the end of the perpendicular line. To select a point on geometry, hold the
CtrlorAltkeys to snap to it.Select a curve that the line will be perpendicular to.
A keypoint line is created that extends from the selected point to the selected curve and is perpendicular to the curve.
If no perpendicular line can be found on the curve to the specified point, linear extensions are built at the start or end of the curve, and the perpendicular is built from those.
You can modify the position of the end point while in the tool, and see the line update interactively.
Click Next to create another line perpendicular with the same options. Or click Change Settings to choose different options.