 Line-arc
Allows you to create a series of alternating keypoint lines and arcs.
Access this tool from the Keypoint Curve Toolbox:

Line-arc tool workflows
Draw alternating lines and arcs
Click the Line-arc tool.
Click the first point of the composite curve, or type a 3D coordinate to place the point exactly.

If you click the endpoint of an existing keypoint curve, the new line attaches itself to the end of the existing curve. Dragging the common endpoint moves both curves.
Click the endpoint of the first line segment, or type a 3D coordinate to place the point exactly.

- Click the
 to add the point freely.
 - Click the
 to align the point horizontally to the previous point.
 - Click the
 to align the point vertically to the previous point.
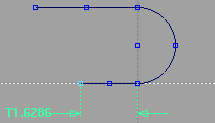
As you drag the end point, the Line-arc tool displays the length of the line in current linear units.
- Click the
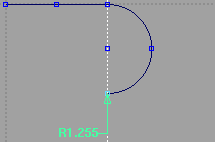
Click the endpoint of the arc segment, or type a 3D coordinate to place the point exactly.
- Click the to add the point freely.
- Click the to align the point horizontally to the previous point.
- Click the to align the point vertically to the previous point.
As you drag the end point, the Line-arc tool displays the radius of the arc in current linear units.
- Click the
You can now:
Repeat steps 3-4 to add more segments.
Click the Line-arc tool to start another composite curve.
Click any other tool to finish the curve.
Tips and notes
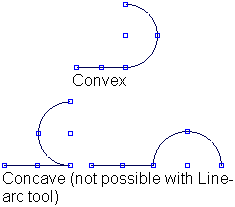
Arcs segments are always convex (the arc always projects “forward” from the previous line). You cannot create concave arcs with the Line-arc tool.
To get concave arcs, you must go back and edit the curve after creating it. See Edit keypoint curves.
Click the endpoint of a segment twice to make the next segment the same type (line or arc).
For example, click the endpoint of a line segment twice to make the next segment a line also. Click the endpoint of an arc segment twice to make the next segment an arc.