 New Edit Point Curve
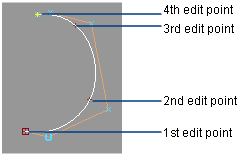
Creates new NURBS curves in the scene by placing edit points.
Access this tool from the Curves tool palette:

Related video
New Edit Point Curve Options
Knot Spacing
A “knot” is the parameter value at an edit point.
Chord – The chord length parameterizes the new curve edit points in current units. The chord length is the cumulative straight line distance between consecutive edit points. The starting point of the curve has the parameter 0.0, and the ending point has the parameter equal to the total chord length of the curve.
Uniform – The new curve edit points have integral parameters: the first edit point is parameter 0.0, the second is 1.0, and so on.
Curve Degree
The mathematical degree of the curve created, which control the number of CVs per span: 1 (linear), 2 (quadratic), 3 (cubic), 5 or 7. The default is 3.
Pivot Position
Specifies the initial position of the curve's pivot points (both rotation and scaling).
Origin – The pivot points are located at (0, 0, 0).
First CV – The pivot points are located at the position of the first CV, that is, the start of the curve. This is the default.
Last CV – The pivot points are located at the position of the last CV, that is, the end of the curve. The pivots position is re-calculated and displayed every time a new control point is placed.
Curve center – The pivot points are located in the middle of the curve, based on arc length. (This is the same position as Snap to Center in the Curve Snap Options box.) The pivots are placed at the first CV until there are enough CVs to form a span, and then are re-calculated and displayed every time a new span is created.
Bounding box center – The pivot points are located at the center of the curve's bounding box. The pivots position is re-calculated and displayed every time a new control point is placed.
Create Guidelines
Create vertical and horizontal guidelines at each point you create.
Show Pick Chooser
The pick chooser appears when edit points are snapped to coincident curves.
New Edit Point Curve workflow
Draw curves by placing edit points
Select the tool.
Click in view windows to place the edit points of the new curve, or type coordinates for the CV locations.

Choose the tool again to start another curve.
Tip: This tool is useful when you want to create a single span curve from two end points.Tip: You can continue drawing curves between view windows. For example, click the first point in the Top window, click the second point in the Back window, and so on.
Connect two points with a straight curve
- Select the tool.
- Click the first point. You can use curve snapping to snap the point to a curve or surface.
- Click the second point.
The new curve is a straight line between the two points. To make the curve tangent or curvature continuous, use the Object Edit > Align > Align tool ![]() to align the new curve with the existing objects, or BlendCrv Tools > Blend Curve Create.
to align the new curve with the existing objects, or BlendCrv Tools > Blend Curve Create.
Add more points to a finished curve
- In the Curve Edit tool palette, use the Add points tool
 .
.
About working with edit points
In theory, moving edit points would be an excellent way to edit a curve, since they lie on the curve itself. Unfortunately, it doesn’t work out that way. This is because the shape of the curve determines the positions of edit points, not the other way around. Alias does allow you to move edit points by “reverse engineering” the curve from the edit point. When you move an edit point, the Move tool tries to find a curve which passes through the new edit point location. Because this process is time-consuming and has an infinite number of solutions, the tool must place constraints on how moving the edit point affects the curve. Because of these constraints, you usually cannot make major changes well by moving edit points. Moving edit points is best for small scale reshaping. The only way to reshape the curve with complete power is by moving CVs.
There are, however, a few tasks that use edit points:
If you want more control in a curve, you can insert an edit point to increase the number of spans in the curve and give you more CVs to work with.
You can also delete edit points to decrease the number of spans in a curve (and probably change the shape of the curve).
It is possible to move edit points to change the shape of a curve, but avoid doing this except for minor adjustments.
Alias does not actually move the edit point itself, but instead moves the CVs to reshape the curve so the edit point is where you specified.