 Curve Fillet
Creates a fillet curve between two existing curves, curves-on-surface, or edges.
Access this tool from the Curves tool palette:

Curve Fillet Control settings
Construction Type
Radius – Produces a fillet where you control the radius value at the center of the fillet (but not the width of the fillet).
Chord – Produces a fillet where you control the distance between the two ends of the fillet (but not the radius). Use the Chordal Length or Tangent Length option to set the distance to maintain.
Section Type
G0 Chamfer – Creates a chamfer edge between the two curves. This type maintains only position continuity with the curves at both ends of the fillet.
G1 Circular – Creates a circular fillet. This type maintains tangent continuity with the curves at both ends of the fillet.
G1 Tangent – Maintains tangent continuity with the curves at both ends of the fillet
G2 Curvature – Maintains curvature continuity (G2) with both curves. G2 continuity means that the curvature (which is the inverse of the radius of curvature) is the same on both sides across the fillet's boundaries.
G3 Curvature – Maintains G3 continuity with both curves. G3 continuity means that the curvature's rate of change is the same on both sides across the fillet's boundaries.
Curvature Side
This option is available only when the Section Type option is set to G2 or G3 Curvature.
Side 1, Side 2 – Make the filet curvature continuous with the first or second set of curves.
Both – Make the fillet curvature continuous with both sets of curves.
Specify
For Radius construction type, with G1 Tangent, G2 Curvature, or G3 Curvature section types, select which values to specify to define the fillet: Tangent Offset, Center Radius, or Both. Both lets you specify both the Tangent Offset and Center Radius of the fillet but not the Form Factor. The form factor is calculated automatically from these two values and varies along the fillet.
Tangent Offset
Radius of a circle that is tangent to both input curves at the endpoints (that is, contact points).
Center Radius
Radius at the center of the fillet (as measured along the arc length).
Radius
For Radius construction type, with a G1 Circular section type. Radius at the center of the fillet (as measured along the arc length).
Form Factor
Adjusts the shape of the fillet. It specifies the ratio between the lengths of the innermost and outermost CV arms of the fillet hull. Values range from 0.1 to 2.0. The smaller the value, the sharper the bend in the fillet.
Chordal Type
For Chord construction type, select which values to specify to define the fillet, Tangent Length or Chordal Length.
Tangent Length – The length of the tangent segment.
Chordal Length – The distance between the two sides of the fillet.
Fillet Plane
Automatic – Uses a fillet plane that is automatically determined.
Specify – Lets you specify the fillet plane using the Fillet Plane Options, or the fillet plane manipulator.
Explicit Control
Gives you control of the curve degree of the new fillet curve.
Fillet Plane Options
These options are available only when Fillet Plane is set to Specify.
X, Y, Z
Select one of these options to specify a vector along that axis.
View
Select this option to specify a vector normal to the current view. The vector is not drawn in the view windows.
If the current view is changed, click Refresh Vector to update the vector.
Picked
Selecting this option lets you specify the name of an existing vector in the Picked Vector field, or pick the vector in the view. This vector defines the pull direction.
Manip
This option is selected automatically when you update the vector direction by manually modifying the manipulator in the view.
Refresh Vector
This button only appears if View is selected. Click it to update the vector if the view has been modified.
Retain Vector
Click this button to create a vector construction object in the view windows. Unless you do this, the vector direction you specified is used by the tool, but you will not see and be able to re-use the vector.
Explicit Control Options
Available only when Explicit Control is selected.
Degree
The degree of the new fillet curve.
Control Options
Trim Type
Automatic – Automatically trims the original curves back to the contact line.
Off – Does not trim the original curves.
Auto Update
Automatically updates the fillet curve as you change options.
If you turn this option off, you can click the Update button when you want to update the curve.
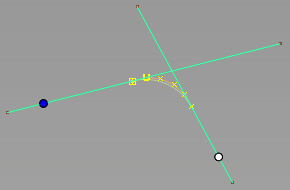
Curvature Comb
Displays a curvature comb plot across the resulting fillet curve.
Create History
Save the fillet curve history for later editing. If you select Create History, when you edit the original curves, the fillet updates automatically.
Create Metadata
Specifies whether or not the Curve Fillet tool creates history metadata.
Curve Fillet workflow
With the Curve Fillet tool, you can create chamfers that are degree 1-3; G1 fillets, degree 3-6; and G2 fillets, degree 5-7. You can create them with curves, curves-on-surfaces, and edges, or any combination of these. The curves, curves-on-surfaces, or edges can be non-planar.
Shift-select the Curve Fillet tool
 icon.
icon.In the option window, select the Construction Type and other fillet options.
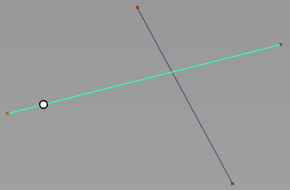
Click the first curve on the fillet side.

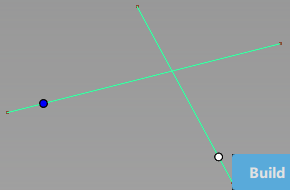
Then click the second curve.

Circular dots appear where you click the curves. These dots do not affect the size or the start/end points of the fillet. They indicate the quadrant where the fillet will be created.
Click Build.

For overlapping curves, to change the fillet quadrant, drag the circular dots and clickUpdate.
