 Reform
Generates a subdivision object that conforms to the shape of a selected mesh object. Use this tool to quickly generate a surface model from scanned meshes or other triangulated mesh objects.
Use the Subdiv Reform tool to quickly generate complex subdivision models from mesh objects.

The Reform tool uses a multi-step process to generate the subdivision model. Inputs for each step are controlled using the tool parameters, such as Reduce to %. The steps are performed in order from top (Reduce to %) to bottom (Curvature Bias) with each relying on the output of the previous step. Therefore, if you make changes to Reduce to %, the final results typically take longer to compute as all steps need to be re-executed.
Before using the tool to generate a subdivision model, investigate the source mesh for obvious irregularities in the topology. In particular, be aware of the following:
- Unwanted holes in the mesh
- Non-uniform boundary edges or edges with sharp features
- Folded edges or self-intersecting triangles.
Consider using the Mesh Repair tool ( Mesh > Mesh Repair) or other Mesh Cleanup tools in Alias to analyze, and then repair irregularities in the source mesh. Starting with a mesh that does not have holes or jagged edges results in a more uniform subdivision model. For more information, see Repair defects in meshes and Clean up and repair meshes.
Access the tool from the Subdivision Palette:

Subdiv Reform settings
Prepare Mesh
Reduce to %
Sets the percent of the source mesh topology used to generate the shape of the subdivision model. The higher the value, the greater the amount of the mesh topology is used in the calculation, which results in a more accurate representation of the mesh shape. For example, a value of 50 reduces the input mesh to 50 percent of its original triangle number before Alias begins generating the subdivision object.
Topology
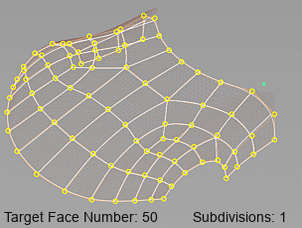
Target Face Number
Sets the number of subdivision faces generated in the output object. The higher the value, the higher the resolution of the subdivision model. This value is an approximate target value. For example, a value of 50 results in a subdivision object with between 40 and 60 quad faces.
Refinement
Subdivisions
Use this option to control the overall resolution of the output subdivision object. When Subdivision is increased by a value of 1, Alias divides each face into four faces. If the Target Face Number is set to 50, increasing Subdivision from a value of 1 to 2 increases the number of subdivision faces to 200.
The higher the Subdivision value, the closer the output subdivision object resembles the shape of the source mesh.
Curvature Bias
Use this setting to increase the distribution of CVs to areas of higher curvature, which can improve the overall shape of the resulting subdivision model. At lower values, the resulting CV layout is more uniform. Increasing this value changes the layout CV to one that distributes a higher number of CVs to areas with more curvature. Typically, higher values take longer to compute.

Reform tool workflow
Shift-select the tool to open the control window.
Tip: Use the tool's default values to generate the first version of the subdivision object, and then adjust the Refinement parameter values until you achieve the desired results. If you don't achieve acceptable results, adjust Target Face Number.Select the source mesh, and then click Build or press the Spacebar.
In the control window, adjust a tool parameter and click Update or press the Spacebar to rebuild the subdivision model.
To further refine the model, such as by adding or removing edges, click Edit in Retopo.
The Retopo tool opens and the mesh is selected as the target object so you can begin editing right away.