 Array
Array
Creates arrays of objects, either linearly or radially, from duplicates of an original object (or set of objects). Options let you create various patterns.
This tool is useful when modeling objects such as grills, speakers, wheels.
Access this tool from the Transform tool palette:

Array Control settings
Plane
Choose whether to create the array in the XY, XZ, or YZ plane.
Mode
Linear – The array consists of rows and columns arranged in a rectangular pattern. The original object is located in the lower left corner.
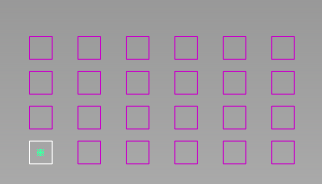
Radial – The array consist of "spokes" arranged radially around the original object. There is an option (Grow Radially) to increase the number of duplicates as the distance to the object increases, to create the appearance of concentric circles.
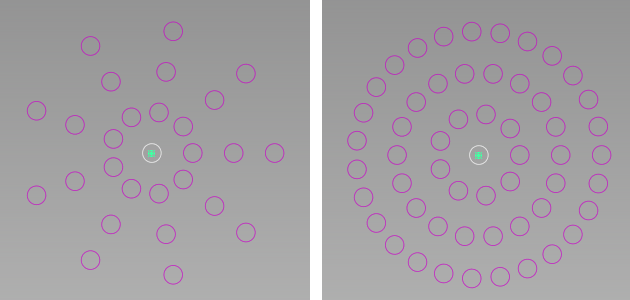
Left: Grow Radially = off; Right: Grow Radially = on
Axis 1/Axis 2 or Radial/Angular
These sections control the two directions of the array. For a linear array, both these sections have identical options. Axis 1 is horizontal and Axis 2 is vertical. For a radial array, Radial is in the direction of the radius, and Angular is in the direction of the circumference.
Number
This value specifies the number of duplicates in each direction (horizontal/vertical for a linear array; radial/angular for a radial array).
Spacing/Angle
Spacing specifies the distance between the rows and columns, in the current units. For a radial array, Angle specifies the angle between the columns, or "spokes".
Offset
Offsets each row (column) in the array by this distance from the previous row (column).
Scale
This is a relative scale factor applied to the original object to produce the last duplicate in each row or column. The sizes of intermediate duplicates are interpolated.
Stagger
Check on to set the Offset to half the Spacing value for alternating rows (or columns), creating a "stagger" effect, or "brick pattern".
Mirror
This option is only available in Linear mode. When selected, the pattern is mirrored in the other axis.
The following options only appear in the Angular section when creating a radial array.
Fit to Circle
Check on to adjust the Angle so that the specified number of columns (spokes) fill a 360 degree circumference evenly. For example, if Number is 6, Angle is set to 60.
Center Original
When the option is selected, the selected object is at the center and copies are created radially around it.
When not selected, the tool creates duplicates around a point beside the original based on the spacing value. The middle object is not created.
Control Options
Auto Update
When checked, duplicates update automatically when values in the control window are changed.
Create History
When checked, the duplicates have construction history so that modifying the original objects causes the duplicates to update accordingly.
Scale Position
Check on to scale the distance between duplicates along with their size when Scale is different from 1.0. For a scale greater than 1.0, this option reduces overlapping.
Grow Radially
This option is only available in Radial mode. When checked, the number of duplicates increases as the radius of its "row" increases. This technique helps create the appearance of concentric circles, rather than spokes.
Rotate Duplicates
This option is only available in Radial mode. Check on to rotate duplicates around their local pivot by a relative value of Angle with respect to their orientation in the previous column (spoke).
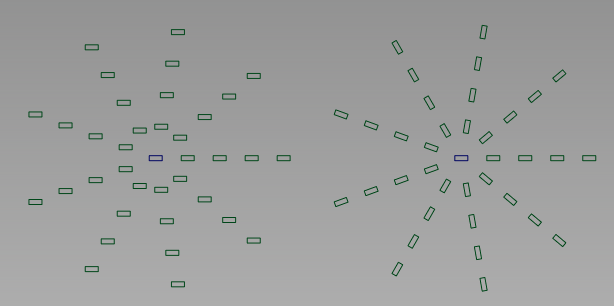
Radial array with 9 spokes and Angle = 40. Left: Rotate Duplicates is OFF; Right: Rotate Duplicates is ON.
Center Original
This option is only available in Radial mode.
Array workflows
Create an array of similar objects from an original
Shift-select the Array tool
 icon.
icon.Select (or box-select) the objects to duplicate.
Click the Build button in the view window.
The array is built.
Note: If Number is 1 along both axes, you only see the original objects.Adjust the options in the control window.
If Auto Update is on, the array updates automatically. Otherwise click the Update button.
Array Example
Below, the Array tool is used to create a grill array from a single hexagonal curve. The array of curves is then projected onto a surface. The surface is trimmed, and draft surfaces are built around the holes.
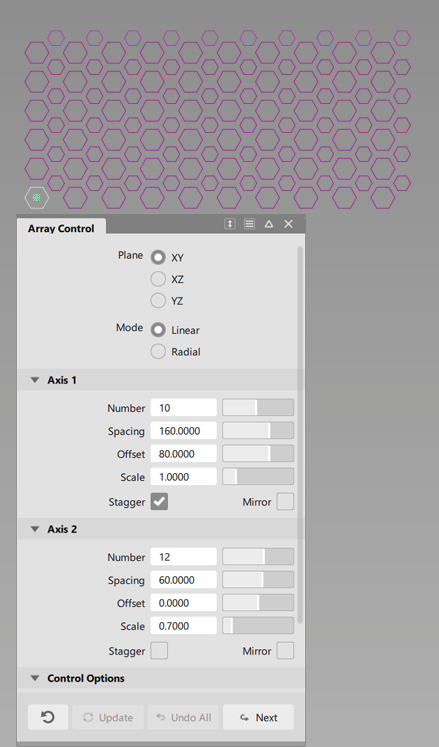
Option settings to create the grill array.
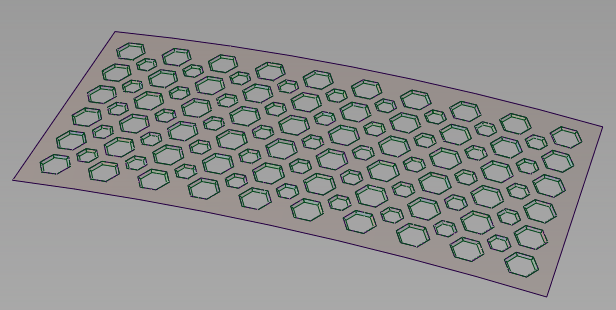
Finished grill after projection, trimming, and draft.