 Path Array
Duplicates one or more objects and places the copies at equal distances along one or more curves, creating stitch patterns.
Access this tool from the Transform tool palette:

Path Array Control settings
Specify
Choose Spacing or Number from the pull-down menu.
This option also appears as a toggling label on the model.
Spacing / Number
Depending on the value of the Specify option.
Spacing – The distance between the duplicates, in current units.
Number – The number of duplicates.
These values can also be set by using the corresponding manipulator on the model.
Start/End
Specifies where the duplicates start and end along the curve. Start and End values of 0.0 and 1.0 respectively define the original extent.
These values can also be set by using the range manipulators on the path curve.
Scale
This is a relative scale factor applied to the first duplicate to produce the last duplicate. The sizes of intermediate duplicates are linearly interpolated.
Position
Offset in the X, Y, and Z directions along the duplicates local axes (in current units).
Rotation X/Y/Z
Rotation around the local X, Y, and Z axes of the duplicates (in current units).
Incremental Rotation X/Y/Z
Rotation around the local X, Y, and Z axes of the duplicates by a relative angle with respect to the previous duplicate. For example, if the X value is 10.0 (degrees), each duplicate is rotated ten degrees more around X than the previous one. This produces a twisting effect along the path.
Control Options
Auto Update
When checked, duplicates update automatically when values in the control window are changed.
Chain Select
When checked, selecting a curve also selects all other curves that are tangent continuous with it.
Create History
When checked, the duplicates have construction history. Modifying the stitch objects or target curves causes the duplicates to update accordingly.
Range Fit
Check this box to ensure that the duplicates fit the entire length of the curves specified by the Start and End positions. This action sometimes causes the Spacing to change (not reflected in the option window).
Orientation
None – No change in orientation.
Tangent – The first copy of the object takes the original orientation and all subsequent copies are rotated based on the tangent of the input curve at the point where the object is being placed. This allows the arrayed objects to follow the flow of the input curve.
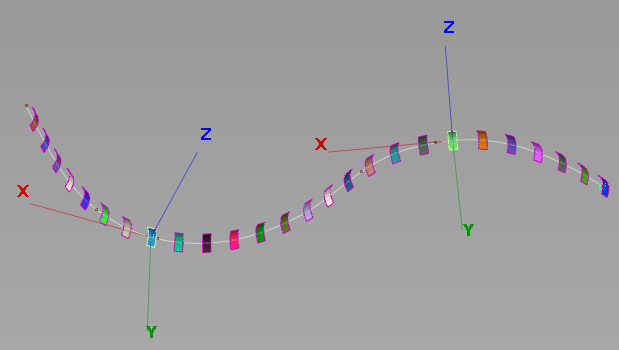
Normal – Aligns the local X axis of each duplicate with the tangent of the target curve at the position of the duplicate. If the target curve is a curve-on-surface, each duplicate is oriented so that its local Z axis matches the normal direction of the surface where the curve-on-surface lies. If the target curve is a free curve, the Z axis of each duplicate is oriented along the direction of the curvature vector of the curve (like plot combs).
 Note: If the curvature of the curve changes direction, the duplicates orientation does not flip at inflection points.
Path Array workflows
Shift-select the Path Array tool
 icon.
icon.Select the objects you want to duplicate. They can be any type of geometry, including curves, surfaces, and meshes, or constructions objects, such as such as points, planes, and vectors.
Click the Build button in the lower right corner of the view window.
Select the target curves. They can be free curves, curves-on-surface, surface edges, trim edges, or isoparms (including precision lines).
- Duplicates of the objects appear along the length of the curves. The pivot points of the duplicates are placed along the curves and used to calculate spacing.
- Range arrow manipulators appear at the start and end of the last target curve.
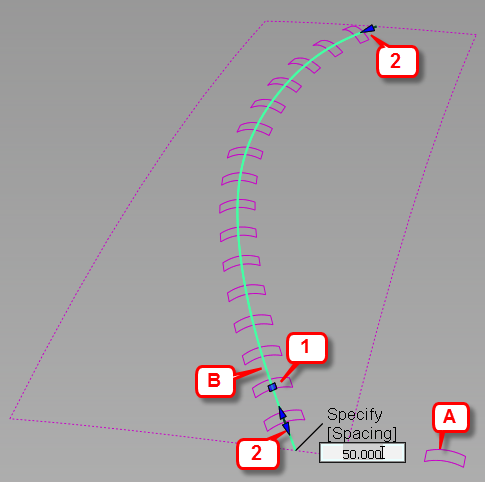
- A Spacing/Number manipulator also appears, with a Specify label that you can click to toggle between Spacing and Number adjustments. Clicking the numerical value below the label lets you enter an exact value.
Modify the spacing, range, and orientation of the duplicates through the control options. You can also use the manipulators to modify the spacing and range directly on the model.
The duplicate objects have history and update as the options are modified.
Note: Only duplicates along the last selected target curve are affected.Select additional target curves if desired.
To set the range, spacing or number of duplicates with the manipulators, some of the options in the control window have a corresponding manipulator on the model.

A: object to duplicate. B: Target curve. 1: Spacing manipulator. 2. Range (Start/End) manipulators.