Use this procedure to create a schedule tag that captures and displays property set data for a particular object in your drawing.
The property set attached to the object must contain the property or properties for the information that you want to display in the tag.
You can create the schedule tag by drawing a symbol and adding text as a placeholder for attributes or by exploding and customizing an existing schedule tag. When you create a schedule tag, each attribute is assigned a unique name (called an attribute tag), which is formed by combining the names of the associated property set definition and property definition. When the schedule tag is anchored to objects to which the property set definition applies, the tag displays the value of the property identified by the attribute tag.
For example, you have a property set definition named DoorProps, which contains a property definition named FireRating. The FireRating property contains fire rating information for door objects. To create a door tag that displays the fire rating of a door to which the tag is anchored, you must first create a schedule tag that contains an attribute definition whose attribute tag is DoorProps:FireRating.
- Draw a symbol for the tag, and add text as necessary to designate the property data you want displayed as an attribute of the tag.
Tags may have multiple attributes and be linked to multiple property definitions.
- Create the schedule tag:
If you want to… Then… create a schedule tag from your custom graphic and text click 
 .
.  Select the objects from which to create the tag, and press Enter.
 create a schedule tag from an existing tag click .  Select the object, and press Enter. Repeat until all nested blocks are exploded, and click . Select the objects from which to create the tag, and press Enter.
 - On the Define Schedule Tag worksheet, enter a name to identify the new tag.
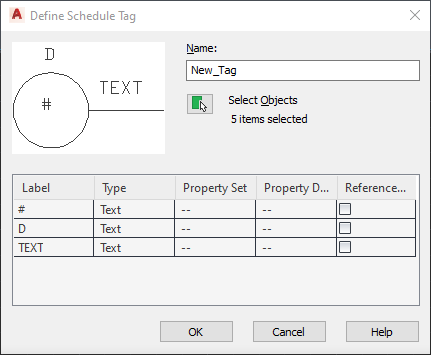
- Click
 to select additional objects.
 - Select the attributes of the tag:
If you want the label to… Then… collect property data from the objects tagged select Property for Type, select a Property Set and a Property Definition, and click OK. display as the text you entered select Text for Type and click OK. 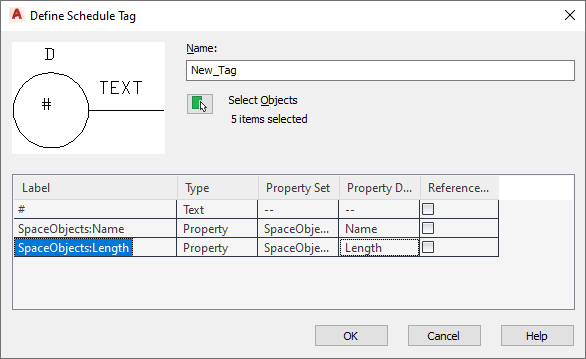
- Specify a point on the tag as the insertion point.