Use this procedure to assign a profile to a vertical edge of a frame or mullion. The curtain wall edge profile can be any profile or any closed polyline that you specify. You can use a profile edge to create a unique corner in situations where a simple miter is not sufficient.
Overriding edge profile
- Draw a closed polyline in the location where you want it to display in the curtain wall. Note: For best results, it is recommended to draw the polyline in Plan view.
- Select the curtain wall for which you want to create a frame or mullion edge profile override.
- Specify the mode in which to edit the curtain wall:
If you want to edit … Then … this instance of the curtain wall click  .
. the curtain wall style click . If this option is not available, the design rules are already style-based for the curtain wall. - Click .
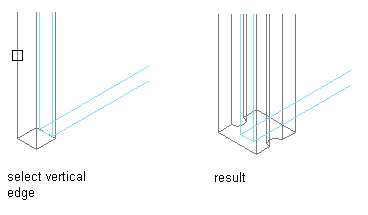
- Select a vertical frame or mullion edge.
- Select a profile for the override.
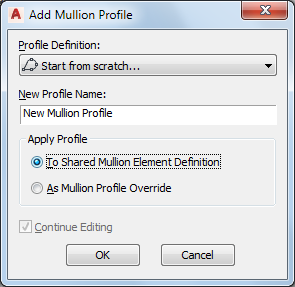
If you want to create the edge profile … Then … from the polyline drawn in step 1 select Start from scratch for Profile Definition, and enter a name for New Profile Name. from an existing profile in the drawing select the existing profile for Profile Definition, and click Continue Editing. - Select whether to apply the profile to the shared edge element definition or as an edge profile override.
- Click OK.
You are now in in-place edit mode, and can edit the profile.
- Click .

- Select the profile and edit it using Edge and Vertex grips, by using the commands on the contextual Edit in Place tab, or by right-clicking the context menu.
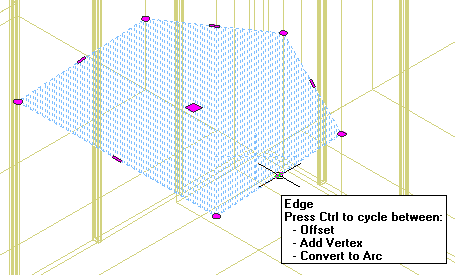
The Edge grip has three edit modes: Offset, Add Vertex, and Convert to Arc. The default mode is Offset, which offsets the selected edge in a direction that is perpendicular to the midpoint of the edge. Depending on the shape of the profile and the edge you choose to modify, neighboring lines are extended or trimmed, and new lines are added, as necessary.
Use the Add Vertex edit mode to add a vertex to the selected edge, and create a new edge. If the selected edge is an arc, the new edge is an arc, as well.
Convert to Arc changes the selected edge to an arc and stretches the midpoint of the edge. The edge grip for an arc also has a Stretch mode, so that you can stretch the midpoint of the edge after it has been converted to an arc.
- Save or discard changes to the curtain wall grid:
If you want to exit the in-place editing session … Then … without saving your changes click . 
after saving your changes click . 