Use this procedure to edit divisions using in-place editing with the Edit Grid grip. With in-place editing, you can edit the curtain wall unit directly and interactively in the drawing area and later save the changes to the curtain wall unit or curtain wall unit style.
- Select a curtain wall unit on which you want to edit divisions with in-place editing.
- Specify the mode in which to edit the curtain wall unit:
If you want to edit … Then … this instance of the curtain wall unit click  .
. the curtain wall unit style click . If this option is not available, the design rules are already style-based for the curtain wall unit. - Click the Edit Grid grip.
- Enter d (Division in place).
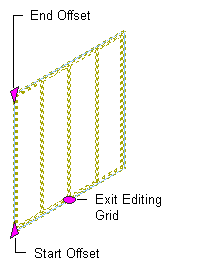
Viewing edit in-place grips for a primary division
Note: You have entered the in-place editing session now. You can see this from the faded color of all objects in the drawing, as well as from the different grips at your disposal. Note that while you are in the in-place editing session, you have only limited editing access to other commands in the drawing. Before working on other objects, you should first end the in-place editing session.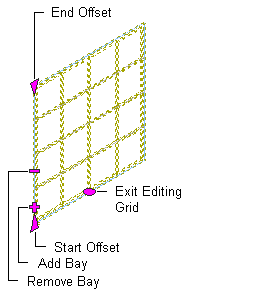
Viewing edit in-place grips for adding and removing bays
- Edit the division:
If you want to … Then … add a bay to the grid click the Add Bay grip. remove a bay from the grid click the Remove Bay grip. change the start offset of the grid select the Start Offset grip and move it to the position. change the end offset of the grid select the End Offset grip and move it to the position. change the spacing of bays click the Auto Grid Bay Spacing grip and move it to the position. manually edit the grid click  .You can manually add and remove gridlines, change the offsets, and change the position of individual gridlines.
 use a worksheet to edit the cell dimensions click the Set Fixed Cell Dimension Rules command grip, and edit the values in the worksheet. - Save or discard changes to the curtain wall unit grid:
If you want to exit the in-place editing session … Then … without saving your changes click . 
after saving your changes click . 
- In the Save Changes dialog box, specify to which division to save the changes:
If you want to … Then … save the changes to the style in the current curtain wall unit division verify the current division is selected for Save Changes to Existing Division, and click Save. The changes are made in the style and affect all curtain wall units of that style in the drawing. create an override to the style by saving the changes in a new curtain wall unit division click New, enter a name for the new division override, and click OK. Click Save. The changes are saved as an override to the style, and affect only the curtain wall units to which the override is applied.