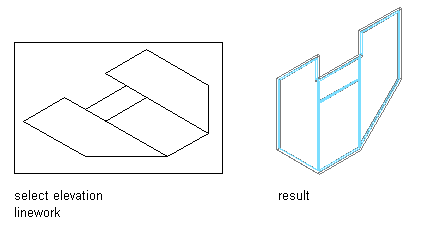
Curtain wall units contain one or more grids. You can define a custom grid with lines, arcs, and circles, and then convert that linework into a curtain wall unit.
Note: Curtain wall unit grids are either horizontal or vertical. To create a grid pattern with horizontal and vertical cells, nested grids are used.
You cannot modify the division definition of a custom grid created from lines, arcs, and circles. You can, however, assign a different division definition to it.
- Use lines, arcs, and circles to draw a grid in the current world coordinate system (WCS).
- At the command line, enter cwunit.
- Enter c (Convert).
- Enter LI (LInework).
- Select the lines, arcs, or circles that define your grid.
- Press Enter.
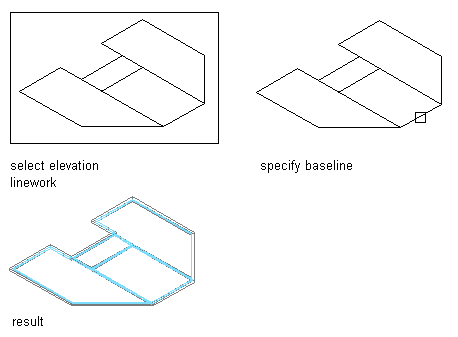
- Select one of the grid lines as the baseline for the curtain wall or press Enter to use the line along the X axis as the baseline.

Converting linework to curtain walls units using the default baseline option
Tip: If you draw your linework in the XY plane (in Plan view) and accept the default baseline, the resulting curtain wall unit is displayed as it is projected in the Z direction.
Converting linework to curtain walls using the specified baseline option
- To erase the lines, enter y (Yes). To have the lines remain after the curtain wall unit is created, enter n (No).
Each enclosed area is assigned the default cell infill. The lines between the cells are assigned the default mullion definition, and the boundary around the grid is assigned the default frame definition.
- Select the resulting custom curtain wall unit.
- Click


 .
. - Click New to create a new curtain wall unit style.
- Enter a name for the new curtain wall unit style.
- Click OK twice.