Use this procedure to create any of the following, with user-specified settings:
- Freestanding regular windows
- Regular windows in walls
- Corner windows
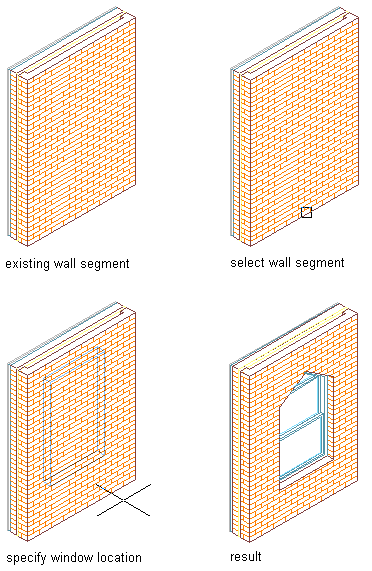
Adding a window to a wall
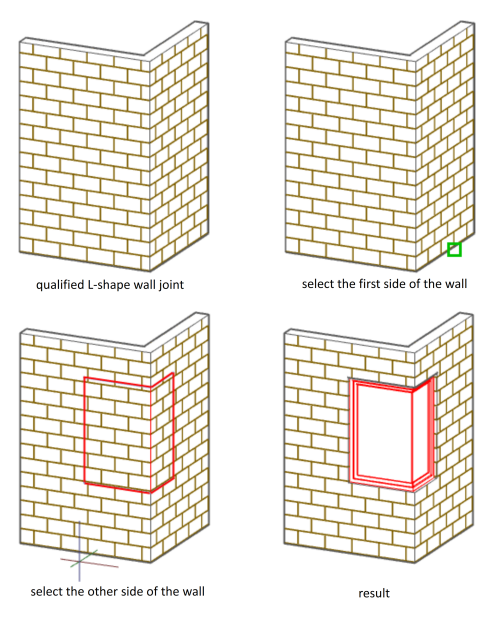
Adding a corner window to a L-shape wall joint
Tip: )To ensure that the Properties palette is displayed before you select a tool, click  .
.
. - Open the Tool palette, and select a Window tool or a Corner Window tool.
If necessary, scroll the tool palette to display the tool you want to use.
Note: Alternatively, you can click
. Find - On the Properties palette, expand Basic, and expand General.
- Select a window style.
- Under Bound Spaces, define if this window can be used as a bounding object for associative spaces.
You can select three options here:
- Yes: this window can be used as bounding object for associative spaces.
- No: this window cannot be used as bounding object for associative spaces.
- By style: this window will use the bounding settings from the window style.
- Expand Dimensions.
- Specify a window size:
If you want to… Then… use a standard window size click Standard Sizes, and then select a window size. use a custom window size enter values for Width and Height. For corner window, width is a sum of Width 1 and Width 2. - Enter a value for Rise, if applicable to the selected style and window type.
- Specify where the window width and height are measured to:
If you want to measure to… Then… the outside of the window frame Select Outside of frame for Measure to. the inside of the window frame Select Inside of frame for Measure to. the center of the window frame Select Center of frame for Measure to. - Enter a value for Opening percent or Swing angle.
Zero indicates a closed window.
- Expand Location.
- If you are placing the window in a wall, specify the position of the window:
If you want to… Then… position the window at a specific distance between the edge of the opening and the end of a wall segment select Offset/Center for Position along wall, and enter a value for Automatic offset. center the window on a wall segment select Offset/Center for Position along wall, and specify a point near the center of the wall segment. position the window anywhere along the wall click Position along wall, and select Unconstrained. - Specify whether you want the window aligned vertically by sill height or by head height:
If you want to align the window… Then… by sill height select Sill for Vertical alignment, and enter a value for Sill height. by head height select Head for Vertical alignment, and enter a value for Head height. - Specify the insertion point for a freestanding window, window, or corner window in a wall:
If you want to insert… Then… a freestanding window press Enter, and specify an insertion point and a rotation angle for the window. the window in a wall select the wall and specify an insertion point along the wall. a corner window in a wall select a qualified L-shaped wall joint. Specify an insertion point along the second wall. Tip: There are 2 command line options that make the insertion of a window in a specific location easier: You can switch the insertion point of the window from left (default) to center and right by entering cy (cycle measure to) once or twice on the command line. For regular window, you can also measure the insertion point of a window in relation to a specified point in the drawing - for example the frame of a door - by entering re (Reference point on) and then selecting the point from which the distance should be measured.