Use this procedure to define mullions that are offset from the start or end of the curtain wall to lengthen or shorten the edge or offset in the X or Y direction to shift the edge. For example, you might want to represent butt glazing by offsetting the mullions to be behind glass panel infills.
| Offset | Description |
|---|---|
| X | For vertical mullions, a positive X offset moves the mullions toward the end of the curtain wall, while a negative X offset moves the mullions toward the start of the curtain wall. For horizontal mullions, a positive X offset moves the mullions toward the top of the curtain wall, while a negative X offset moves the mullions toward the bottom of the curtain wall. |
| Y | In Plan view, a positive Y offset moves the mullions above the baseline, while a negative Y offset moves the mullions below the baseline. |
| Start | Negative Start offset lengthens the mullions beyond the start point, while a positive Start offset shortens the mullions. |
| End | Negative End offset lengthens the mullions beyond the end point, while a positive End offset shortens the mullions. |
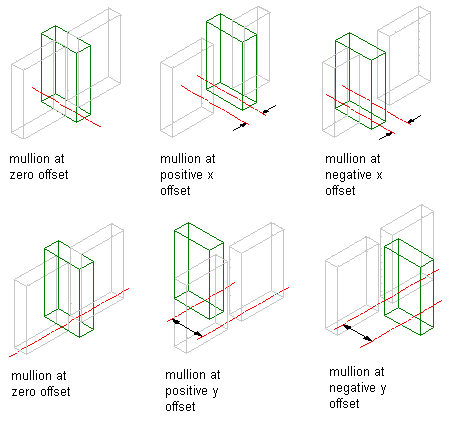
Specifying mullion offsets in x and y directions
Tip: To quickly identify the start and end of a curtain wall, select the curtain wall. The Reverse Direction grip is displayed near the center of the curtain wall and points toward the end of the curtain wall.
- Click
 .
. 
- Expand Architectural Objects, and expand Curtain Wall Styles.
- Select a curtain wall style.
- Click the Design Rules tab.
- In the left pane, select Mullions under Element Definitions.
- Select a mullion definition from the list.
- Specify an offset distance for the X, Y, Start, or End.
- Click OK.