When a command prompts you for a point, you can specify a precise location using coordinates, object snaps, and several other methods.
Snap to a Geometric Location on an Object
- At a prompt for a point, hold down Shift and then right-click in the drawing area. Choose the object snap that you want to use.
- Move your cursor over the desired object snap location.
Your cursor locks onto the object snap location that you specified, and a marker and tooltip indicate the object snap location.

If more than one object snap is available, press Tab to cycle through the choices.
- Select the object.
The cursor snaps to the specified geometric feature closest to where you selected the object.
Snap to a Location Based on Two Other Locations
Use object snap tracking to select a point along alignment paths that are based on object snap points. Alignment paths can be horizontal, vertical, parallel, or to a preset polar tracking angle.
- Press F11 to turn on object snap tracking.
- At a prompt for a point, hold down Shift and then right-click in the drawing area. Choose the object snap that you want to use.
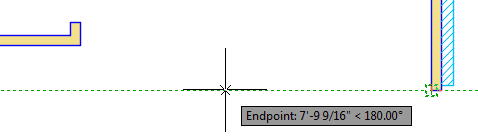
- Move your cursor over an object snap location.
Acquired points display a small plus sign (+).
- Move your cursor. Alignment paths that are relative to the acquired point display as you move the cursor.
- Move your cursor over a second object snap location.
- Move your cursor until the tracking path displays and intersects with the previous alignment path.
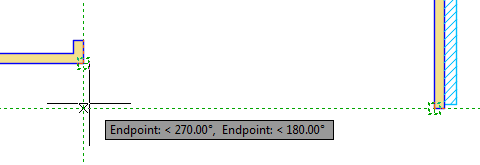
- Click to specify the combined location.
Snap to a Location by Tracking Along an Angle and Entering a Distance
Polar tracking guides the movement of your cursor to specified polar angles and angle increments.
- Define the polar tracking settings.
- On the status bar, right-click Polar Tracking. Find
- From the menu that displays, click Tracking Settings.
- In the Drafting Settings dialog box, Polar Tracking tab, turn on polar tracking.
- Specify the polar tracking angles, incremental and additional, and other settings as needed.
- Start a command, for example click
 .
Find
.
Find
- Specify the start point.
- At a prompt for a point, move the cursor near the desired angle.
The cursor snaps to the angles and increments defined in the polar tracking settings.
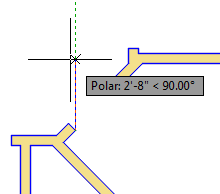
- Enter a distance from the start point, for example 2.25.
Snap to a Grid Location
The grid is a rectangular pattern of lines or dots that covers the entire XY plane. Grid Snap restricts the movement of the crosshairs to intervals that you define. Grid and Snap are independent settings but are often turned on at the same time.
- Define the grid and snap settings.
- On the status bar, right-click GRIDMODE. Find
- Click Grid Settings.
- In the Drafting Settings dialog box, Snap and Grid tab, turn on both snap and grid.
- Specify the grid and snap spacing and other settings.
- At a prompt for a point, click near a grid snap point.
The cursor snaps to the closest grid point.
Enter Relative 2D Coordinates
Relative coordinates are based on the last point specified. The last point specified can be from the same command or from a previous command.
- On the status bar, turn off Dynamic Input. Find
- At a prompt for a point, enter UCS coordinates using the following format:
- Cartesian coordinates: Enter
@ x,y
For example, @2.5,1, specifies a point 2.5 units in the X direction and 1 unit in the Y direction from the previous point.
- Polar coordinates:
@ distance
< angle
For example, @3<45, specifies a point 3 units at a 45-degree angle from the previous point.
- Cartesian coordinates: Enter
@ x,y