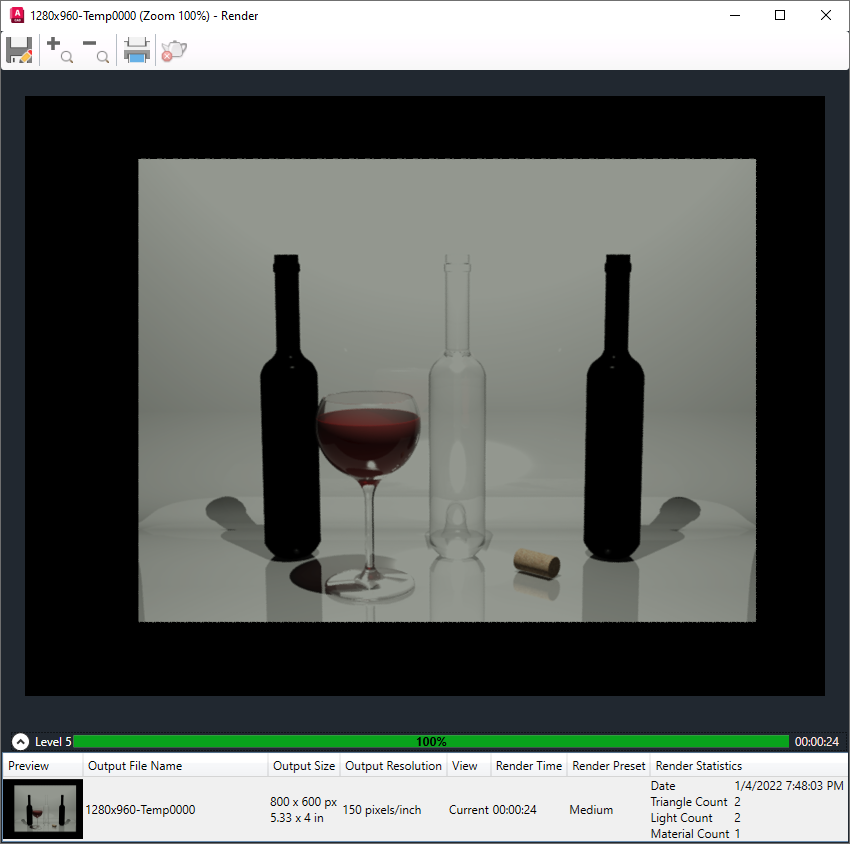
The Render window is divided into the following two panes:
- Image pane. Displays the progress of the current rendering and the final rendered image once the current rendering operation has been completed.
- History and Statistics pane. At the bottom, collapsed by default; provides access to recently rendered images of the current model and statistics about the objects used to create a rendered image.
Rendering from any drawing always appears in its corresponding Render window.
From here, you can
- Save the image to a file.
- Save a copy of the image to a file.
- Monitor the progress of the current rendering.
- Track the rendering history of the model.
- Delete an image from the rendering history.
- Zoom into a section of the rendered image, pan around the image, and then zoom back out.
List of Options
The following options are displayed.
- Save
-
Saves an image to a raster image file. For more information, see “About Saving a Rendered Image”.
You cannot use the SAVEIMG command when rendering to the Render window. This command applies only to rendering in a viewport.
- Zoom +
-
Zooms into the rendered image in the Image pane. When zoomed in, you can pan around the image.
- Zoom -
-
Zooms out of the rendered image in the Image pane.
-
Sends the rendered image to a specified system printer.
- Cancel
-
Aborts the current rendering.
Image Pane
Primary output target of the renderer.
- Zoom factor
-
The zoom factor ranges from 1% to 6400%. You can click the Zoom + and Zoom - buttons, or roll the mouse wheel to change the current zoom factor.
Progress Meter
The progress meter displays the number of levels completed, the progress of the current iteration, and overall rendering time.
You can cancel a rendering by clicking Cancel along the top of the Render window or by pressing Esc.
History Pane
The data stored in history entries includes
- Preview. Small thumbnail of the completed rendered image.
- Output File Name. File name of the rendered image.
- Output Size. Width and height of the rendered image, in pixels.
- Output Resolution. Resolution of the rendered image in dots per inch (DPI).
- View. Name of the view name that was rendered. If no named view is current, the view is stored as Current .
- Render Time. Render time measured in hours:minutes:seconds.
- Render Preset. Name of the render preset used for the rendering.
- Render Statistics. Date and time the rendered image was created, and the number of objects in the rendered view. The object counts include geometry, lights, and materials.
Any history entry that has a file name will be saved.
History Pane - Shortcut Menu
Right-clicking a history entry displays a menu that contains the following options:
- Render Again
-
Restarts the renderer for the selected history entry.
- Save
-
Displays the Render Output File dialog box where you can save the rendered image to disk.
- Save Copy
-
Saves the image to a new location without affecting the location stored in the entry. The Render Output File dialog box is displayed.
- Make Render Settings Current
-
Sets the render preset associated with the selected history entry current.
- Remove From The List
-
Removes the entry from the history while leaving any associated image files in place.
- Delete Output File
-
Removes the image file associated with the selected history entry from disk.