You can create and modify toolbars to better fit your processes.
Display the Customize User Interface (CUI) Editor
- Click
 .
Find
.
Find
Create a Toolbar
- In the Customize tab, Customizations In
<file name> pane, right-click the Toolbars node and click New Toolbar.

A new toolbar (named Toolbar1) is placed at the bottom of the Toolbars tree.
- Right-click Toolbar1. Click Rename and enter a new toolbar name.
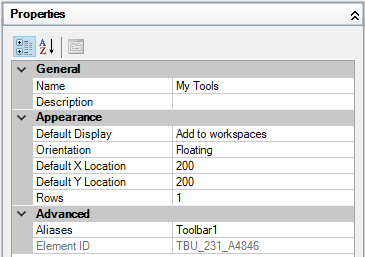
- Select the new toolbar, and update its properties in the Properties pane:
- In the Description box, enter a description for the toolbar.
- In the Default Display box, specify if the toolbar should be displayed by default when the CUIx file is loaded as a partial customization file.
- In the Orientation box, specify the orientation of the toolbar.
- In the Default X Location box, enter a number that represents the floating or docked location for the toolbar.
- In the Default Y Location box, enter a number that represents the floating or docked location for the toolbar.
- In the Rows box, enter the number of rows for a floating toolbar.
- In the Aliases box, enter an alias for the toolbar.
- In the Command List pane, drag the command you want to add to the toolbar in the Customizations In
<file name> pane.
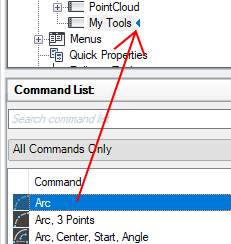
- Click Apply.
Add a Command
- In the Customize tab, Customizations In <file name> pane, click the plus sign (+) next to the Toolbars node to expand it.
- In the Command List pane, drag the command to the toolbar you want to add it to in the Customizations In
<file name> pane.
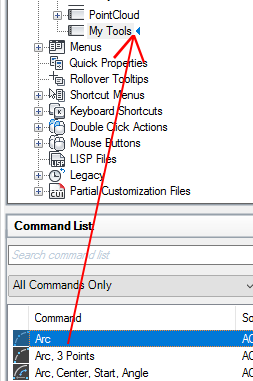 Tip: You can also drag and drop a command from the Command List pane onto the toolbar’s preview in the Toolbar Preview pane.
 - Click Apply.
Add a Control
- In the Customize tab, Customizations In <file name> pane, click the plus sign (+) next to the Toolbars node to expand it.
- Click the plus sign (+) next to the toolbar to which you want to add a control.
- In the Command List pane, Categories drop-down list, select Toolbar Control Elements.

The Command List pane displays a list of toolbar control elements only.
- In the Command list, drag the control to the toolbar you want to add it to in the Customizations In
<file name> pane.
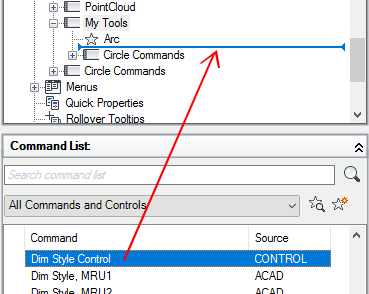 Tip: You can also drag and drop a control from the Command List pane onto the toolbar’s preview in the Toolbar Preview pane.
 - Click Apply.
Switch a Control in a Toolbar
- In the Customize tab, Customizations In <file name> pane, click the plus sign (+) next to the Toolbars node to expand it.
- Click the plus sign (+) next to the toolbar to which you want to switch a control.
- Click the control element under the toolbar.
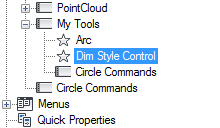
- In the Properties pane, Control box, click the down arrow to display a list of all available toolbar controls.
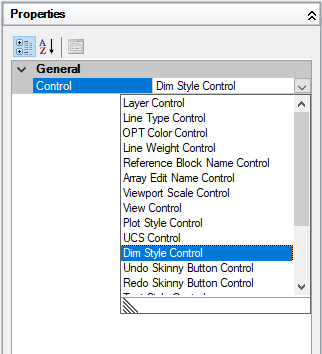
- Select a toolbar control to replace the original control with.
- Click Apply.
Reposition a Command or Control
- In the Customize tab, Customizations In <file name> pane, click the plus sign (+) next to the Toolbars node to expand it.
- Click the plus sign (+) next to the toolbar that contains the command or control you want to reposition to expand it.
- Drag the command or control you want to reposition to the new location on the toolbar.
While dragging the command or control, use the visual indicator to specify the new position of the command or control.
Tip: You can also reposition commands and controls by dragging them in the Toolbar Preview pane for a selected toolbar. - Release the pointing device button to reposition the command or control.
- Click Apply.
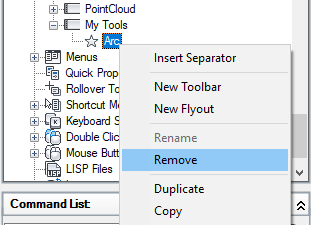
Remove a Command or Control
- In the Customize tab, Customizations In <file name> pane, click the plus sign (+) next to the Toolbars node to expand it.
- Click the plus sign (+) next to the toolbar that contains the command or control you want to remove.
- Right-click the command or control you want to remove. Click Remove.
 Tip: You can also remove a command or control in the Toolbar Preview pane by dragging and dropping the command or control outside of the preview.
 - Click Apply.
Change Properties of a Toolbar
- In the Customize tab, Customizations In
<file name> pane, click the plus sign (+) next to the Toolbars node to expand it.
Note: Making changes to a toolbar’s properties here only affects the initial appearance of the toolbar after the customization (CUIx) file has been loaded. It is recommended to use a workspace to control the appearance of a toolbar.
- Select the toolbar whose properties you want to change.
- In the Properties pane, make your changes.
- Click Apply.
Change the Tooltip of a Command on a Toolbar
- In the Customize tab, Customizations In <file name> pane, click the plus sign (+) next to the Toolbars node to expand it.
- Click the plus sign (+) next to the toolbar that contains the command whose tooltip text you want to change.
- Select the command you want to change.
- In the Properties pane, Display section, make the desired change to the Name property (not the Command Name or Command Display Name properties), and the Description and Extended Help File properties.
- Click Apply.
Create a Toolbar from a Pull-down Menu
- In the Customize tab, Customizations In <file name> pane, click the plus sign (+) next to the Menus node to expand it.
- Drag the menu that you want to create a toolbar from and drop it onto the Toolbars node.

- Update the workspaces in the customization (CUIx) file as desired to control the display and position for the new toolbar.
Add a Command to a Toolbar in the Application Window
- Display the toolbar you want to add a command to by right-clicking over a toolbar button. Click the name of the toolbar to display.
- Right-click over any toolbar button. Click Customize.
- In the Customize tab, Command List pane, drag the command you want to add and drop it onto a toolbar displayed in the application window.

You can control the location of the command you are adding by using the visual indicator.
- In the Customize User Interface (CUI) Editor, click Apply.
Reposition a Command on a Toolbar in the Application Window
- Display the toolbar you want to reposition a command on by right-clicking over a toolbar button. Click the name of the toolbar to display.
- Right-click over any toolbar button. Click Customize.
The Customize User Interface (CUI) Editor is displayed.
- Drag the command on the toolbar that you want to reposition.
While dragging the command, use the visual indicator to specify the new position of the command.
- In the Customize User Interface (CUI) Editor, click Apply.
Remove a Command From a Toolbar in the Application Window
- Display the toolbar from which you want to remove a command by right-clicking over a toolbar button. Click the name of the toolbar to display.
- Right-click over any toolbar button. Click Customize.
The Customize User Interface (CUI) Editor is displayed.
- Drag the command you want to remove from the toolbar and drop it over the drawing area.

- Click OK to confirm the deletion of the command from the toolbar.
- In the Customize User Interface (CUI) Editor, click Apply.