Because you frequently zoom and pan when working on drawings, it's important to be as efficient as possible with these operations. There are some amazing techniques that you can use to control what's displayed.
Zooming Efficiently
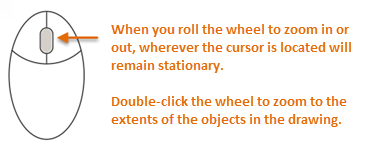
While you're already familiar with using a wheel mouse to zoom and pan, the feedback we've received suggests that you might appreciate some tips. First, here are two basic tips:
Here's how you can reduce the need for panning by combining panning and zooming.
- Locate the cursor to the outside of the area that you want to center.
- Scroll the mouse wheel to zoom in.
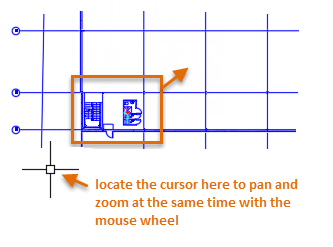
This technique moves the area of interest toward the center of the drawing as you zoom in.
Control the Zoom Rate
We've also received a lot of requests to be able to slow down the rate at which you zoom in or out of an area using the wheel mouse.
- Enter ZOOMFACTOR and set it to 15 or 20 from its default value of 60.
- Zoom in and out using the scroll wheel on your mouse.
The result gives you smoother and finer adjustments using the mouse wheel.
Control the Visual Complexity within an Area
Some drawings are large and complex enough to be visually confusing. This can slow you down and lead to mistakes when you pan and zoom. Typically, you turn off or freeze any layers that are not currently needed. Did you know that you can temporarily hide areas of the drawing with the Isolate Objects feature?
- From the status bar in the lower-right corner of the application window, click the indicated button and choose the Isolate Objects option.
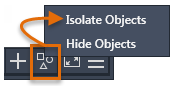
The Isolate Objects operation hides everything except the objects that you selected.
- At the Select Objects prompt, click points 1 and 2 to select the objects within the area you're working and press Enter.
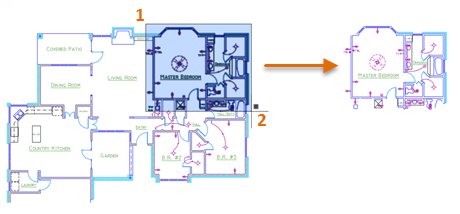
- Double click the mouse wheel to perform a Zoom Extents.
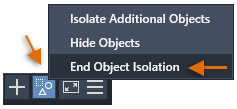
- After you make any changes, click the same status bar control and choose End Object Isolation to redisplay the hidden objects.
A Better Way to Zoom to Previous Views
Currently, you can switch backward and forward between previous views from the View tab, Navigate panel. However, this panel is hidden by default. To display the Navigate panel, perform the following steps:
- Right-click the View tab on the ribbon.
- From the menu, click Show Panels and then click Navigate. This displays the Navigate panel at the right end of the View tab.
- After panning and zooming within the current drawing, first try clicking the Back button and then the Forward button.
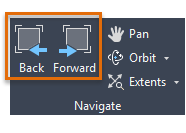
As you can see, these buttons are especially useful if you find yourself switching repeatedly between two or three views.
An Even Faster Way to Zoom to Previous Views
Wouldn't it be great to be able to switch backward and forward between previous views from the Quick Access toolbar?
Good news--this is easy to set up!
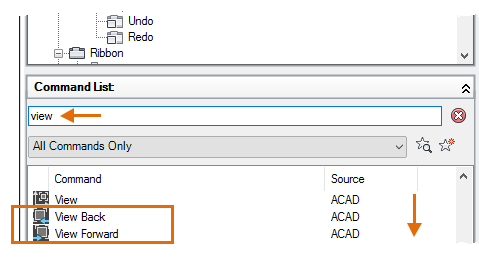
- Enter CUI at the Command prompt to display the Customize User Interface Editor.
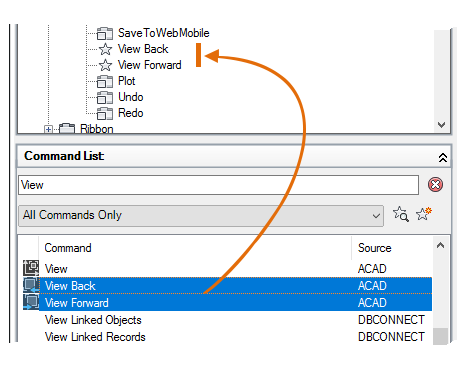
- Expand the Quick Access Toolbars node as shown.

- Enter "view" in the Command List Search box and scroll down the list about half way until you see the View Back and View Forward items.
- Shift-select and drag both the View Back and View Forward commands to just above Plot.
- Copy and paste the following macros into the Name field for each of them when you click the control in the CUI under Quick Access Toolbars:
- $(if,$(getvar, VIEWBACKSTATUS),,~)View Back
- $(if,$(getvar, VIEWFWDSTATUS),,~)View Forward
For example, here's what the properties of View Back should look like:

These two macros gray out the View Back and View Forward buttons once you reach the beginning or end of the previous views.
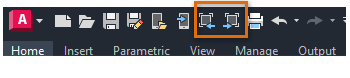
- Close the CUI dialog box by clicking OK and try out the new View Back and View Forward buttons on the Quick Access toolbar.
Adding these two buttons can improve your efficiency, especially when you need to zoom in and out of an area repeatedly.
Control the Behavior of Zooming and Panning
You can control the behavior of zooming and panning operations by setting system variables or creating custom buttons. Here are the most commonly used commands and system variables related to zooming and panning.
| Command | Description |
|---|---|
| PAN | Shifts the view without changing the viewing direction or magnification |
| VTOPTIONS | Displays a change in view as a smooth transition |
| ZOOM | Increases or decreases the magnification of the view in the current viewport |
| System Variable | Description | Default Value | Saved In |
|---|---|---|---|
| MBUTTONPAN | Controls the behavior of the third button or wheel on the pointing device | 1 | Registry |
| VTDURATION | Sets the duration of a smooth view transition, in milliseconds | 750 | Registry |
| VTENABLE | Controls when smooth view transitions are used | 3 | Registry |
| VTFPS | Sets the minimum speed of a smooth view transition, in frames per second | 7 | Registry |
| ZOOMFACTOR | Controls how much the magnification changes when the mouse wheel moves forward or backward | 60 | Registry |
| ZOOMWHEEL | Toggles the direction of transparent zoom operations when you scroll the middle mouse wheel | 0 | Registry |
Use the AutoCAD Help system to learn more about these commands and the supported values for the listed system variables. You can experiment with the system variable settings to find what works best for your needs.