Have you ever found yourself repeatedly selecting the same set of objects for copying, moving, or some other operation?
For example, you might be working with a standard office furniture arrangement, a mechanical assembly, or part of an infrastructure component. You could associate them in a block definition, but there's a quicker method using the Group feature.
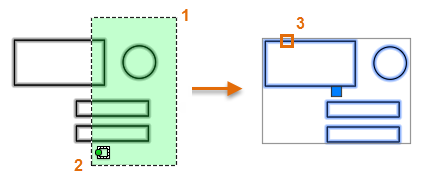
With the GROUP command, simply select the objects that you want to associate together (1, 2) and press Enter. Then, when you select any object in the group (3), all of the grouped objects are selected. A grip is displayed at the center of the group bounding box to provide access to all grip operations.
To disassociate the objects, use the UNGROUP command and select one of the objects in the group. The group association is dissolved.
For easy access to the controls for groups on the ribbon, locate the Home tab, Groups panel.
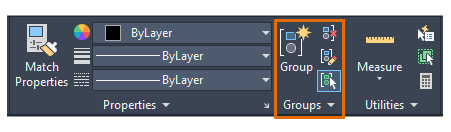
The commands in the panel include Group and Ungroup, plus . . .
- Group Edit. Use this command to add to or remove objects from a group.
- Group Selection On/Off. Use this toggle to control whether the entire group is selected or just an object within the group is selected when you select a grouped object. Use this toggle when you need to modify the objects within a group, click it again to restore group selection.

Create and Work with a Group
- Open one of your drawings or create some simple objects as previously illustrated.
- Select several objects that you want to group.
- Click
 Group. Find
The objects now belong to a group.
- Start the Copy command, select one of the objects in the group, and specify the location for the copied objects.
With group selection turned on, the copy of the group is also a separate group.
- Click
Group Selection On/Off Find
- Move a single object in the copied group.
- Click the Group Selection On/Off button again to restore group selection, and erase the entire copied group. Remember, you only need to select one object within the group.
- Click
Home tabGroups panelUngroup. Find
- Select an object in the original group that you created.
So, the next time you spend time selecting an intricate set of objects, consider whether taking the extra step of using the Group feature will save you time selecting and reselecting the same objects.