AutoLISP is a powerful productivity tool that allows you to automate workflows and extend the functionality of AutoCAD LT.
While AutoLISP isn't a new feature, it is now available in AutoCAD LT starting with the 2024 release.
The implementation of AutoLISP in AutoCAD LT lets you run most of the AutoLISP programs that have been developed over the past almost 40 years with some limitations. While you don't need to be an expert in AutoLISP to take advantage of many of the existing programs out there, learning AutoLISP programming is a skill that can unlock untapped productivity.
AutoLISP programs are commonly stored in a text file with the .lsp extension. Learning to load AutoLISP files is one of the first things you learn in the following exercises before learning some of the basics of AutoLISP programming. And no, you don't need prior programming experience to take advantage of AutoLISP. In many cases, a few new concepts and your current understanding of AutoCAD commands and system variables are all you really need.

Load an AutoLISP File
When first getting started with AutoLISP, rather than writing your own programs, you will likely be loading an AutoLISP file that you found online, or your company created. AutoLISP files can be loaded:
- At AutoCAD LT startup
- Upon the open of a drawing file
- When you want to use the programs defined in the file
The following methods can be used to load AutoLISP files at startup, upon the opening of a drawing, or manually.
| Loading at Startup | Loading Manually |
|---|---|
|
|
As you can see, AutoCAD LT is capable of loading AutoLISP files in a variety of ways. The methods you use depend on the configuration of your drafting environment. For now, we will look at loading an AutoLISP file with the Load/Unload Applications dialog box.
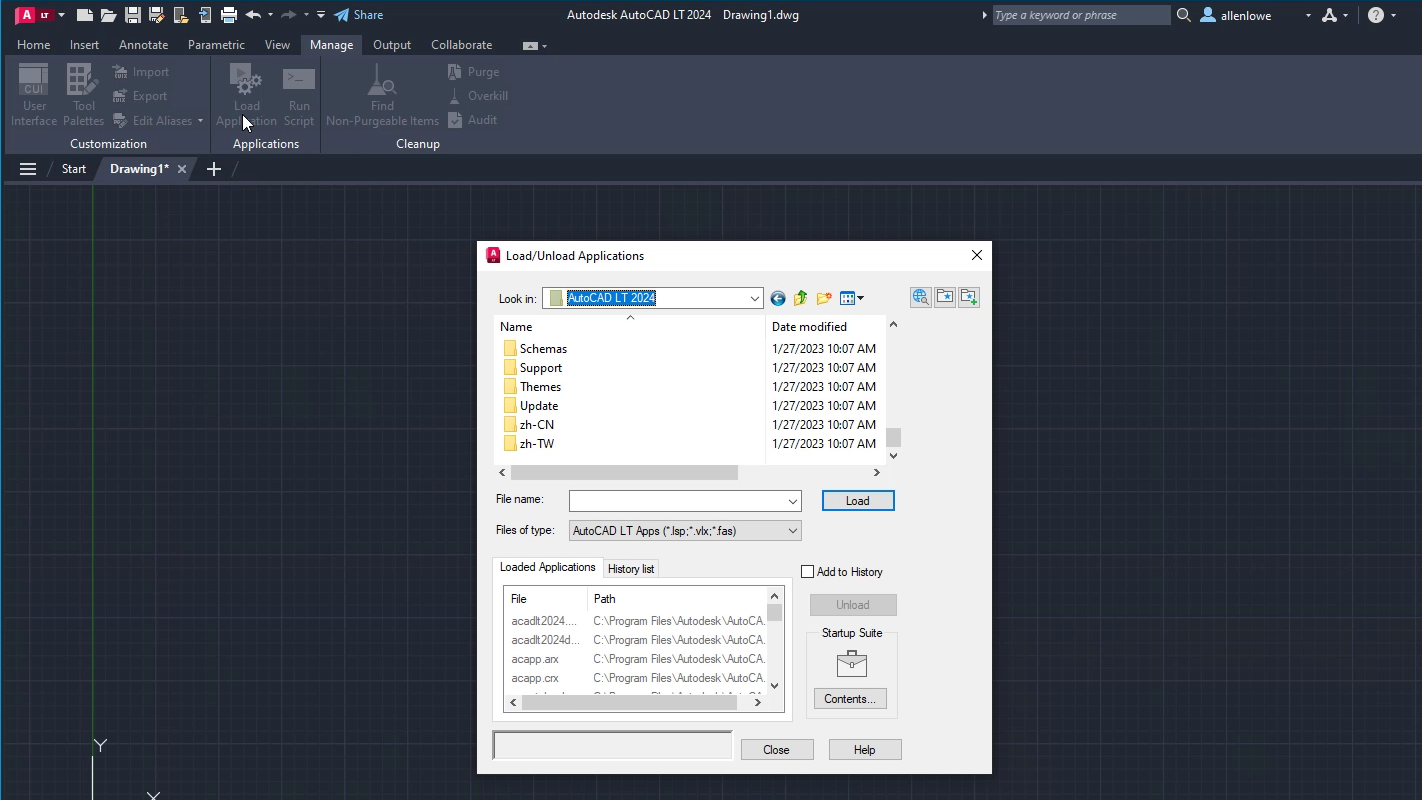
- In AutoCAD LT, click Manage tab > Applications panel > Load Application.
Find
APPLOAD could also be entered at the Command prompt.
- In the Load/Unload Applications dialog box, click the Look In drop-down list and select
This PC.
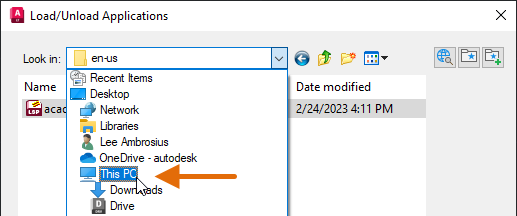
- In the Folders and Files list, navigate to
C:\Program Files\Autodesk\AutoCAD LT <release>\Support\en-us.
If you have a different language installed other than English, such as jp-jp, then select that folder instead of en-us.
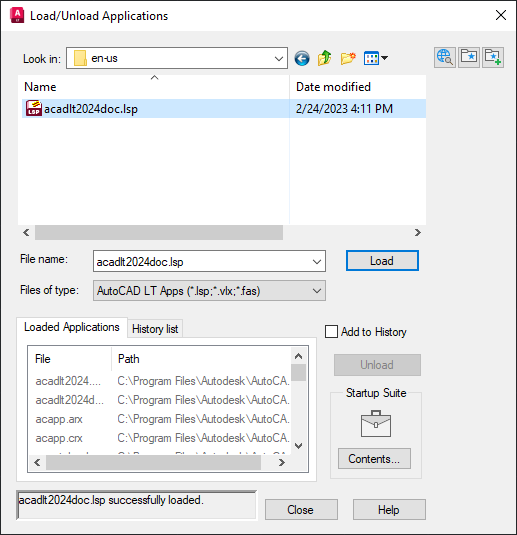
- Select
acadlt2024doc.lsp and click Load.
The acadlt2024doc.lsp file is one of the specially named AutoLISP files that AutoCAD LT searches for and loads if found into each drawing that is opened or created. This AutoLISP file contains some commands and custom AutoLISP functions used by the product. Here, I'm just using it as an example file.
In the message box, "acadlt2024doc.lsp successfully loaded." is displayed in the lower-left corner of the dialog box and in the command line window.

- Click Close.
- At the Command prompt, enter
ddgrips.
This starts the DDGRIPS command defined by AutoLISP in the acadlt2024doc.lsp. The DDGRIPS command opens the Options dialog box and sets the Selection tab current.
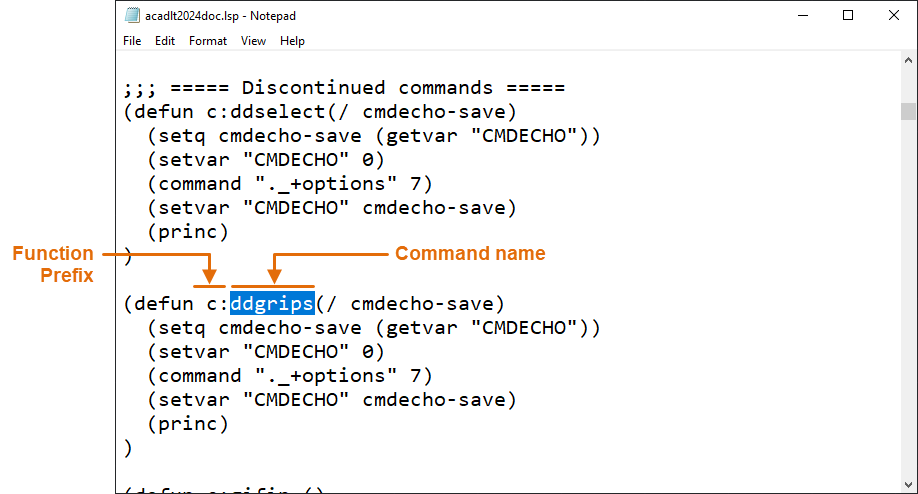
In the previous exercise, you used the DDGRIPS command. I'm sure you are wondering how you would have known that is a command in the loaded AutoLISP file. Sometimes, programs might use some code that puts a message directly in the command line window so you know which commands are defined and can be used. However, that isn't always the case, and you might have to open an AutoLISP file to know which commands are defined. An AutoLISP file can be opened using Notepad.
The following image shows part of the acadlt2024doc.lsp file opened in Notepad. AutoLISP-defined commands that can be entered at the Command prompt are prefixed with c:. The text directly after c: is the name of the command.
Manage and Secure AutoLISP Files
While there is no specific place where you must store the AutoLISP files you download or create before using them, it is recommended to store them in a shared location. Like drawing templates and block libraries, you want to make sure all drafters in a team or in the company have access to the same AutoLISP files. You should consider:
- Storing them in a folder on a networked drive or cloud storage provider
- Synchronizing them from a network folder to the local drive using a Windows login script/batch file during Windows startup
Once you have identified a folder to store your AutoLISP files, you need to inform AutoCAD LT where the folder is located using the Support File Search Path and Trusted Locations settings on the Files tab of the Options dialog box. AutoCAD LT needs to know where your LSP files are located for the following reasons:
- Load other AutoLISP files as needed with the use of the AutoLISP load function (Support File Search Path setting)
- Identify which folders from which it is safe to load LSP files (Trusted Locations setting)
The following steps show how to add the folder C:\AutoLISP Files to the Support File Search Path and Trusted Locations settings. You will use this location later to create an LSP file with a few short AutoLISP programs.
- In File Explorer, create the folder AutoLISP Files on the C:\ drive or in a location that you have write access, such as Documents.
- In AutoCAD LT, right-click the drawing area and select Options. Find
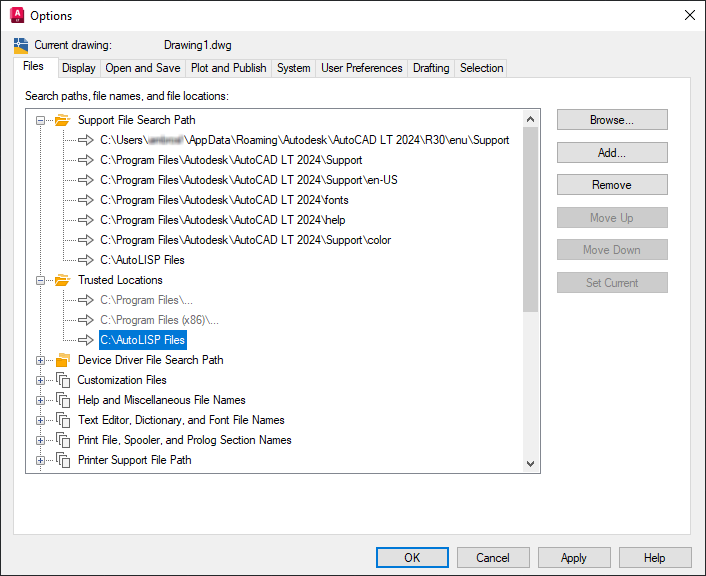
- In the Options dialog box, Files tab, expand and select the Support File Search Path node.
The listed folders are where AutoCAD LT looks for your AutoLISP files among other types of custom files used to store hatch patterns, linetypes, command aliases, and define new user interface elements.
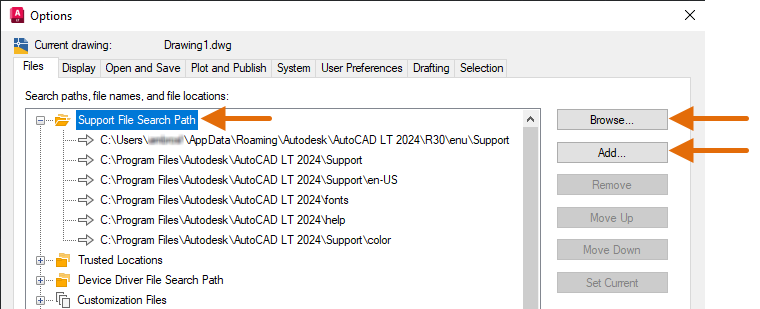
- Click Add and then Browse on the right-side.
- In the Browse for Folder dialog box, navigate to
C:\AutoLISP Files or the folder that contains your AutoLISP files.
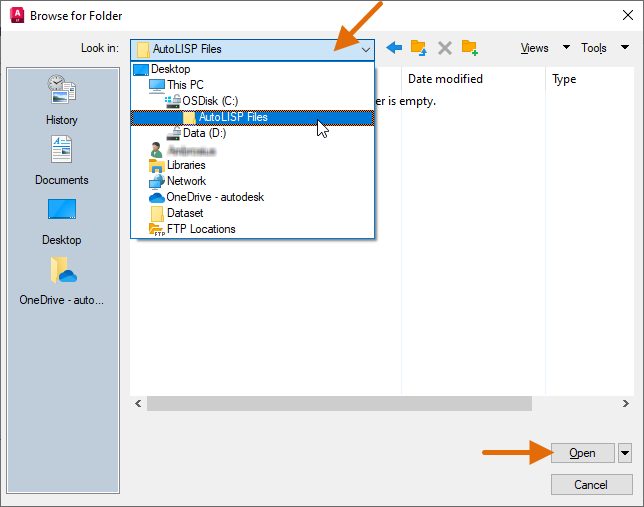
- Select the folder that contains your AutoLISP files and click Open.
The folder is added to the bottom of the list.
Note: AutoCAD LT searches the list from top down for custom files. In most cases, you don't need to reorder the folders unless you want to replace one of the standard customization files with one of your own.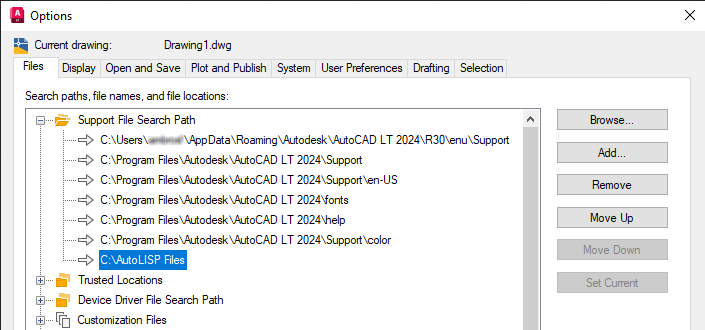
- Select the Trusted Locations node and add the C:\AutoLISP Files folder or the folder that contains your AutoLISP files. Follow steps 4 through 6 to add the folder.
- If the Trusted File Search Path – Security Concern message box is displayed, click Continue.
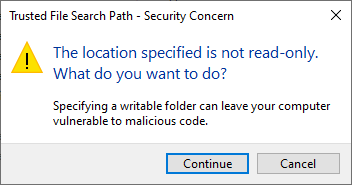
Remember: It is recommended to mark the folder where you store your AutoLISP files as read-only.The folder is added to the bottom of the list.
- Click OK to save the changes and exit the Options dialog box.
In addition to marking the folders with your AutoLISP files as read-only and identifying those folders as trusted, AutoCAD LT also offers some additional settings that help to secure AutoCAD LT from malicious code and malware. You can access the Security settings of AutoCAD LT by doing the following:
- In AutoCAD LT, right-click in the drawing area and select Options. Find
- In the Options dialog box, System tab, under the Security panel, click Security Options.

- Change the Options as needed under the Security Level and Automatic Loading sections.
- Security Level – Controls the restrictions applied to loading executable programs (SECURELOAD system variable)
- Trusted Folders – Folders in which AutoCAD is allowed to load executable programs when Security Level is medium or higher (TRUSTEDPATHS system variable)
- When Searching for Executable Files – Controls whether AutoCAD LT looks for AutoLISP files in the Start In folder defined by the desktop shortcut or the folder on an open drawing (LEGACYCODESEARCH system variable)
- Automatic Loading – Controls whether acadlt.lsp is loaded at start of session only or with each drawing opened (ACADLSPASDOC system variable)
- Click OK to save the changes or Cancel to discard changes, and exit the dialog box.
- In the Options dialog box, click OK to save the changes and exit the dialog box.
Enter AutoLISP Statements in AutoCAD LT
Being able to load and manage AutoLISP files that you find online, or your company already has, is just the beginning of becoming more productive with AutoLISP in AutoCAD LT. After you start using the AutoLISP programs from the AutoLISP files you already have in your everyday workflows, there may come the day when you want to make a change to them or even write your own basic AutoLISP programs.
You might be thinking to yourself, AutoLISP is a programming language and that you aren't a programmer. While true, AutoLISP is a programming language, you don't need to be a programmer to learn and write AutoLISP programs. The simplest AutoLISP program is a single statement that allows you to execute a command or change the value of a system variable.
An AutoLISP statement begins with an open parenthesis and ends with a closing parenthesis. The following is an example of an AutoLISP statement that turns Ortho Mode on with the ORTHOMODE system variable.
(setvar "orthomode" 1)
Like command and system variable names, AutoLISP statements can be entered at the Command prompt in AutoCAD LT. Let's give it a try:
- In AutoCAD LT, create a new drawing.
- On the status bar, click the Ortho Mode button to disable Orthomode.
The status bar button is gray in color when disabled.

- At the Command prompt, type
(setvar "orthomode" 1) and press Enter.
The Ortho Mode button on the status bar should now be enabled and blue in color.

Congratulations on writing your first AutoLISP statement! You are now a programmer!
The previous AutoLISP statement utilizes the setvar function to set the value of a system variable. There is also a function that returns the current value of a system variable named getvar. The setvar and getvar functions are just two out of hundreds of functions that can be used to automate workflows using AutoLISP. While there are hundreds of functions that make up the AutoLISP programming language, you only need to understand five key functions to get started. Two of which you have already learned about. The five functions are:
- COMMAND – Executes a command with specified options and values.
- DEFUN – Organizes multiple AutoLISP statements into a named function. Functions can be defined as commands which can be entered directly at the AutoCAD Command prompt.
- GETVAR – Gets the current value of a system variable.
- SETQ – Stores a value which can later be passed to a command or AutoLISP function.
- SETVAR – Assigns a value to a system variable.
Now that you know the five key functions and have used the setvar function to set a system variable, let's look at using the command function. Before continuing, you should know that command names can be prefixed with . (period) and _ (underscore) characters while command option names can be prefixed with an _ (underscore) character. These characters are used to ensure the provided command executes as expected.
Here is an explanation of what these characters mean:
- . (period) ensures that the standard command is used and not one that has been redefined with AutoLISP. A standard command can be undefined using the UNDEFINE command.
- _ (underscore) ensures the AutoLISP statement executes the global command or option name rather than the local language command or option name. For example, without the underscore, the French version of AutoCAD LT would expect the command name of CERCLE. Adding the underscore allows the same AutoLISP statement to work in English and French along with any other language.
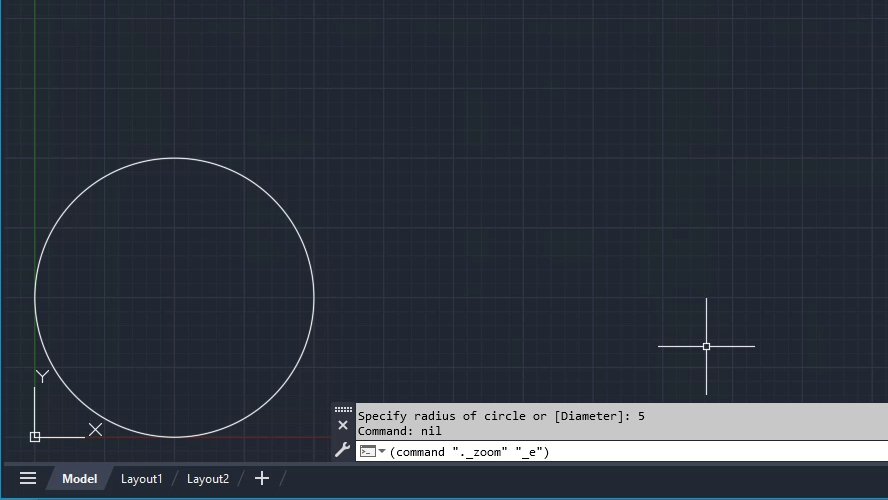
In the following steps, you draw a circle and zoom to the extents of the drawing using the command function.
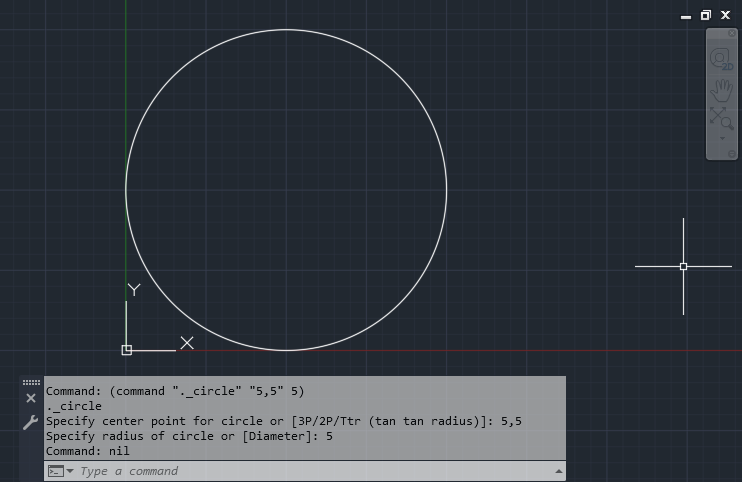
- At the Command prompt, type
(command "._circle" "5,5" 5) and press Enter.
A circle is drawn on the current layer with a radius of 5 units at 5,5.
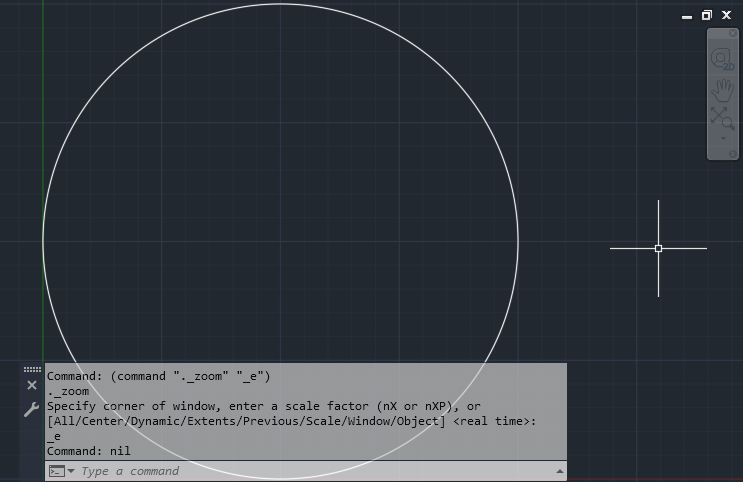
- At the Command prompt, type
(command "._zoom" "_e") and press Enter.
The drawing is zoomed to the extents of the circle if that is the only object in the drawing, else it zooms to the extents of all objects in the drawing.
Now that you have seen some AutoLISP statements, let's take a closer look at the various parts and syntax of the example AutoLISP statements:
- An AutoLISP statement starts with an open and ends with a closing parenthesis.
- Command names, options, and non-numeric values in AutoLISP statements need to be surrounded by double quotation marks. Balanced double quotation marks are used to denote a string. Some examples of strings are "1 1/4\"", "CONFIDENTIAL DRAFT", and "DOOR36.dwg".
- Whole and decimal numbers don't need to be surrounded by double quotation marks in most cases, unless part of a string.
- Coordinate values can be represented as a string or list value. For example, "5,5" and '(5 5) have the same meaning when passed as a value to the command function.
- Double quotation marks without a value ("") represent the pressing of the Enter key.
- The PAUSE variable (or token) is used to indicate when the user should be prompted for user input.
- If a string contains a double quotation mark, put a backslash (\) character before the double quotation mark to interpret it as a literal double quotation mark. For example, if your string contains an inch mark it might look like "1 1/4\"".
While entering AutoLISP statements directly at the Command prompt is a great way to start learning AutoLISP since you get feedback in real-time, it isn't very efficient to repeatedly retype statements at the Command prompt. One approach to allow you to reuse AutoLISP statements is to group them as a custom command with the defun function.
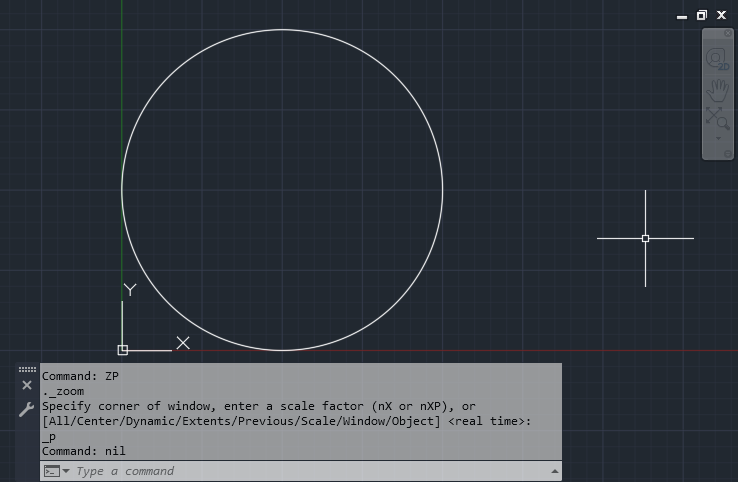
Let's give the defun function a try and define a custom command named ZP that zooms to the previous view of the drawing:
- At the Command prompt, type (defun c:zp () and press Enter.
- At the prompt (_>, type (command "._zoom" "_p") and press Enter.
- At the prompt (_>, type
) and press Enter.
C:ZP is output to the command.

- At the Command prompt, enter
ZP.
The previous view is restored.
- Use the ZOOM or PAN command to bring the circle back into the current view.
- At the Command prompt, enter
ZP.
The previous view is now restored.
Even though you can define custom commands with the defun function to make the reuse of AutoLISP statements easier, the commands you define are only available in the drawings of which they are defined, and while the drawing remains open. In the next section, you'll learn how to create an AutoLISP file to store your custom AutoLISP commands along with other AutoLISP statements that you might want to execute upon the loading of the AutoLISP file.
You can learn more about the five key functions along with the hundreds of other available functions in the AutoLISP Reference Guide.
Store AutoLISP Statements in AutoLISP (LSP) Files
Now that you know how to enter AutoLISP expressions at the Command prompt, let's look at how we can create an AutoLISP file and store your AutoLISP expressions and custom commands to make them available when you need them. AutoLISP files are plain ASCII text files that can be created with a simple text editor, such as Notepad, and have the file extension of .lsp. It is not recommended to use a word processor application like Write or Word as it can introduce specialized characters and formatting that will cause problems when it comes time to load the LSP file.
In the next exercises, you learn how to create an LSP file, add some AutoLISP statements to the LSP file, load the LSP file, and then try the commands defined in the LSP file. In addition to the five key functions mentioned earlier, you are also introduced to:
- The prompt and princ functions which are used to display and suppress messages in the command line window.
- Comments which are statements within an LSP file that start with a ; (semi-colon). These lines are there for informational purposes only and are not executed. A comment can be on its own line or after an AutoLISP statement.
Now let's create our own file and load it into AutoCAD LT:
- In Windows, click the Windows Start button > Windows Accessories > Notepad or in the search box on the task bar enter notepad.
- In Notepad, type the following in the editor area:
; Zoom commands
(defun c:ze () (command "._zoom" "_e"))
(defun c:zp () (command "._zoom" "_p"))

; Creates the layer A-ANNO-REV, draws a rectangle and
; converts the rectangle to a revision cloud with arc lengths
; based on half the current value of the LTSCALE system variable
(defun c:rv ()
  (setq old-layer (getvar "clayer"))

  (command "._-layer" "_m" "A-ANNO-REVCLD" "_c" "1" "" "")
  (command "._rectang" PAUSE PAUSE)
  (command "._revcloud" "_a" (/ (getvar "ltscale") 2) "" "_o" "_l" "_n")

  (setvar "clayer" old-layer)
)

; Display a general message in the command line upon load
(prompt "\nLoaded MyFirst.lsp")
(princ)
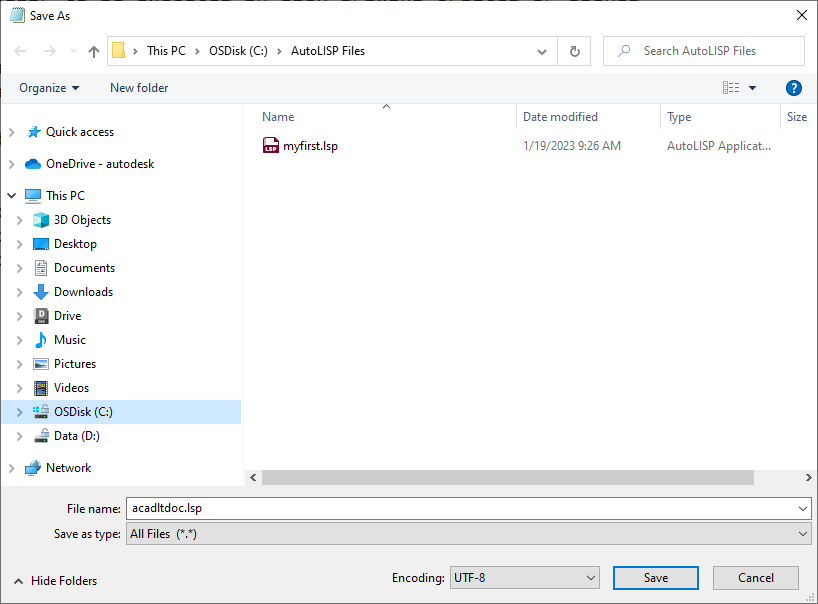
- On the menu bar, click File > Save As.
- In the Save As dialog box, navigate to the
C:\AutoLISP Files folder.
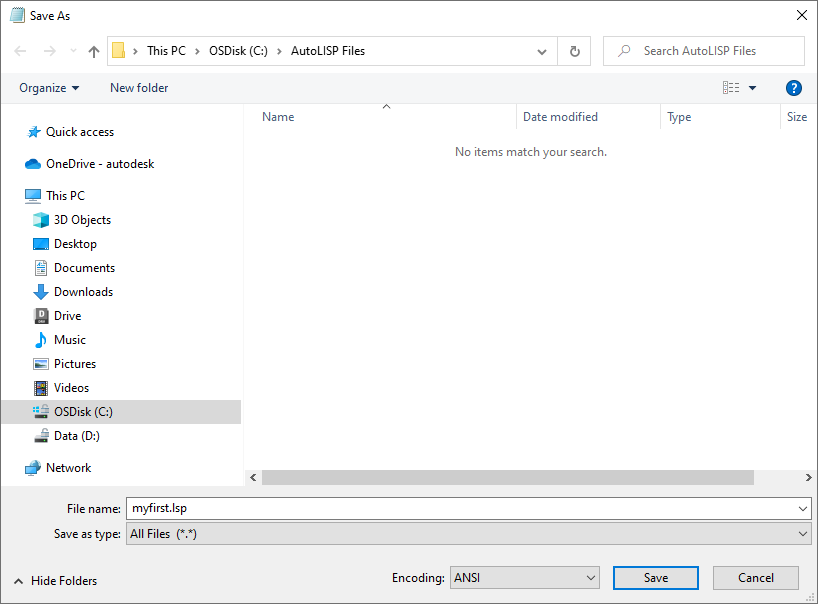
- In the File name text box, type myfirst.lsp.
- Click the Save as Type drop-down list and select All Files (*.*).
- Click the Encoding drop-down list and select
ANSI.
If your programs need to utilize Unicode characters, select UTF-8.
- Click Save.
Now that you have created the file, instead of using the Load/Unload Application dialog box that is displayed with the APPLOAD command, you will load the LSP file using File Explorer.
- In Windows, right-click on the Windows Start button and select File Explorer.

- In File Explorer, browse to the location of the myfirst.lsp file.
- Open a drawing in AutoCAD LT.
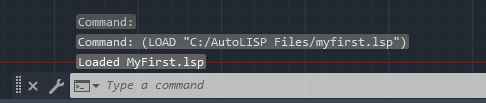
- Click and drag the LSP file over the AutoCAD LT drawing area.

- Release the mouse button to load the file into the drawing.
Once loaded, you should see the message "Loaded MyFirst.lsp" in the command line window history which was displayed by the prompt function.
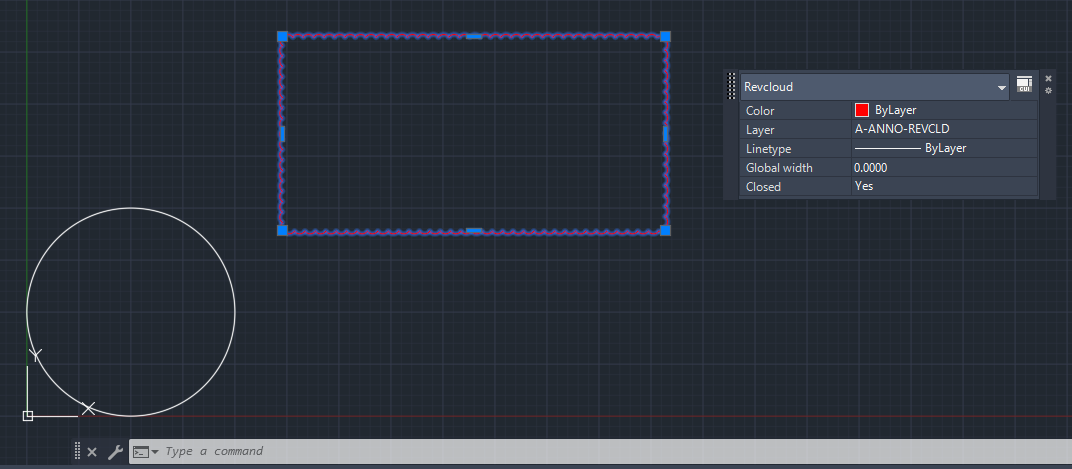
- At the Command prompt, enter RV.
- Specify two points to define the rectangular revision cloud.
Notice the revision cloud is red and placed on the layer A-ANNO-REVCLD. This can be seen from the Layer drop-down list on the Layers panel of the ribbon or the Properties/Quick Properties palettes.
- At the Command prompt, enter
ZE.
The drawing is zoomed to its extents.
- At the Command prompt, enter
ZP.
The previous view of the drawing is restored.
Load AutoLISP Files with the Startup Suite
The Load/Unload Application dialog box can be used to not only manually load AutoLISP files as they're needed, but it can also automatically load AutoLISP files upon the opening or creating of a new drawing file. The Startup Suite area of the Load/Unload Application dialog box is used to specify which AutoLISP files to automatically load.
Here are the steps used to add an AutoLISP file to the Startup Suite:
- In AutoCAD LT, click Manage tab > Applications panel > Load Application.
Find
APPLOAD could also be entered at the Command prompt.
- In the Load/Unload Application dialog box, under the Startup Suite section, click Contents.
- In the Startup Suite dialog box, click Add.
- In the Add File to Startup Suite dialog box, browse to and select the AutoLISP file you want to have automatically loaded. Click Open.
If you created the myfirst.lsp file in the previous section, you could select that file.
- Click Close twice to return to the drawing area.
The AutoLISP file you added to the Startup Suite is automatically loaded into the current drawing.
Note: If you added the myfirst.lsp file to the Startup Suite and are continuing with the next section, it is best to remove the file from the Startup Suite for now. Go back to the Startup Suite in the Load/Unload Application dialog box, select the myfirst.lsp file and click Remove.
Specialized Startup AutoLISP Files
When AutoCAD LT starts up or a drawing is created/opened, AutoCAD LT looks for four AutoLISP files with specific names. If the files are found, they are automatically loaded. These files help to make sure the AutoCAD LT environment is configured as expected and that your AutoLISP defined commands are available upon the creation or opening of a drawing.
AutoCAD LT looks for and automatically loads these four files when found in its support paths:
- acadlt.lsp – Loaded at startup by default, but may also be loaded into each drawing that is created or opened based on the current value of the ACADLSPASDOC system variable
- acadlt2024.lsp – Loaded at startup only
- acadltdoc.lsp – Loaded into each drawing that is created or opened
- acadltdoc2024.lsp – Loaded into each drawing that is created or opened
acadlt.lsp and acadltdoc.lsp must be created by you; they are not part of the standard AutoCAD LT installation. acadlt2024.lsp and acadltdoc2024.lsp are included with the program and shouldn't be modified.
You can utilize the acadlt.lsp and acadltdoc.lsp files like any other LSP files with the addition of these files automatically being loaded under the previously mentioned contexts. These two files can be used to load other AutoLISP files using the AutoLISP load function, execute AutoLISP statements as these files are being loaded, and define AutoLISP command definitions so they are ready for use once a drawing has been created or opened. The AutoLISP load function accepts two parameters; the AutoLISP file to load which is required and a second optional parameter that is a message to be displayed if the AutoLISP file being loaded is not found in one of the support file search paths of AutoCAD LT. See the Manage and Secure AutoLISP Files section on setting up support file search paths.
The following steps explain how to create the acadltdoc.lsp file in the C:\AutoLISP Files folder, add a few AutoLISP statements to it, load it into AutoCAD LT, and then verify the file was loaded.
- In Windows, click the Windows Start button > Windows Accessories > Notepad or in the search box on the task bar enter notepad.
- In Notepad, type the following in the editor area:
; AutoLISP to be executed in each drawing created or opened

; Set Object Snap and Ortho modes
(setvar "osmode" 4133)
(setvar "orthomode" 1)

; Load the LSP file created earlier under the
; "Store AutoLISP Statements in AutoLISP (LSP) Files" section
(load "myfirst.lsp" "\nMyFirst.lsp file couldn't be found")

; Display a general message in the command line upon load
(prompt "\nLoading my custom programs")
(princ)
- On the menu bar, click File > Save As.
- In the Save As dialog box, navigate to the
C:\AutoLISP Files folder.
- In the File name text box, type acadltdoc.lsp.
- Click the Save as Type drop-down list and select All Files (*.*).
- Click Save.
- If AutoCAD LT 2024 isn't already running, start AutoCAD LT 2024.
- In AutoCAD LT 2024, create or open a drawing file.
- Press F2 to expand the command line window.
In the command line window, you should see the message "Loading my custom programs" which is from one of the last two lines you entered earlier in step 2.
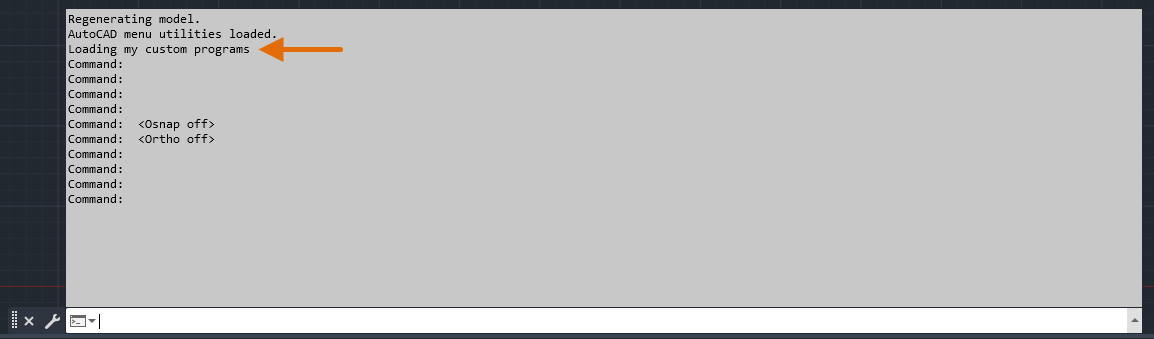
- On the status bar, click the Ortho Mode and 2D Object Snap buttons if they are blue to turn them off.

- Create or open a drawing file again.
The status bar buttons should once again be enabled.

Plug-in Bundles (Advanced)
A plug-in bundle is a folder structure with a manifest file named PackageContents.xml file that informs AutoCAD LT of the files and settings that make up the plug-in. While plug-in bundles are not required for loading AutoLISP programs into AutoCAD LT as you have already learned throughout this article, they can make the managing of AutoLISP files easier and are a safer way to deploy custom programs than with the use of the acadlt.lsp or acadltdoc.lsp files. Plug-in bundles can also help configure AutoCAD LT without the need of the Options dialog box in most cases.
For information on plug-in bundles, see the Example: Basic .bundle Folder Structure for a Plug-in.
Summary
Automating your workflows can help improve your productivity and reduce repetitive tasks. While AutoLISP programming does have a learning curve, if you stick to learning the five key functions, you can make some small programs that help you realize just how valuable AutoLISP can be in your everyday workflows.
AutoLISP Related Commands and System Variables
Here are some frequently used commands and system variables related to AutoLISP.
| Command | Description |
|---|---|
| APPAUTOLOADER | Lists or reloads all plug-ins in the application plug-in folder. |
| APPLOAD | Loads and unloads applications and defines which applications to load at startup. |
| OPTIONS | Customizes the program settings. |
| SECURITYOPTIONS | Controls the security restrictions for running executable files in the product. |
| UNDEFINE | Allows an application-defined command to override an internal command. |
| System Variable | Description | Default Value | Saved in |
|---|---|---|---|
| ACADLSPASDOC | Controls whether the acad.lsp file, or acadlt.lsp file for AutoCAD LT, file is loaded into every drawing or just the first drawing opened in a session. | 0 | Registry |
| APPAUTOLOAD | Controls when plug-in applications are loaded. | 14 | Registry |
| CLAYER | Sets the current layer. | 0 | Drawing |
| CLIPROMPTUPDATE | Controls whether the command line displays the messages and prompts generated while an AutoLISP or script file is being executed. | 1 | Registry |
| CMDDIA | Controls the display of the In-Place Text Editor for the DIMEDIT and QLEADER commands, and the display of certain dialog boxes in AutoCAD-based products. | 1 | Registry |
| CMDECHO | Controls whether prompts and input are echoed during the AutoLISP command function. | 1 | Not-saved |
| FILEDIA | Suppresses display of file navigation dialog boxes. | 1 | Registry |
| LEGACYCODESEARCH | Controls whether searching for executable files includes the folder from which the program is started. | 0, may be locked by a CAD administrator | Registry |
| NOMUTT | Suppresses the message display (muttering) when it wouldn't normally be suppressed. | 0 | Not-saved |
| ORTHOMODE | Constrains cursor movement to the perpendicular. | 0 | Drawing |
| OSMODE | Sets running object snaps. | 4133 | Registry |
| SECURELOAD | Controls whether executable files are restricted to being loaded from trusted folders only. | 1, may be locked by the CAD administrator | Registry |
| TEXTEVAL | Controls how text strings entered with TEXT (using AutoLISP) or with -TEXT are evaluated. | 0 | Not-saved |
| TRUSTEDPATHS | Specifies which folders have permission to load and execute files that contain code. | Varies, may be locked by a CAD administrator | Registry |