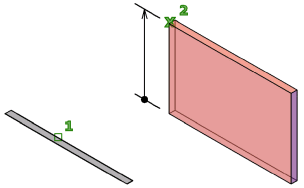
Creates a 3D solid or surface by extending a 2D or 3D curve.
Access Methods
Tool Set:
.

Menu: .
Summary
Extrusions can extend in the Z direction or be set to taper or follow a path.
You can extrude an open or closed object to create a 3D surface or solid.

The DELOBJ system variable controls whether the object(s) and path (if selected) are automatically deleted when the solid or surface is created or whether you are prompted to delete the object(s) and path.
You can use the following objects and subobjects with EXTRUDE:
| Object type | Can be extruded? | Can be extrusion path? | Comments |
|---|---|---|---|
| 3D faces | X | ||
| Arcs | X | X | |
| Circles | X | X | |
| Ellipses | X | X | |
| Elliptical arcs | X | X | |
| Helixes | X | ||
| Lines | X | X | |
| Meshes: faces | X |
The MESHEXTRUDE command may provide better results. |
|
| Meshes: edges | X | X | |
| 2D Polylines | X | X |
2D polylines with crossing segments cannot be extruded. Thickness and width are ignored. The extrusion extends from the center line. |
| 3D Polylines | X | X | |
| Regions | X | ||
| 2D Solids | X | ||
| 3D Solids: edges | X | X | |
| 3D Solids: faces | X | ||
| Splines: 2D and 3D | X | X | |
| Surfaces: edges | X | X | |
| Surfaces: planar and non-planar | X | X | |
| Traces | X |
List of Prompts
The following prompts are displayed.
- Objects to Extrude
-
Specifies the objects to extrude.
 Note: Select face and edge subobjects by pressing Ctrl while you select them.
 - Mode
-
Controls whether the extruded object is a solid or a surface.
Surfaces are extruded as either NURBS surfaces or procedural surfaces, depending on the SURFACEMODELINGMODE system variable.
- Height of extrusion
-
Extrudes selected objects along the positive or negative Z axis. The direction is based on the UCS that was current when the object was created, or (for multiple selections) on the original UCS of the most recently created object.

- Direction
-
Specifies the length and direction of the extrusion with two specified points. (The direction cannot be parallel to the plane of the sweep curve created by the extrusion.)
- Path
-
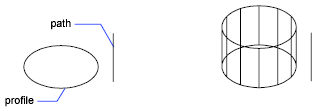
Specifies the extrusion path based on a selected object. The path is moved to the centroid of the profile. Then the profile of the selected object is extruded along the chosen path to create solids or surfaces.
 Note: Select face and edge subobjects by pressing Ctrl while you select them.
The path should not lie on the same plane as the object, nor should the path have areas of high curvature.
The extrusion starts from the plane of the object and maintains its orientation relative to the path.
If the path contains segments that are not tangent, the program extrudes the object along each segment and then miters the joint along the plane bisecting the angle formed by the segments. If the path is closed, the object should lie on the miter plane. This allows the start and end sections of the solid to match up. If the object is not on the miter plane, the object is rotated until it is on the miter plane.
Objects with multiple loops are extruded so that all of the loops appear on the same plane at the end section of the extruded solid.
- Taper angle
-
Specifies the taper angler for the extrusion.

Positive angles taper in from the base object. Negative angles taper out. The default angle, 0, extrudes a 2D object perpendicular to its 2D plane. All selected objects and loops are tapered to the same value.
Specifying a large taper angle or a long extrusion height can cause the object or portions of the object to taper to a point before reaching the extrusion height.
Individual loops of a region are always extruded to the same height.
When an arc is part of a tapered extrusion, the angle of the arc remains constant, and the radius of the arc changes.
- Angle of taper. Specifies the taper between -90 and +90 degrees.
- Specify two points. Specifies the taper angle based on two specified points. The taper angle is the distance between the two specified points.
Drag the cursor horizontally to specify and preview the taper angle. You can also drag the cursor to adjust and preview the height of the extrusion. The dynamic input origin should be placed on the extruded shape, on the projection of the point to the shape.
When you select the extruded object, the position of the taper grip is the correspondent point of the dynamic input origin on the top face of the extrusion.
- Expression
-
Enter a formula or equation to specify the extrusion height. See Constrain a Design with Formulas and Equations.