Use Markup Import to overlay a marked-up PDF, JPG, or PNG file on top of a drawing in the Trace workspace, and use Markup Assist to insert any detected markups into the drawing.
Import a Markup
- Click .
- Select a PDF, JPG, or PNG markup file to import.
The imported markup file can include hand-drawn or digitally drawn markups. The markup file can be a digital copy, a photograph, or a scanned version of the original drawing.
- Move, align, rotate, or scale the markup if the imported markup file isn't automatically aligned to the drawing correctly.
Modify or Align the Imported Markup File
Imported markups are automatically aligned with the existing drawing. However, sometimes the imported markup doesn't align correctly and requires manual alignment.
To align the imported file:
- Specify a source point and then the corresponding destination point. To rotate the imported markup, specify a second source point followed by a second destination point.
- Press Enter to end the command.
- The selected objects are moved from the source point to the destination point. Second and third points, if you specify them, rotate, and tilt the selected objects.
Use Markup Assist To Insert Text
Markup Assist identifies text in the imported markup that can be inserted into the drawing file as multiline text or as a multileader object, or used to append or replace existing text in the drawing.
- After importing a markup, with the trace open, turn on TRACEBACK and MARKUPASSISTMODE.

- Click the blue highlighted border of an identified text markup. When hovering over an identified markup, you'll see the Markup Assist icon.
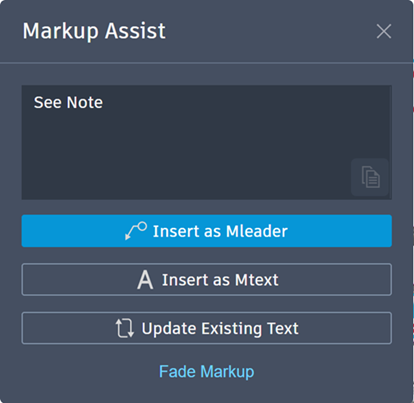
 The Markup Assist dialog box opens.
- Select one of the following:
- Insert as Mleader. Starts the MLEADER command and inserts the markup text into the drawing. After inserting as an mleader, the markup switches to faded.
- Insert as Mtext. Starts the MTEXT command and inserts the markup text into the drawing. After inserting as mtext, the markup switches to faded.
- Update Existing Text. Use the markup text to append or replace existing drawing text. After appending or replacing text, the markup switches to faded.
- Fade Markup. Fade the markup so it is less visible on the trace.
- Copy to Clipboard. Copy the text to the Clipboard.
Often, Markup Assist doesn't perfectly identify the characters in the markup text. This is especially true with hand-written markups. Fortunately, you can edit the text using the Markup Assist dialog box before inserting it. To add more complex changes or formatting changes, it's recommended to copy to the text to Clipboard and edit text outside the Markup Assist dialog box, or insert the text into the drawing, then edit it using the MTEDIT command.
Use Markup Assist to Insert a Revision Cloud
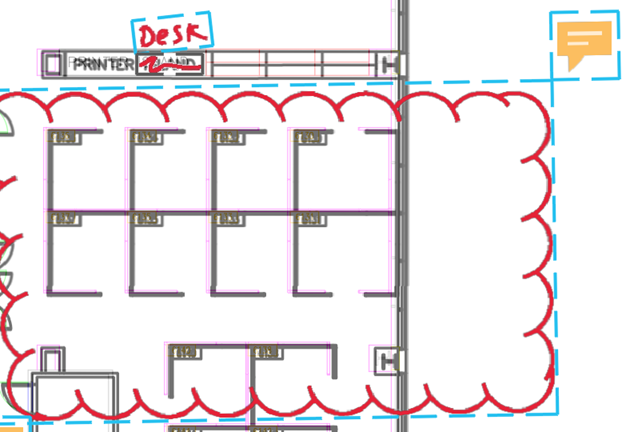
Markup Assist identifies boundaries (for instance, a hand drawn circle) that can be inserted into the drawing as revision clouds.
- After importing a markup, with the trace open, turn on TRACEBACK and MARKUPASSISTMODE.
- Click the blue highlighted border of the boundary markup. When hovering over an identified markup, you'll see the Markup Assist icon.

- Select one of the following:
- Insert as Revcloud. Insert a rectangular revision cloud into the drawing, using the highlighted border as the defined size and shape. The markup switches to faded.
- Fade Markup. Fade the markup so it is less visible on the trace.
The Markup Assist dialog box opens.
Use Markup Assist to Update Existing Text
You can use the markup text to append or replace existing text in the drawing.
- After importing a markup, with the trace open, turn on TRACEBACK and MARKUPASSISTMODE.
- Click the blue highlighted border of an identified text markup. When hovering over an identified markup, you'll see the Markup Assist icon.

- Select Update Existing Text.
- Select the text in the drawing that you want to update.
- Choose one of the following:
- Append. Opens the text editor and adds the text to the end of the existing text.
- Replace. Opens the text editor and adds the text to the end of the existing text. Make changes in the text editor, and close the text editor when complete.
- Select a strikethrough. Select a strikethrough markup, which opens the text editor and adds the text in place of the crossed out text.
- Make changes in the text editor, and close the text editor when complete.
The Markup Assist dialog box opens.
Use Strikethrough Text
Markup Assist recognizes text that has been crossed out, and allows you to erase the text or replace the text with text from a markup.
To replace existing text:
- Click a strikethrough markup. The Markup Assist dialog box opens.
- Click Replace Existing Text.
- Click the text in the drawing to replace.
- Click the text in the markup to replace the existing text with.
To erase existing text:
- Click a strikethrough markup. The Markup Assist dialog box opens.
- Click Erase Existing Text.
- Select the text in the drawing to erase.
Fade and Unfade Markups
- With TRACEBACK on, click Fade Markup on the Trace toolbar. Alternatively, at the Command Prompt, enter FADEMARKUP.
- Select markups. To unfade, enter N at the Command Prompt and then select markups.
You can also fade and unfade individual markups by clicking the markup while in Markup Assist mode, and then selecting Fade Markup or Unfade Markup from the Markup Assist dialog box.
Selecting Markups Within a Boundary
When you use any command that prompts to "Select Objects," you can click the blue highlighted border of a Markup Assist boundary to select all the AutoCAD objects within it. When you click the highlighted border, all objects entirely within the border are added to the selection set.
Markups With Associated PDF Text Comments
Text comments that are added to a PDF using Adobe software will display and can be inserted into the drawing as an Mleader or Mtext, or used to update existing text.

To insert text from a PDF text comment:
- Click the markup that contains a PDF text comment.
- Insert the text as an Mleader, Mtext, or Update Existing Text.
The Markup Assist dialog box opens.
Instruction Text on a Markup
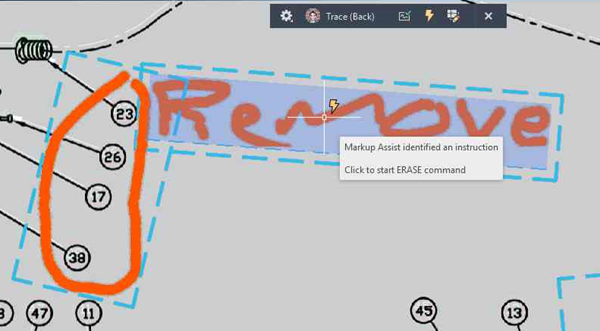
Markup Assist detects certain instructions in markup text that are linked to commands such as "MOVE," "COPY," or "DELETE." When Markup Assist identifies an instruction, you can click that instruction to start the associated command.

To Import Markup Directly from Your Camera on a Mobile Device
You can use the AutoCAD mobile app to import a photograph into the drawing as markup.
- In the AutoCAD mobile app, tap .
- Using the device's camera, take a photo and confirm the image.