Use Sheet Set Manager for Web to manage sheet sets stored on Forma Data Management (formerly Autodesk Docs).
Open a Sheet Set Saved on Forma Data Management
- In the Sheet Set Manager for Web, click Open Sheet Set.

- In the Start tab, click Autodesk Projects.
- Double-click a sheet set in File Explorer.
- In the AutoCAD web app (https://web.autocad.com/), connect to Autodesk Projects and open a sheet set as desired.
Display the Sheet Set Manager for Web
Opening a sheet set saved on Forma Data Management displays the Sheet Set Manager for Web by default. Otherwise, do the following to control the display of the Sheet Set Manager for Web.
- At the Command prompt, enter ssmdetectmode.
- Enter on.
Create a Sheet Set in the Cloud
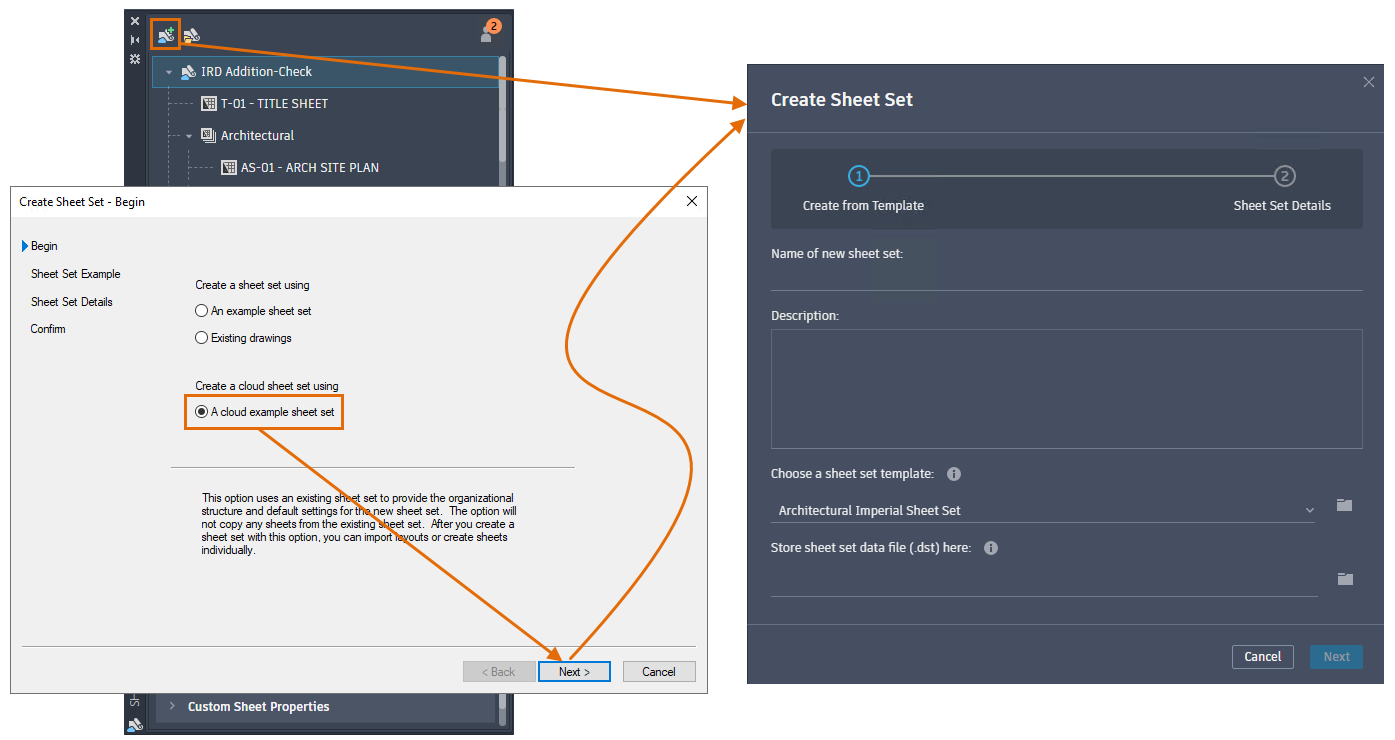
- In AutoCAD desktop, click Application menu

 NewSheet Set.
Find
NewSheet Set.
Find
In the AutoCAD web app, click
 (Create Sheet Set) on the Sheet Set Manager.
- Follow the steps in the Create Sheet Set wizard.
- Choose the option to create a cloud sheet set using an example sheet set.
- Click Next.
- In the Create Sheet Set dialog box, enter the name, description, and location of the new sheet set.
- Choose a sheet set template.
- Click Next.
- Review the sheet set properties and click Create.
- Sheets with existing sheet set references can't be imported using the Create Sheet Set wizard.
- Creating folders based on subsets does not work with Forma Data Management.
Create a New Sheet Set Subset
- In the Sheet Set Manager for Web, right-click the sheet set node (at the top of the list), or an existing subset node. Choose New subset.
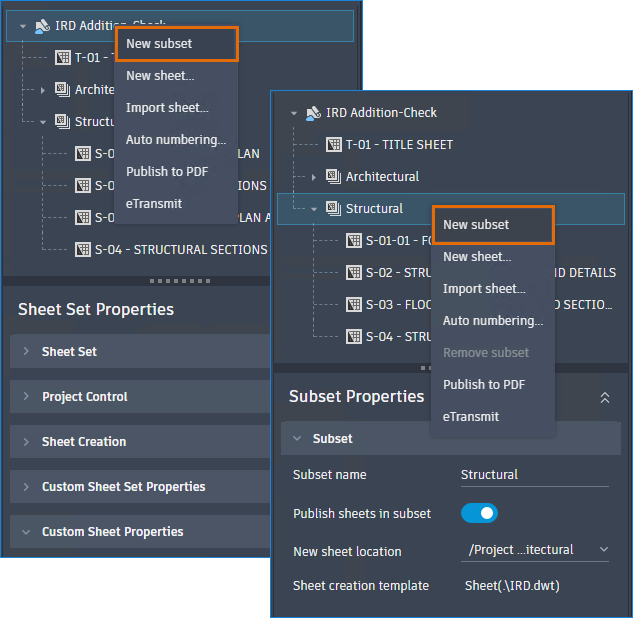
- Select the new subset, if necessary.
- At the bottom of the Sheet Set Manager for Web, Subset Properties, enter the name and other properties of the new subset.
Remove a Subset
- In the Sheet Set Manager for Web, remove any sheets the subset contains, if necessary.
Note: You can only remove an empty subset.
- Right-click the subset and choose Remove subset.
Create a New Sheet
- In the Sheet Set Manager for Web, right-click the sheet set node (at the top of the list), or an existing subset node. Choose New sheet.
- (Optional) Specify a different template.
- Select the new sheet, if necessary.
- At the bottom of the Sheet Set Manager for Web, Sheet Properties, enter the name and other properties of the new sheet.
Specify a Location for New Sheets
- In the Sheet Set Manager for Web, select a sheet set or a subset.
- At the bottom of the Sheet Set Manager for Web, Sheet Set Properties pane, expand Sheet Creation and click Sheet Storage Location drop-down.
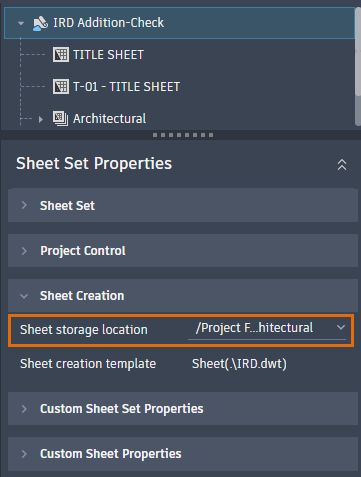 If you've selected a subset, under Subset Properties pane, expand Subset and click New Sheet Location drop-down.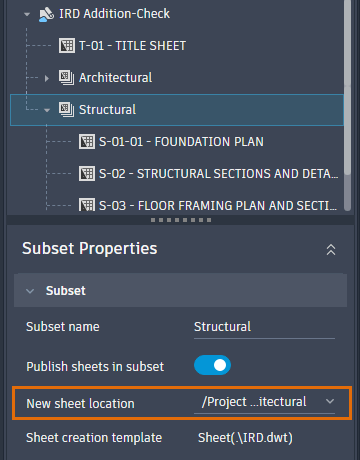
- Click Browse.
- In the Specify sheet storage location dialog box, click the appropriate checkbox to choose a folder.
Important: When selecting a sheet location folder, do NOT click the folder name. Clicking the folder name displays the contents in the folder but does not select it.
- Click Select.
Remove a Sheet from a Sheet Set
- In the Sheet Set Manager for Web, right-click a sheet.
- Choose Remove sheet.
This disassociates the sheet from the sheet set, but doesn't delete the drawing file or the layout.
Reorder a Sheet or Subset
- In the Sheet Set Manager for Web, select a sheet or a subset.
- Drag the selected sheet or subset anywhere on the sheet list or under other subsets.
Rename or Renumber a Sheet
- In the Sheet Set Manager for Web, right-click a sheet. Choose Rename and renumber.
- In the Rename and Renumber dialog box, specify the following:
- Sheet number. Specifies the sheet number of the selected sheet.
- Sheet title. Specifies the sheet title of the selected sheet.
- Layout name. Specifies the name of the layout associated with the selected sheet.
- File name. Specifies the name of the drawing file associated with the selected sheet.
- To renumber or retitle a series of sheets, click Previous or Next.
Automatically Number New Sheets
- In the Sheet Set Manager for Web, right-click a sheet set or subset.
- In the Auto Numbering dialog box, specify the following:
- Prefix. Adds a number, letter, or word to the new sheets of the selected sheet set or subset.
- Start number. Specifies the first number in the sequence of the newly created sheets. This field only accepts zero or positive integers.
Modify Properties
- In the Sheet Set Manager for Web, select a sheet set or subset, or sheet.
- At the bottom of the Sheet Set Manager for Web, Properties pane, make any changes to the sheet set, subset, or sheet properties.
Add Custom Properties
- In the Sheet Set Manager for Web, select a sheet set.
- At the bottom of the Sheet Set Manager for Web, at the right of the Sheet Set Properties pane, click
 to create a new sheet set or sheet property.
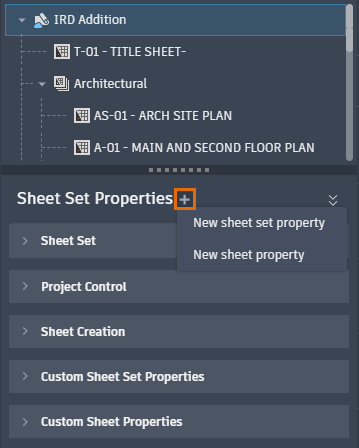
- Sheet set properties are typically specific to a project, for example, the contract number.
- Sheet properties are typically specific to each sheet, for example, the name of the designer.
- To remove a custom property, right-click a property and choose Remove.
Import a Layout to a Sheet Set
- In the Sheet Set Manager for Web, right-click a sheet set or a subset.
- Choose Import sheet.
- Browse to the cloud location and select one or more drawings that you want to use.
- Click Select.
- Select the layouts to be imported as sheets in the current sheet set or subset.

- Click Import.
Specify a Support File Location
- Log in to AutoCAD Web at web.autocad.com.
- In the pane on the left, do one of the following:
- If Autodesk Projects is listed, continue to the next step.
- If Autodesk Projects is not listed, click Add Autodesk Projects. In the Connect Autodesk Projects dialog box, select the projects to connect and click Done.
- Under Autodesk Projects, click the project you want to work with.
Note: If the project you want to work with isn't listed under Autodesk Projects, click Connect Projects. In the Connect Autodesk Projects dialog box, select the projects to connect and click Done.
- In the main area, click Manage Support Files to configure the support files for the project.
- In the Support Files dialog box, upload the support files and add search paths to be used by the drawings and sheet sets in the project.
For more information about uploading and managing support files and search paths, see File Management in the AutoCAD web app Help.
- Click Done.
For more information, see FAQ: How do I Set Up Project-Aware Settings for a Sheet Set?
Publish to PDF
You can easily publish an entire sheet set, a subset of a sheet set, a single sheet.
- In the Sheet Set Manager for Web, right-click a sheet set, subset, or sheet.
To publish multiple sheets, hold down the Ctrl key while selecting subsets or sheets, and then right-click.
- Choose Publish to PDF.
- In the Publish Settings dialog box, specify the following:
- Output format. Defines how to publish the files. You can publish the sheets to a single multi-page PDF file or to multiple single-page PDF files.
- File name. Specifies the name of the single multi-paged PDF file or the ZIP file name containing multiple PDF files.
- Storage location. Specifies the folder where the PDF or ZIP file is created.
Important: When selecting a storage location folder, do NOT click the folder name. Clicking the folder name displays the contents in the folder but does not select it.
- Specify whether to overwrite the file if a duplicate name exists in the specified storage location.
- Click Publish.
Transmit a Sheet Set
You can package and send a sheet set or a portion of a sheet set electronically.
- In the Sheet Set Manager for Web, right-click a sheet set, subset, or sheet.
To include multiple sheets in the transmittal, hold down the Ctrl key while selecting subsets or sheets, and then right-click.
- Choose eTransmit.
- In the eTransmit Settings dialog box, specify the following:
- File name. Specifies the name of the zipped transmittal package.
- Storage location. Specifies the folder where the transmittal package is created.
Important: When selecting a storage location folder, do NOT click the folder name. Clicking the folder name displays the contents in the folder but does not select it.
- Specify whether to overwrite the file if a duplicate name exists in the specified storage location.
- Click Transmit.
Add a Sheet List Table
Use the following steps to add a sheet list table for sheet sets stored on Forma Data Management.
- In AutoCAD desktop, close Sheet Set Manager for Web.
- At the Command prompt, set SSMDETECTMODE to off.
- From Forma Data Management, navigate to the location of the desired DST file. Manually lock the file to keep others from editing the DST file.
- Open the cloud DST file.
With SSMDETECTMODE turned off, the legacy Sheet Set Manager should display when opening a cloud-based DST file.
- In the legacy Sheet Set Manager, right-click a sheet set name, subset, or multiple sheet set names and subsets. Click Insert List Table.
- In the Sheet List Table dialog box, do the following:
- Set the table style in the Table Style Settings group.
- On the Table Data tab, specify title text for the table and add, remove, or change the order of the column entries.
- On the Subsets and Sheets tab, select the subsets and sheets to be included in the sheet list table.
Note: If you add a sheet to a subset later on, you will be automatically prompted to update the sheet list table.
- Click OK.
- In the Sheet Set Manager, right-click the sheet set and choose Close Sheet Set.
- From Forma Data Management, navigate to the DST file location and manually unlock the file.
- In Autodesk desktop, set SSMDETECTMODE to on.
- Re-open the DST file.
The Sheet Set Manager for Web now displays when the cloud-based DST file is opened.