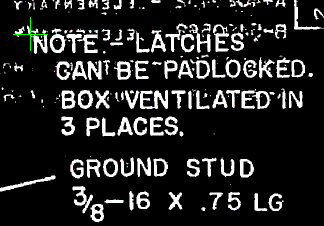
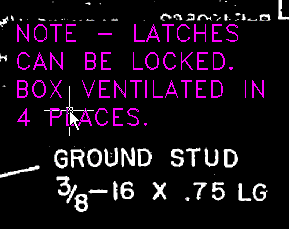
In this exercise you learn how to replace multiline text paragraphs (e.g., construction notes), or single lines of text with vector versions.
Often when you try to use scanned drawings as part of a construction document set, text must be modified or updated.
Related Exercises
Before doing this exercise, ensure that AutoCAD Raster Design toolset options are set as described in the exercise Exercise A1: Setting AutoCAD Raster Design Toolset Options.
Exercise
- In the
..\Program Files\Autodesk\ApplicationPlugins\RasterDesign2024.Bundle\Contents\Tutorials\Tutorial6 folder, open the drawing file
VTools_03.dwg.
Turn off raster snaps
- On the ribbon, click
Raster Tools tab
 Snap panel
  Dialog box launcher (
 ).
).
- In the Drafting Settings dialog box, Raster Snap tab, clear the
Raster Snap On check box and then click
OK.
This turns off any Raster Snaps so any point in the image can be selected. You can also accomplish this by pressing Ctrl + F3 to toggle Raster Snap.
Convert raster notes to multiline text
- To create a new, corrected block of text, on the ribbon, click
Raster Tools tab
 Vectorize & Recognize Text panel
  Text drop-down menu
  Multiline Text
 .
.
- Select a point at the upper left corner of the existing note for the box.

- Press Enter to accept the rotation angle of 0.
- Drag a window around the existing four lines of text to specify the area to be used by the multiline text.
- In the multiline text frame, enter the following replacement text:
NOTE: LATCHES CAN BE LOCKED. BOX VENTILATED IN 4 PLACES.
- On the ribbon, click
Text Editor tab
 Close panel
  Close Text Editor to finish.
- Select two points outside the new text to create a selection window for removing the raster from behind the new text. The background raster is highlighted to show what will be removed. If the wrong area was selected, you can enter
r (Repick) and select a new area.

- Press
Enter to remove the raster and complete the command.
 Note: If you need to edit the vector text, select it, then right-click and click MText Edit.
Convert a raster label to a single line of text
In the next few steps, you will replace a single line of text to correct an alignment problem with the second line of the label for concentric knockouts in the lower left region of the drawing.
- To create a new line of text, on the ribbon, click
Raster Tools tab
 Vectorize & Recognize Text panel
  Text drop-down menu
  Text
Text
 .
.
- Select a point to mark the lower left corner of the inserted text, just above the left edge of the line “OR 1.50 DIA. OUTPUT”.
The following example shows you where to select the starting point for the new single line of text.

- In the
VText Edit dialog box, enter the following replacement text and then click OK:
KNOCKOUTS FOR 1.25
- Select two points outside the new text to create a selection window for removing the raster text from behind the new vector text.
The background raster is highlighted to show what will be removed. If the wrong area was selected, you can enter r (Repick) to re-select the window.

- Press
Enter to remove the raster. Press
Enter a second time to complete the command.

- Close the drawing without saving changes.