In this exercise, you will reduce the number of points that are used to define a surface.
A surface can be simplified by removing either TIN edges or points. When the simplify surface command is complete, new points and TIN edges are calculated based on specified parameters. The original surface points are still contained in the referenced point file, but are not used in the surface triangulation.
In this exercise, you will use the Point Removal method of simplifying a surface. This method randomly selects points from the surface, and removes them based on the point density at different areas of the surface. More points are removed from areas in which the concentration of points is very dense than from areas that contain fewer points.
You cannot specify which points to remove. Points that are used to define surface borders and breaklines are not removed with the Simplify Surface command.
This exercise continues from Exercise 1: Limiting Imported Surface Data.
Simplify a surface
- Click
Home tab
 Layers panel
  Layer drop-down. Next to the
C-TOPO-CONT-MAJR-ORIG and
C-TOPO-CONT-MINR-ORIG layers, click
 .
.
These layers contains polylines that represent the original major and minor contours. These polylines will enable you to observe the results of the Simplify Surface command.
- Click
Modify tab
 Ground Data panel
  Surface Find.
- Click
tab
 panel
panel  drop-down
  Find.
Find.
- In the Simplify Surface wizard, on the Simplify Methods page, select the Point Removal option.
- Click Next.
- On the
Region Options page, specify the following parameters:
- Select Objects: Selected
- Mid-Ordinate Distance: 1.000’
- Click Pick In Drawing.
- In the drawing, click the orange corridor boundary.
In the Simplify Surface wizard, notice the value for Total Points Selected In Region. This is the current number of points in the selected region.
- Click Next.
- On the
Reduction Options page, specify the following parameters:
- Percentage Of Points To Remove: Selected, 50%
- Maximum Change In Elevation: Cleared
- Click
Apply.
At the bottom of the wizard, notice the Total Points Removed value. This value is the number of points that the simplify surface command removed within the selected boundary.
Note:You can click Apply again to repeat the Simplify Surface command and keep the wizard open. If you click Finish, the Simplify Surface command is repeated and the wizard is closed.
- Click Cancel.
- Zoom in to the surface.
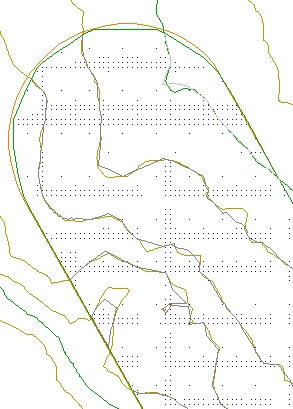
Notice that the points are not as dense as they were at the beginning of the exercise, and the new, gray surface contours are very similar to the original contours. The Simplify Surface command reduced the amount of data that the surface uses without sacrificing much surface accuracy.

Simplified surface
This exercise uses Surface-2.dwg with the modifications you made in the previous exercise.
To continue to the next tutorial, go to Changing the Surface Style and Display.